
User Manual

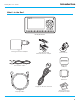
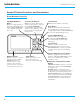
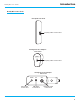

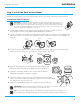
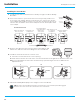
Table Of Contents

9
Roady BT User Guide
Installation
Step 2: Install the Dash or Vent Mount
Follow the instructions on the next several pages for the mounting method you have selected.
Installing the Adhesive Mount
CAUTION! The adhesive used on the Adhesive Mount may be difficult to remove. Do
not install this mount on leather surfaces (contact your automobile dealership if you
are unsure about your dash surface), and make sure the air temperature is at least
60°F (15°C) during installation. If it’s not at least 60°F, turn on the heater in your
vehicle to bring the temperature up to 60°F.
1. Locate a flat surface for the Adhesive Mount. Make sure there is ample room for
the Intelligent Vehicle Dock and Roady BT Radio when installed.
2. Set the orientation of the Adhesive Mount before adhering it. Loosen the knob and adjust the
adhesive foot for the location you selected in “Step 1: Choose a Location for Your Radio” on
page 8.
3. The dock mounting plate can be tilted in different directions. Adjust as necessary for your
particular vehicle. When the orientation is correct, tighten the knob.
4. Remove the adhesive liner from the back of the Magnet and
adhere the adhesive side of the Magnet to the Dash Mount.
5. Clean the mounting surface in the vehicle with the alcohol
preparation pad and let it dry thoroughly.
6. Once the surface is dry, remove the adhesive liner from the Dash
Mount. Press and hold the Dash Mount in place for 30 seconds. Allow
the adhesive to cure for 2-4 hours.
7. Attach the Roady BT Display to the magnet on the Dash Mount.
IMPORTANT!
Allow the Adhesive Mount adhesive to cure (dry) for a minimum of 2-4 hours
before using the mount. The best adhesion occurs after 24 hours.
TIP! To remove the Adhesive Mount, carefully lift the adhesive pad with your fingers or a
spoon. Warming the pad with a hair dryer for several minutes will help soften the adhesive.
Option 1
Option 3
Option 2 Option 4
KnobAdhesive Foot
Mounting Surface
for Magnet