DC-214/216 ADSL Homestation ADSL Homestation DC-214/216 full manual
DC-214/216 ADSL Homestation 1. INTRODUCTION ........................................................................................................ 2 1.2 Package Contents .............................................................................................. 2 1.3 The DC-214/216 ADSL Homestation Features........................................................ 3 1.4 PHYSICAL DETAILS ....................................................................................................
DC-214/216 ADSL Homestation 1. Introduction The DC-214/216 ADSL Homestation provides a high-speed Ethernet port and an USB port for high-speed Internet browsing. It can support downstream transmission rates of up to 8Mbps and upstream transmission rates of up to 1024Kbps. It is compliant with Multi-Mode standard (ANSI T1.413, Issue 2; G.dmt (G.992.1); G.lite (G992.2); G.hs (G994.1)). It is the perfect solution to connect a small group of PCs to a high-speed broadband Internet connection.
1.3 The DC-214/216 ADSL Homestation Features The DC-214/216 ADSL Homestation provides the following features: ADSL Multi-Mode Standard: Supports downstream transmission rates of up to 8Mbps and upstream transmission rates of up to 1024Kbps. It is compliant with Multi-Mode standard (ANSI T1.413, Issue 2; G.dmt (G.992.1); G.lite (G992.2); G.hs (G994.1)).
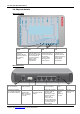
DC-214/216 ADSL Homestation 1.4 Physical details The Front LEDs Power USB When lit, it indicates that the device is turned on and working properly. When this LED is lit, it indicates that the USB port is connected to the PC and working properly. When flashing data is received/send LAN ADSL When lit, it indicates that the LAN port is connected to the PC and working properly. When flashing data is received/send When lit, it indicates the ADSL port is connected with the DSLAM and working properly.
network. 1.5 Cabling Through Ethernet Port Connect the LAN cables: Use standard LAN cables to connect the PCs to the LAN ports (switch) on the homestation. Make sure that all connected devices are turned on. Please, check that the PWR, LAN LNK and ADSL SYN LEDs are lit. If they are not, verify that you are using the proper cables. If the cables are connected and the LEDs are lit normally, please go to section “3. Configuring the Network Properties” to modify the network settings.
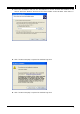
DC-214/216 ADSL Homestation 2. Installation 2.1 Installing the USB Driver If you connect the ADSL Homestation to the USB port, for the first time the USB cable is connected to the PC, Windows will automatically detect the device. Follow the steps to install the USB driver. Windows XP 1. Select “Install from a list or specific location” and click “Next >”. 6Please, visit www.sitecom.
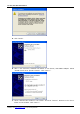
2. Insert the installation CD into the CD-ROM drive. Check “Include this location in the search” and click “browse”. Browse to the ‘driver’ folder on the CD-Rom. Click “Next >”. 3. Click “Continue Anyway” to pass the windows logo test. 4. Click “Continue Anyway” to pass the windows logo test.
DC-214/216 ADSL Homestation 5. Click “Finish”. 6. After a few moments, Windows will detect a new device, USB ADSL Adapter. Select “Install from a list or specific location”. Click “Next >”. 7. Check “Include this location in the search” and click “browse”. Browse to the ‘driver’ folder on the CD-Rom. Click “Next >”. 8Please, visit www.sitecom.
8. Click “Continue Anyway” to pass the windows logo test. 9. Click “Finish” to end installation. 10.After installing the driver, follow the section “3. Configuring Properties” below to modify the network settings on your PC.
DC-214/216 ADSL Homestation Windows 2000 1. Click “Next >”. 2. Insert the installation CD into the CD-ROM drive. Select “Search for a suitable driver for my device”. Click “Next>”. 3. Check “Specify a location”. Click “Next >”. 10Please, visit www.sitecom.
4. Click “browse”. Browse to the ‘driver’ folder on the CD-Rom. Click “Next >”. 5. Click “Next >” . 6. Click “Yes” to pass the digital signature.
DC-214/216 ADSL Homestation 7. Press “Finish”. 8. Click “Yes” to pass the digital signature. 9. After installing the driver, follow the section “3. Configuring the Network Properties” below to modify the network settings on your PC. 12Please, visit www.sitecom.
Windows Me 1. Select “Specify the location of the driver”. Click “Next >”. 2. Insert the installation CD into the CD-ROM drive. Select “Specify a location”. and click “browse”. Browse to the ‘driver’ folder on the CD-Rom. Click “Next >”. 3. Click “Next >“.
DC-214/216 ADSL Homestation 4. Windows will start copying files to your system. Click “Finish”. 5. Select “Specify the location of the driver”. Click “Next >”. 6. Insert the installation CD into the CD-ROM drive. Select “Specify a location”. and click “browse”. Browse to the ‘driver’ folder on the CD-Rom. Click “Next >”. 14Please, visit www.sitecom.
7. Click “Next >“. 8. Windows will start copying files to your system. Click “Finish”. 9. Click “Yes” to restart your PC.
DC-214/216 ADSL Homestation 10.After installing the driver, follow the section “3. Configuring the Network Properties” below to modify the network settings on your PC. Windows 98 1. Click “Next >”. 2. Select “Search for the best driver for your device [Recommended]”. Click “Next >”. 3. Insert the installation CD into the CD-ROM drive. Select “Specify a location”. and click “browse”. Browse to the ‘driver’ folder on the CD-Rom. Click “Next >”. 16Please, visit www.sitecom.
4. Click “Next >“. 5. Windows will start copying files to your system. Then, click “Finish”.
DC-214/216 ADSL Homestation 6. Click “Next >“. 7. Select “Search for the best driver for your device [Recommended]”. Click “Next >”. 8. Insert the installation CD into the CD-ROM drive. Select “Specify a location”. and click “browse”. Browse to the ‘driver’ folder on the CD-Rom. Click “Next >”. 18Please, visit www.sitecom.
9. Click “Next >“.
DC-214/216 ADSL Homestation 10.You will see the following screen prompting for the path of the Windows source files. Please specify a location of the original windows CD-Rom. Click “OK”. 11.Windows will start copying files to your system. Then, click “Finish”. 11.Click “Yes” to restart your PC. 12.After installing the driver, follow the section “3. Configuring the Network Properties” below to modify the network settings on your PC. 20Please, visit www.sitecom.
3. Configuring the Network Properties Windows 98/ME Right click the icon My Network Places on your desktop and then choose Properties.
DC-214/216 ADSL Homestation Windows 2000/XP Right click the icon My Network Places on your desktop and then choose Properties. A window opens, like the one below: Right click the Local Area Connection of the correct network card, and then choose Properties. Windows 98/ME/2000/XP Select the line “ Internet Protocol” (2000/XP) or "TCP/IP -> network card" (98/ME), as illustrated below. Click on the button Properties to get a similar screen as the one that is illustrated below.
DHCP server in the broadband router will assign an IP address to the PC. Restart your PC, even if you have not made any changes. NOTE: If the list that appears on screen does not include a line, such as the one that has been selected above ("TCP/IP -> network card"), follow the steps below: • Click on the button "Add" • Double-click on "Protocol" • Select "Microsoft" and then "TCP/IP" • Click on "OK" • Wait a few seconds, so that TCP/IP can be added. Then, click "OK" to leave the network properties screen.
DC-214/216 ADSL Homestation You can change the default installation folder, or Click ‘Next’ The set-up gathered enough information. Click ‘Next’. 24Please, visit www.sitecom.
Click ‘Finish’ to restart the PC After the reboot, please start the utility via start/programs/ADSL homestation Utility 25
DC-214/216 ADSL Homestation In the Utility select your country. When your country is not listed select ‘manual configuration’. In that case you need additional information from your provider about protocols, encapsulation, and VPI/VCI settings. Choose your ISP. Besides a username or password, no additional settings like Encapsulation and VPI/VCI settings are required. The utility will set-up your DC-213 or DC-214/216 automatically for the chosen ISP.
Click ‘OK’ to start the automatic configuration procedure. The Utility will copy all necessary settings to the DC-213 or DC-214/216. Do not interrupt this process, which could take up to 2 minutes. The blue status bar in the Utility window indicates the process.
DC-214/216 ADSL Homestation Click ‘OK’ to finish the configuration. Click ‘cancel’ to quit the Utility. The taskbar will show a new icon. When clicking this icon the connection tool will start The status will show the type of connection and if you are connected or disconnected. The control depends on the connection status and shows ‘connect’ or ‘shut down’. When connecting or shutting down, a progress bar is shown. With hide the tool can be minimized to the taskbar. 28Please, visit www.sitecom.
With right clicking the icon, you can quit or remove the utility.
DC-214/216 ADSL Homestation 5. Advanced Configuration. 5.1 Default settings 1. password Password : There are two levels of password protection, Administrator Level and User Level. Administrator Level User Level User Name Password admin password user password 2. Device IP LAN site IP Address : 192.168.1.254 Subnet Mask : 255.255.255.0 3. ISP setting in WAN site Virtual Circuit 0: 1483 Routed IP LLC Virtual Circuit 1 ~ 7 : 1483 Bridged IP LLC 4. DHCP server DHCP server is enabled.
5.3 Information from ISP Before you start configuring this device, you have to check with your ISP what kind of service is provided, including the following: 1. PPPoE VC-Mux 2. PPPoE LLC 3. PPPoE None 4. PPPoA VC-Mux 5. PPPoA LLC 6. 1483 Bridged IP VC-Mux 7. 1483 Bridged IP LLC 8. 1483 Routed IP VC-Mux 9. 1483 Routed IP LLC 10. Classical IP over ATM 11.
DC-214/216 ADSL Homestation Gather the information as illustrated in the following table and keep it for reference. PPPoE VC-Mux VPI/VCI, Service Name, Username, Password, and Domain Name System (DNS) IP address (it can be automatically assigned from ISP or be set fixed). PPPoE LLC VPI/VCI, Service Name, Username, Password, and Domain Name System (DNS) IP address (it can be automatically assigned from ISP or be set fixed).
5.4 Configuring with Web Browser The ADSL Homestation can be configured with your Web browser. Open the web browser, enter the IP address of the ADSL Router, which default is 192.168.1.254, click enter. You’ll see the log-in windows. Type your username and password. The default User Name is admin (or user if you log-on in user level), the default password is password.
DC-214/216 ADSL Homestation 5.5 Status 5.5.1 Homepage This screen contains information of the software version of your device and some settings, such as IP Address, Subnet Mask, and MAC Address of the WAN and LAN connections. Firmware Version: This field displays the firmware version number. Customer Software Version: This field displays the customer’s own firmware version number and it is based on revision.txt.
5.5.2 Status – ADSL Status Displays the status of your ADSL connection. It will refresh every two seconds. Showtime Firmware Version: This field displays the Conexant ADSL data pump firmware version number. ADSL Line Status: This field displays the ADSL connection process and status. ADSL Modulation: This field displays the ADSL modulation status for G.dmt or T1.413. ADSL Annex Mode: This field displays the ADSL annex modes for Annex A or Annex B.
DC-214/216 ADSL Homestation 5.5.3 Status – LAN Displays the status of your Local Area Network (LAN) connection. LAN: These fields display the IP address, Subnet Mask and MAC address for the LAN interface. Total Number of LAN Interfaces: This field displays the total number of available interfaces for the LAN interface. Number of Ethernet Devices Connected to the DHCP Server: These fields display the DHCP client table with the assigned IP addresses and MAC addresses.
5.6 Configuration 5.6.1 WAN Configuration This screen contains settings for the WAN interface. (In most cases you won’t have to configure manually. The configuration Utility from Chapter 4 takes care of all these settings) System Wide Settings Default Gateway: Enter the gateway address provided by your ISP. Per VC Settings There are eight Virtual Circuits (VC) to set, VC 0 to VC 7.
DC-214/216 ADSL Homestation MAC SPOOFING The MAC Spoofing is developed to solve the scenario when the ISP only recognizes one MAC address. Copy the ISP-recognized MAC address here. ATM Service Category: Select UBR or CBR. Bandwidth: Enter the bandwidth.
Automatic Reconnect: Check to enable this device to automatically re-establish the connection when disconnected by ISP. DHCP DHCP client enable: Check to enable the DHCP client function if you want the device to get an IP address automatically from your ISP. Host Name: Enter the name of your work group. All settings need to be saved and the device needs to be rebooted before the changes to take effect.
DC-214/216 ADSL Homestation 5.6.2 LAN Configuration This screen contains settings for LAN interface. IP Address: Default at 192.168.1.254. This is the device IP address in LAN site. If you plan to change it to another IP address to a different range of IP subnet. Please make sure your PC is also located at the same IP subnet. Otherwise, you may not be able to access the ADSL Router. Subnet Mask: Default at 255.255.255.0.
Lease Time: Set the lease time you required. Lease time is the periode the Local PC will obtain the IP address it received from the DHCP server. After this periode the local PC will request a new IP from the DHCP server. If all fields are 0, the allocated IP addresses will be effective forever. DHCP Gateway Selection: The default setting for the DHCP Gateway Selection is “Automatic”. The user can select the “User Defined” to specify “User Defined Gateway Address”.
DC-214/216 ADSL Homestation 5.6.3 NAT Configuration The NAT Configuration page allows the user to set the configuration for the Network Address Translation. NAT feature allows multiple users to access Internet through a single IP account, sharing the single IP address from ISP. The default setting is Dynamic NAPT.
Session Name: This field allows the user to enter his/her own session Name to distinguish different NAT session for different interfaces among different PPP sessions and different PVCs. Interface: This field allows the user to choose specific WAN Interface (PVC or PPP Session) for NAT Session. NAT Session Name Status: This table displays at the bottom of this page to show all the NAT Session Names with its WAN Interface.
DC-214/216 ADSL Homestation 5.6.4 Virtual Server Configuration Being a natural Internet firewall, the ADSL Router protects your network from being accessed by outside users. When it needs to allow outside users to access internal servers, e.g. Web server, FTP server, E-mail server or News server, this product can act as a virtual server. You can set up a local server with specific port numbers that stands for the service, e.g.
Public Port: Enter the public port number you want to configure. Private Port: Enter the private port number you want to configure. In most cases, the private port number is same as public port number. Port Type: Select TCP if you want to scope for the connection-based application service on the remote server using the port number. Or select UDP if you want to scope for the connectionless application service on the remote server using the port number.
DC-214/216 ADSL Homestation 5.6.5 Bridge Filtering Configuration The Bridge Filtering configuration page allows the user to set the configuration of IP filtering. Enable Bridge Filtering: Check Yes to enable this function or check No to disable. Source MAC: When the bridge filtering is enabled, enter the Source MAC address, select Block and click Add. Then all incoming WAN and LAN Ethernet packets matched with this source MAC address will be filtered out.
5.6.6 DNS Configuration The DNS Configuration page allows the user to set the configuration of DNS proxy. The firmware supports the DNS proxy function. For the DHCP requests from local PCs, the DHCP server will set the LAN port IP as the default DNS server. Thus, all DNS query messages will come into LAN port first. The DNS proxy on the ADSL homestation recorded the available DNS servers, and forward DNS query messages to one of DNS server.
DC-214/216 ADSL Homestation 5.6.7 Save Settings Click the Submit button to write settings to flash. Then, the system will reboot for changes to take effect. 5.7 Administration 5.7.1 WAN Status Each VC setting you enabled in the WAN Configuration section except those which use PPP encapsulation will be displayed in this table. 48Please, visit www.sitecom.
5.7.2 ATM Status Display the status of ATM. (statistics between homestation and telephone central) This screen will automatically refresh every two seconds.
DC-214/216 ADSL Homestation 5.7.3 TCP Status Display the status of TCP. (networking statistics) This screen will automatically refresh every two seconds. 50Please, visit www.sitecom.
5.7.4 Route Table The Route Table page displays routing table and allows the user to manually enter the routing entry. The routing table will display the routing status of Destination, Netmask, Gateway, and Interface. The interface br0 means the USB interface; lo0 means the loopback interface; and ppp1 means the PPP interface.
DC-214/216 ADSL Homestation System Default Gateway Configuration The system-wide Default Gateway now provides three options: Auto, User-selected Network Interface, and None. None: This field allows the user to choose to have no Default Gateway in the CPE Auto: This field allows the user to select the CPE to automatically decide the Default Gateway. (System Default) User-selected Network Interface: This field allows user to select a Network Interface from a list (PVCs, PPP Sessions, USB and LAN).
5.7.5 Learned ( Bridge ) MAC Table Aging Timeout: Enter the time period for the router to memorize MAC addresses.
DC-214/216 ADSL Homestation 5.7.6 ADSL Configuration Trellis: Default at Enabled. Handshake Protocol: Default at Autosense – G.dmt first. You can also choose other protocols, such as Autosense – T1.413 first, G.dmt/G.lite, T1.413, G.dmt, G.lite. Wiring Selection: Default at Tip/Ring. Select Auto or A/A1 if necessary. Bit Swapping: This field allows the user to enable or disable the upstream bit swapping. 54Please, visit www.sitecom.
5.7.7 RIP Configuration The Routing Information Protocol, enables routers to broadcast and receive information to and from other routers about which routers it’s connected and the steps it requires to get there. A router will changes it’s routing table if it receives information it could reach a specific router faster. RIP: This field allows the user to Enable or Disable the RIP session.
DC-214/216 ADSL Homestation The RIP Per Interface Configuration page allows the user to set the configuration for each Interface (PVCs, PPP Sessions, USB and LAN). Interface: This field allows the user to choose the Interface (PVCs, PPP Sessions, USB and LAN), for the RIP to be configured. Enable: This field allows the user to Enable (Yes) or Disable (No) the specified interface for RIP. Supplier: This field allows the user to select the Supplier Mode (RIP Transmit).
5.7.8 Password Configuration In factory setting, the default password for administrator is password, and that for user is also password. You can change the default password to ensure that someone cannot adjust your settings without your permission. Every time you change your password, please record the password and keep it at a safe place. Please note that the minimum input for password is 8 alphanumeric characters.
DC-214/216 ADSL Homestation 5.7.9 Miscellaneous Configuration HTTP Server Access: This field allows the user to configure the Web pages can be accessed from WAN All: When this field is checked, it allows both WAN and LAN access to the Web pages. Restricted LAN: This field allows the Web pages access from LAN side. Restricted WAN Specified IP & Subnet Mask: This field allows the Web access from WAN side with a specify IP and subnet mask.
5.7.10 Reset to Factory Default With the submit button, the router will be reset to it’s default settings, described in chapter 5.1. Be carefull, all your settings will be lost.
DC-214/216 ADSL Homestation 5.7.11 Diagnostic Test As soon as you enter the test program, all tests will run automatically to diagnose the connection status of the device. Checking LAN Connection Testing Ethernet LAN connection This test passes if the Ethernet LAN interface is working properly.
Checking Circuit 0 for Network Connection Test ATM OAM Segment Loop Back This test sends ATM OAM F5 Segment loop back request cells to the central office equipments through your DSL connection. This test will pass if response cell is received. Since your service provider might not support this test, your DSL homestation could still work even if this test fails. If this test fails consistently and your DSL homestation seems not working, check to make sure the VPI and VCI are configured correctly.
DC-214/216 ADSL Homestation Test PPP Layer connection This test returns PASS if your DSL homestation has been assigned a valid IP address by your service provider through DHCP or your DSL homestation is assigned a valid IP address statically. If this test returns FAIL, run this test again a few minutes after this test is completed. If this test returns FAIL consistently and DHCP client is turned on in your DSL homestation, check with your service provider.
5.7.12 Firmware Update To upgrade the firmware of the ADSL Router, you should download or copy the firmware to your local environment first. Press the “Browse…” button to specify the path of the firmware file. Then, click “Upload” to start upgrading. When the procedure is completed, please reboot the device to make the new firmware work.
DC-214/216 ADSL Homestation 5.7.13 Network Code Image Update The Network Code Image Update page allows the user to upgrade the image code from a remote FTP server. 5.7.14 System Log Display the system logs cumulated till the present time. You can trace the historical information through this function. It refreshes every five seconds. 64Please, visit www.sitecom.
6. Trouble shooting If the ADSL Router is not functioning properly, you can refer first to this chapter for simple troubleshooting before contacting your service provider. This could save your time and effort but if the symptoms persist, then consult your service provider. 6.1 Problems Starting Up the ADSL Router Problem None of the LEDs are on when you turn on the ADSL Router. Corrective Action Check the connection between the adapter and the ADSL Router.
DC-214/216 ADSL Homestation 7. Specifications Protocols IP, NAT, NAPT, PPPoE, PPPoA, IPoA, DHCP, ICMP, IGMP, PAP, CHAP LAN Port RJ-45, 1 port 10/100Base-T WAN Port RJ-11, 1 ADSL port to external DSL/Cable Homestation, or other network equipment USB Port 1.