MD-300 PC on TV Full Manual
Table of Contents 1 Introduction ....................................................................................................... 3 2 Cautions ............................................................................................................ 4 3 Package content ................................................................................................. 5 4 Setup Possibilities ...............................................................................................
1 Introduction Thank you for purchasing the MD-300 PConTV. The MD-300 PConTV is the first device that can show all content of your Windows as well as Mac computers on your TV wirelessly. You can easily control up to 8 computers with your mouse and/or keyboard. You can share any content from your computers with your friends and family in your living room.
2 Cautions This device’s design and manufacturer has your safety in mind. In order to safely and effectively use this device, please read the following before usage. Usage Cautions The user should not modify this device. The environmental temperature should be within +0 ~ +40 degrees Celsius. Power The device’s power voltage is DC 5V 2.5A. When using this device, please connect the supplied AC adapter or AC adapter cable to the device’s power jack.
3 Package content The following items are included in your PConTV package: • • • • • • • PConTV device Quick Installation Guide 2 WiFi antennae Universal power adaptor Installation CD User’s Manual (on CD) Warranty Card On/Off button Ethernet USB Antenna HDMI Antenna Power
4 Setup Possibilities 1. Ethernet setup (recommended): Optimal performance Local client PC’s and PConTV in full Ethernet setup. 2. Homeplug power-line modem Setup: Optimal performance Local client PC’s and PConTV in Home Plug** setup.
3. Partly wireless, Partly Ethernet Setup Local client PC’s wireless* and PConTV in Ethernet setup. 4. Wireless Setup Local client PC’s and PConTV in full wireless setup.* * ** Performance depends on wireless performance of home ADSL or cable router. HomePlug devices sold separately.
5 Quick start 1. Connect a HDMI cable to the PConTV, connect it to your HDMI input on your TV and turn on your TV. 2. Connect the power adaptor to your PConTV, and plug it into a power outlet. 3. Press the Power button on the PConTV to turn on the device. 4. The PConTV will be powered ON. The main menu shown below will be presented on your TV screen when the system is ready. 5. The PConTV receives an IP address from your home router (See ethernet setup/wireless setup). This may take 30-40 seconds.
. Connect to selected access point. 10. Connecting to PConTV server. If only one server is found, it will automatically connect to the server. 11. The application will temporarily adjust your Windows or Mac resolution for best projection result, and then project your screen to TV. You should see your Windows or Mac PC Desktop on the TV screen now. 12. To quit a projection, click the button on the PConTV software user interface (as shown below).
6 Using PConTV software user interface After you have installed the PConTV software application from the installation CD to your PC (‘s) you can run the PConTV software user interface to connect to the PConTV. If there is more than one PConTV active in the same network, the software will list the devices for you to choose.
Each activation key can be used to register on eight different PCs. If you have trouble activating your software, please contact customer service for assistance. Video Mode vs. App Mode On the PConTV software user interface you can find a switch button to operate two modes: Video Mode and App Mode. Video Mode is designed to guarantee smooth video experiences. By default this mode performs with little latency between your Windows or Mac PC and the TV.
Main Menu Bar (Task bar): Click to show version information of this program. Click to check for updates.
Using the PConTV software user interface pop-up Menu When the PConTV software is running, you can move your mouse cursor to the Menu button (to be found on the right edge of the PConTV software user interface). Click on the Menu (as shown above) button to show the menu items. Click to connect to the PConTV administration web page. For more information on the web management, please refer to chapter 7 of this user manual.
Click to connect to another PConTV. The last PConTV you connected is remembered. To connect to another PConTV in your network, Click on . Click to adjust projection image quality in quality requires higher bandwidth. Default is Normal.
Click to adjust projection image quality. Larger resolution requires higher bandwidth. Default is Middle. Click Many TV’s have an overscan design which will cut the edges of the PC Desktop shown on the TV screen. If you cannot turn off overscan from your TV menu, please use the to fit the projected screen into your TV screen. Drag the sliders to set the offset value. Click to update the TV projection. Check the TV screen.
wireless performance will be depending on the strength of your Wireless module in your home router. Please make sure that the signal between your home router (N-type router recommended) and the PConTV device is good to ensure good performance. Check the button to activate AP-Client mode. Click on the magnifier glass to search for your home router SSID. Click OK to save the settings.
7 Controlling your computers Working with multiple computers You can use the PConTV with more than one Windows or Mac computer. Just install the software on every computer you want to use, and then run the software on each computer. Connected computer names will be shown in the standby screen as shown in the following picture: Use a standard USB mouse or keyboard connected to the USB port on the PConTV to select which computer you want to control on TV.
Once connected, the mouse or keyboard can be used to select a PC from the PC list above, and also to operate every PC when its screen is shown on TV. If you want to use a game controller for gaming, attach your controller directly to your laptop or PC. Controlling your PC with Air Mouse Controller via iPhone®, iPod® Touch, iPad® or other touch gestured mobile device. Search for an Air Mouse application in the App Store. Download a suitable program of your choice.
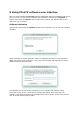
8 Web management Home page Make sure your Windows or Mac PC is connected to the PConTV successfully. Open your browser, and enter the IP address of your PConTV. (You can find the PConTV IP address on the TV screen when the PConTV is powered on and is presenting the startup screen in the lower left corner of this startup screen). The screen below will be shown in your browser. Choose your language in the upper right corner and click .
Click [Admin] and then enter the password to login to the web page. The default password is “admin”. System status *** Click [System Status] to show current system status. Model Name: Product model name Versions: ♦ Firmware version: Product firmware version number. Network Status: ♦ IP address: IP address of the PConTV device.
Network setup You can select “obtain IP address automatically” or “Use the following IP address” ♦ IP Address: The default value is 192.168.100.10 (not connected to any network). ♦ Subnet Mask: The default value is 255.255.255.0 ♦ Default Gateway: The default value is 192.168.100.
You can select “Auto” or “Disable”. When “Auto” is selected, it will automatically disable DHCP on the PConTV when another DHCP server is detected, otherwise it will enable its DHCP service. ♦ Start IP: The start IP address of DHCP Server. ♦ End IP: The end IP address of DHCP Server. ♦ Wireless LAN: you can select “Enable” or “Disable” ♦ Region: default value is “Worldwide”. ♦ SSID: SSID string, max. Length is 32 bytes.
Reset to default *** Click [Reset to Default] button to restore the factory default settings. : Confirmation and action. Firmware update *** Click [Firmware Update] button to upgrade firmware. ♦ Get the latest firmware. ♦ Click to specify file name you want to upgrade. ♦ Click to start. The upgrade process will take about 5 minutes to complete. The PConTV device will reboot automatically when the process is completed.
!!!! Warning: Don’t power off PConTV while the firmware upgrade is in progress, otherwise the PConTV device may be damaged and have to be returned to your vendor for repair!!!!! Reboot system *** Click on [Reboot System] button to restart system. : reboot system automatically. Log out *** Click on [Logout] button to return to home page.
9 Frequently asked questions Q. My PC cannot connect to PConTV. What can I do? A. Check the status shown on the projection panel. 1. If the left line is not connected, then your PC is not connected to any network. Please check your network connection. 2. If the left line is connected but the right line is disconnected, then no PConTV is found in the network you are connected to. The IP of your Windows or Mac PC should be in the same subnet as your PConTV device.
benchmark score measured during installation should be 4 stars or above for video projection. 2. System too busy. Close all other programs and try again. 3. Network not fast enough. Check connection speed. You may try lower screen resolution or projection quality to save bandwidth. Q. The PC desktop edges are cut off my TV screen. What can I do? A. Most TV’s present overscan. The result will deliver a cut PC desktop to your TV screen.
Q. Which video player can be used best on my PC to work with PConTV? A. The recommended video player we suggest you to use is VLC player. This player is capable to play al popular video formats. It is free to use and offers multi-platform software. Q. Can I use a NAS (Network Attached Storage Device) in combination with PConTV? A. Yes, you need at least one of your PC’s projecting to PConTV.
10 Certifications Safety European Union EN60950-1 (CE-LVD) EMI European Union (CE mark) EN55022 Class B EN61000-3-2 EN61000-3-3 North America FCC Part 15 (Class B) EMC European Union (CE mark) EN55024 • Electrostatic Discharge EN61000-4-2 • Radiated RF immunity EN61000-4-3 • EFT/ Burst EN61000-4-4 • Surge EN61000-4-5 • Conducted Susceptibility EN61000-4-6 • Voltage Dips/Interruption EN61000-4-11 Wi-Fi WPA2 Power adapter European ErP (2009/125/EC) North America Energy Start V www.sitecom.