WL-600/607 Wireless Broadband Router (802.
Introduction Congratulations on purchasing this Wireless Broadband Router. This Wireless Broadband Router is a cost-effective IP Sharing Router that enables multiple users to share the Internet through an ADSL or cable modem. Simply configure your Internet connection settings in the Wireless Broadband Router and plug your PC to the LAN port and you're ready to share files and access the Internet.
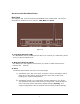
Get to know the Broadband Router Back Panel The diagram (fig1.0) below shows the broadband router’s back panel. The router’s back panel is divided into three sections, LAN, WAN and Reset: Figure 1.0 1) Local Area Network (LAN) The Broadband router’s 4 LAN ports are where you connect your LAN’s PCs, printer servers, hubs and switches etc. 2) Wide Area Network (WAN) The WAN port is the segment connected to your xDSL or Cable modem and is linked to the Internet.
Front Panel On the router’s front panel there are LED lights that inform you of the router’s current status. Below is an explanation of each LED and its description.
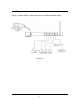
Setup Diagram Figure 1.2 below shows a typical setup for a Local Area Network (LAN). Figure 1.
Getting started This is a step-by-step instruction on how to start using the router and get connected to the Internet. 1) Setup your network as shown in the setup diagram above (fig 1.2). 2) You then need to set your LAN PC clients so that it can obtain an IP address automatically. All LAN clients require an IP address. Just like an address, it allows LAN clients to find one another.
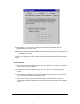
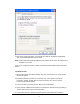
8: Reboot the PC. Your PC will now obtain an IP address automatically from your Broadband Router’s DHCP server. Note: Please make sure that the Broadband router’s DHCP server is the only DHCP server available on your LAN. Once you’ve configured your PC to obtain an IP address automatically, please proceed to Step 3 2b) Windows XP 1: Click the Start button and select Settings, then click Network Connections. The Network Connections window will appear. 2: Double-click Local Area Connection icon.
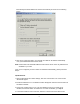
5: Click OK to confirm the setting. Your PC will now obtain an IP address automatically from your Broadband Router’s DHCP server. Note: Please make sure that the Broadband router’s DHCP server is the only DHCP server available on your LAN. Once you’ve configured your PC to obtain an IP address automatically, please proceed to Step 3. 2c) Windows 2000 1: Click the Start button and select Settings, then click Control Panel. The Control Panel window will appear.
automatically and Obtain DNS server address automatically as shown on the following screen. 6: Click OK to confirm the setting. Your PC will now obtain an IP address automatically from your Broadband Router’s DHCP server. Note: Please make sure that the Broadband router’s DHCP server is the only DHCP server available on your LAN. Once you’ve configured your PC to obtain an IP address automatically, please proceed to Step 3.
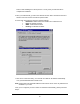
button to start installing the TCP/IP protocol. You may need your Windows CD to complete the installation. 5: After you install TCP/IP, go back to the Network window. Select TCP/IP from the list of Network Protocols and then click the Properties button. 6: Check each of the tabs and verify the following settings: • IP Address: Select Obtain an IP address from a DHCP server. • DNS: Let all fields are blank. • WINS: Let all fields are blank. • Routing: Let all fields are blank.
3) Once you have configured your PCs to obtain an IP address automatically, the router’s DHCP server will automatically give your LAN clients an IP address. By default the Broadband Router’s DHCP server is enabled so that you can obtain an IP address automatically. To see if you have obtained an IP address, see Appendix A. Note: Please make sure that the Broadband router’s DHCP server is the only DHCP server available on your LAN.
Menu Description Home (Chapter 1) In this section you can see the Broadband router's system information, Internet Connection, Device Status, System Log, Security Log and DHCP client information. Wizard (Chapter 2) Select your Internet connection type and then input the configurations needed to connect to your Internet Service Provider (ISP). Wireless Settings (Chapter 3) This section contains the wireless settings and allows you to configure the AP settings and security.
tools allow you to Backup (save), Restore, or Restore to Factory Default configuration for your Broadband router. The Firmware upgrade tool allows you to upgrade your Broadband router's firmware. The RESET tool allows you to reset your Broadband router. 7) Click on Wizard (see chapter 2) to start configuring settings required by your ISP so that you can start accessing the Internet. 8) It’s also highly recommended to setup encryption for your wireless network.
Chapter 1: Home 1.1 Status The Status section allows you to monitor the current status of your router. You can use the Status page to monitor: the connection status of the Broadband router's WAN/LAN interfaces, the current firmware and hardware version numbers, any illegal attempts to access your network, and information on all DHCP client PCs currently connected to your network. Parameters 1.
1.2 LAN The LAN Port screen below allows you to specify a private IP address for your router’s LAN ports as well as a subnet mask for your LAN segment. Parameters Default Description IP address 192.168.0.1 IP Subnet Mask 255.255.255.0 Specify a Subnet Mask for your LAN segment 802.1d Spanning Tree Disabled If 802.1d Spanning Tree function is enabled, this router will use the spanning tree protocol to prevent from network loop happened in the LAN ports.
Lease Time The DHCP when enabled will temporarily give your LAN clients an IP address. In the Lease Time setting you can specify the time period that the DHCP lends an IP address to your LAN clients. The DHCP will change your LAN client’s IP address when this time threshold period is reached DHCP Client Range You can select a particular IP address range for your DHCP server to issue IP addresses to your LAN Clients. Note: By default the IP range is from: Start IP 192.168.0.100 to End IP 192.168.0.199.
1.3 Active DHCP Client View your LAN client's information that is currently linked to the Broadband router's DHCP server Parameters Description Active DHCP Client This page shows all DHCP clients (LAN PCs) currently connected to your network. The “Active DHCP Client Table” displays the IP address and the MAC address and Time Expired of each LAN Client.
1.4 System Log View the operation log of the system. Parameters Description System Log This page shows the current system log of the Broadband router. It displays any event occurred after system start up. At the bottom of the page, the system log can be saved to a local file for further processing or the system log can be cleared or it can be refreshed to get the most updated situation. When the system is powered down, the system log will disappear if not saved to a local file.
1.5 Statistics View the statistics of packets sent and received on WAN, LAN and Wireless LAN. Parameters Statistics Description Shows the counters of packets sent and received on WAN, LAN and Wireless LAN.
Chapter 2: Wizard • Click Wizard to configure the router. • The Setup wizard will now be displayed; check that the modem is connected and click Next. • Select your country from the Country list. • From Service, select your internet provider. Click Next.
• Depending on the chosen provider, you may need to enter your user name and password, MAC address or hostname in the following window. After you have entered the correct information, click Next. • Click OK to complete the configuration. • Wait for about 10 seconds to allow the router to connect to the Internet.
Chapter 3: Wireless Settings 3.1 Wireless Basic Settings Wireless Access Point builds a wireless LAN and can let all PCs equipped with IEEE 802.11b or 801.11g wireless network adaptor connect to your Intranet. It supports WEP and WPA2 encryption to enhance the security of your wireless network. Parameters Default Description Disable wireless interface Disabled You can select to enable or disable the wireless access point module of this router.
Associated Clients Click “Show Active Clients” button, then an “Active Wireless Client Table” will pop up. You can see the status of all active wireless stations that are connecting to the access point. WLAN MAC This is the MAC address used by the Wireless interface of this AP when it is in the station modes. Clone MAC Click the “Clone MAC” button will copy the MAC address of your PC, that you are using to configure the AP, to the WLAN MAC.
3.2 Advanced Settings You can set advanced wireless LAN parameters of this router. The parameters include Authentication Type, Fragment Threshold, RTS Threshold, Beacon Interval, Preamble Type …… You should not change these parameters unless you know what effect the changes will have on this router. Parameters Description Authentication Type There are two authentication types: "Open System" and "Shared Key".
Beacon Interval The interval of time that this wireless router broadcast a beacon. Beacon is used to synchronize the wireless network. Data Rate The “Data Rate” is the rate this access point uses to transmit data packets. The access point will use the highest possible selected transmission rate to transmit the data packets. Preamble Type The “Long Preamble” can provide better wireless LAN compatibility while the “Short Preamble” can provide better wireless LAN performance.
3.3 Security This Access Point provides complete wireless LAN security functions, include WEP, IEEE 802.11x, IEEE 802.11x with WEP, WPA with pre-shared key and WPA with RADIUS. With these security functions, you can prevent your wireless LAN from illegal access. Please make sure your wireless stations use the same security function. 3.3.1 WEP only When you select 64-bit or128-bit WEP key, you have to enter WEP keys to encrypt data. You can generate the key by yourself and enter it.
Hexadecimal Digits: 12345abcde Default Key Select one of the four keys to encrypt your data. Only the key you select it in the "Default key" will take effect. Key 1 - Key 4 The WEP keys are used to encrypt data transmitted in the wireless network. Fill the text box by following the rules below. 64-bit WEP: input 10-digit Hex values (in the "AF", "a-f" and "0-9" range) or 5-digit ASCII character as the encryption keys.
3.3.4 WPA Pre-shared key Wi-Fi Protected Access (WPA) is an advanced security standard. You can use a pre-shared key to authenticate wireless stations and encrypt data during communication. It uses TKIP or CCMP(AES) to change the encryption key frequently. So the encryption key is not easy to be broken by hackers. This can improve security very much. Parameters Description WPA(TKIP) TKIP can change the encryption key frequently to enhance the wireless LAN security.
WPA2(AES) This use CCMP protocol to change encryption key frequently. AES can provide high level encryption to enhance the wireless LAN security. WPA2 Mixed This will use TKIP or AES based on the other communication peer automatically. RADIUS Server IP address The IP address of external RADIUS server. RADIUS Server Port The service port of the external RADIUS server. RADIUS Server Password The password used by external RADIUS server.
3.4 Access Control This wireless router provides MAC Address Control, which prevents the unauthorized MAC Addresses from accessing your wireless network. Parameters Description Enable wireless access control Enable wireless access control Add MAC address into the list Fill in the "MAC Address" and "Comment" of the wireless station to be added and then click "Add". Then this wireless station will be added into the "Current Access Control List" below.
3.5 Site Survey This page provides a tool to scan the wireless network. If any Access Point or IBSS is found, you can choose to connect it manually when client mode is enabled.
3.6 WDS Wireless Distribution System uses wireless media to communicate with other APs. To use WDS, you must set these APs in the same channel and set MAC addresses of other APs which you want to communicate with in the table and then enable the WDS. Click the ‘Set Security’ button to change security options.
Chapter 4: Firewall 4.1 Port Filtering The WL-161 offers the option to filter certain ranges of ports on your local area network. Select ‘Enable Port Filtering’ to enable the port filter option, and enter a port range in the appropriate box.
4.2 IP Filtering The WL-161 offers the option to filter UDP or TCP traffic for certain IP addresses on your local area network. Select ‘Enable IP Filtering’ to enable the IP filter option, and enter a local IP address in the appropriate box.
4.3 MAC Filtering This wireless router provides MAC Address Control, which prevents the unauthorized MAC Addresses from accessing your network.
4.4 Port Forwarding The Port Forwarding allows you to re-direct a particular range of service port numbers (from the Internet/WAN Ports) to a particular LAN IP address. It help you to host some servers behind the router NAT firewall. Parameter Description Enable Port Forwarding Enable Port Forwarding IP Address This is the private IP of the server behind the NAT firewall. Note: You need to give your LAN PC clients a fixed/static IP address for Port Forwarding to work properly.
Table" below. If you find any typo before adding it and want to retype again, just click "Clear" and the fields will be cleared. Remove Port Forwarding into the table If you want to remove some Port Forwarding settings from the " Current Port Forwarding Table", select the Port Forwarding settings you want to remove in the table and then click "Delete Selected". If you want remove all Port Forwarding settings from the table, just click "Delete All" button. Click "Reset" will clear your current selections.
4.5 DMZ If you have a local client PC that cannot run an Internet application (e.g. Games) properly from behind the NAT firewall, then you can open the client up to unrestricted two-way Internet access by defining a DMZ Host. The DMZ function allows you to re-direct all packets going to your WAN port IP address to a particular IP address in your LAN. The difference between the virtual server and the DMZ function is that the virtual server re-directs a particular service/Internet application (e.g.
Chapter 5: Toolbox 5.1 Password Settings You can change the password required to log into the broadband router's system web-based management. By default, there is no password. So please assign a password to the Administrator as soon as possible, and store it in a safe place. Passwords can contain 0 to 12 alphanumeric characters, and are case sensitive. Parameters Current Password Description Enter your current password for the remote management administrator to login to your Broadband router.
5.2 Time Zone The Time Zone allows your router to reference or base its time on the settings configured here, which will affect functions such as Log entries and Firewall settings. Parameter Description Select Time Zone Select the time zone of the country you are currently in. The router will set its time based on your selection. NTP Server Address The router default the “Time Server Address” is “192.43.244.18” Click at the bottom of the screen to save the above configurations.
5.3 Firmware Upgrade This page allows you to upgrade the router’s firmware Parameters Description Firmware Upgrade This tool allows you to upgrade the Broadband router’s system firmware. To upgrade the firmware of your Broadband router, you need to download the firmware file to your local hard disk, and enter that file name and path in the appropriate field on this page. You can also use the Browse button to find the firmware file on your PC.
5.4 Backup The Configuration Tools screen allows you to save (Backup) the router’s current configuration setting. Saving the configuration settings provides an added protection and convenience should problems occur with the router and you have to reset to factory default. When you save the configuration setting (Backup) you can re-load the saved configuration into the router through the Restore selection.
5.5 DDNS DDNS allows you to map the static domain name to a dynamic IP address. You must get an account, password and your static domain name from the DDNS service providers. This router supports DynDNS, TZO and other common DDNS service providers.
Appendix A How to Manually find your PC’s IP and MAC address 1) In Window’s open the Command Prompt program 2) Type Ipconfig /all and • • • Your PC’s IP address is the one entitled IP address (192.168.1.77) The router’s IP address is the one entitled Default Gateway (192.168.1.
Glossary Default Gateway (Router): Every non-router IP device needs to configure a default gateway’s IP address. When the device sends out an IP packet, if the destination is not on the same network, the device has to send the packet to its default gateway, which will then send it out towards the destination. DHCP: Dynamic Host Configuration Protocol. This protocol automatically gives every computer on your home network an IP address.
ISP: Internet Service Provider. An ISP is a business that provides connectivity to the Internet for individuals and other businesses or organizations. LAN: Local Area Network. A LAN is a group of computers and devices connected together in a relatively small area (such as a house or an office). Your home network is considered a LAN. MAC Address: MAC stands for Media Access Control. A MAC address is the hardware address of a device connected to a network.
create IP address numbers used only within a particular network (as opposed to valid IP address numbers recognized by the Internet, which must be assigned by InterNIC). TCP/IP, UDP: Transmission Control Protocol/Internet Protocol (TCP/IP) and Unreliable Datagram Protocol (UDP). TCP/IP is the standard protocol for data transmission over the Internet. Both TCP and UDP are transport layer protocol. TCP performs proper error detection and error recovery, and thus is reliable.