Full Manual MD-270 MD-270 TV Media Player Full Manual -1-
Full Manual MD-270 User Manual Revision 1.0 Table of Contents 1 2 3 4 Key Features.............................................................................. 4 Package Contents ....................................................................... 5 Product Layout ........................................................................... 6 Getting Started ........................................................................ 10 Transfer Media files to USB storage...................................
Full Manual MD-270 Introduction Congratulations on your purchase of the Sitecom MD-270 TV Media Player. The MD270 TV Media Player supports playback of the most common file formats of digital video, audio and photo media. Attach the media player via standard AV or HDMI cables to a standard or high-definition TV.
Full Manual MD-270 1 Key Features The key features of MD-270 TV Media Player include: • • • • • • • HDMI interface for digital audio and high-definition video. Composite interface (RCA, yellow/white/red) for analogue AV connection. Video output resolution includes 480i (using the composite interface), or 480p, 576p, 720i, 720p, 1080i, and 1080p (available when using the HDMI interface). Built-in screensaver. Remote Control included.
Full Manual MD-270 2 Package Contents Open the package carefully, and make sure that none of the items listed below are missing. Do not discard the packing materials, in case of return; the unit must be shipped back in its original package.
Full Manual MD-270 3 Product Layout Front Panel Ethernet LED USB Port Power LED InfraRed Receiver Item Description USB Port Use this to connect external USB storage to the Media Player. InfraRed Receiver Point the Remote Control at the InfraRed Receiver. Ethernet LED The LED lights green when the MD-270 is connected to Ethernet. Power LED The LED lights blue when the MD-270 is switched on.
Full Manual MD-270 Back Panel Power Connector Composite Out Ethernet Port HDMI Out USB Port S/PDIF Out Item Description Power Connector Connect the 12V DC Adapter to this port. Ethernet Port Connect a UTP cable to this port. USB Port Use this to connect external USB storage to the Media Player. Composite Out Use this to connect analogue video and audio receivers. HDMI Out Use this to connect a digital Television. S/PDIF Out Use this to connect a digital audio receiver.
Full Manual MD-270 Remote Control Power Home OK/Select Page Up Scroll Right Scroll Left Page Down Back to Previous Page Playback Options Fast Reverse Stop Play Pause/Play Fast Forward Play Previous File Play Next File Search View Information -8-
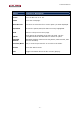
Full Manual MD-270 Button Function or Description Power Turn the MD-270 on or off. Home Go to the Homepage. Menu Arrows Use these to select the file or menu option you want displayed. Ok/Select Choose the option/action/file that’s currently highlighted. Back Return to the previous menu page. Option View options for playback of the file type used. Use the navigation buttons and OK button to select an option.
Full Manual MD-270 4 Getting Started Before beginning the installation, please read through the installation procedure described in this manual. Installation Requirements To begin using the MD-270 TV Media Player, you will need: • • • A television set (TV) with either a HDMI connection or available AV composite cable connections for audio and video. The MD-270 TV Media Player connected to the TV. A USB hard disk or USB flash memory device with a USB 2.
Full Manual MD-270 • Composite Video Plug the yellow plug of the video cable into the Video connector on the rear panel of the MD-270 and the opposite end of the cable into the composite video in connector on your TV. • HDMI Video Plug the HDMI cable into the HDMI connector on the back panel of the MD-270. Plug the opposite end to the matching HDMI connector on your television or audio video system. HDMI provides the best video quality resolution up to 1080p, plus audio support.
Full Manual MD-270 Audio Connections The MD-270 supports S/PDIF optical digital and RCA analogue connections for the stereo audio signal. Both connections can be used simultaneously. • Analogue Audio (RCA) Plug the supplied red and white connectors into the colour-coded Audio connectors on the rear panel of the MD-270. Connect the red plugs to the Right (R) jacks and the white plugs to the Left (L) jacks on the MD-270 and the TV or stereo amplifier to which it is connected.
Full Manual MD-270 Connect power to the MD-270 Connect the supplied 12V 2A DC adapter to a free wall socket. Connect the other end to the designated port on the back of the TV Media Player. Connect USB storage to the MD-270 Connect the USB memory device to the TV Media Player. The TV Media Player automatically searches the disk for supported media content.
Full Manual MD-270 Connect Ethernet to the MD-270 (Optional) The MD-270 includes an Ethernet port to connect the TV Media Player to a local network in order to use digital media stored on servers connected to the network. Connect a Cat5 or higher certified cable to the designated port on the TV Media Player. Connect the other end of the cable to a hub, switch, modem or router.
Full Manual MD-270 5 Navigating the menu Once the TV Media Player is connected to a USB hard disk containing digital media files it automatically begins searching for supported media. The TV Media Player can be used while it is still scanning for content. Turn on the TV and direct it to the input used for the TV Media Player to view the main menu interface.
Full Manual MD-270 6 Playing Videos Select the Video option in the main menu and scroll down to the video menu option you want. The available options for video selection are All Video, By Date (select by date added), Folders (select by folder on the USB memory device), Recent (select from a list of recently played videos) and Network Media (select from UPnP or shared drives). Note: If the Media Library function has been disabled, Video media files will not be organized into categories.
Full Manual MD-270 Video Playback Options To view the video control icons, press the Option button on the remote control unit. Use the left/right navigation buttons on the remote control to move the selector and press the OK button to select the function you want to use. Press the button again to hide the video control icons. Option Subtitle Language: Here you can select different subtitle languages. Subtitle Font Size: Here you can select the subtitle font size.
Full Manual MD-270 7 Playing Music Select the Music option in the main menu and scroll down to the music menu option you want.
Full Manual MD-270 Music Playback Options During playback of a song, you can change the playback options. button on the remote control, you should see the option menu Press the Option appear on the top of the page. Press OK to change the playback mode. Look for the playback mode icon on the right of the playback progress bar. The playback modes are: Repeat all: All the audio files in the current music folder/playlist are played in sequence and repeatedly until you press STOP or BACK.
Full Manual MD-270 8 Showing Photos Select the Photos option in the main menu and scroll down to the photo menu option you want. The available options for photo selection are All, By Date (select by date added), Folders (select by folder on the USB memory device), Recent (select from a list of recently shown photos) and Network Media (select from UPnP or shared drives). Use the navigation buttons on the remote control to scroll through the available photo files. Press OK to select the photo or folder.
Full Manual MD-270 Photo Control Options To view the photo control tool icons, press the Option button on the remote control unit. Use the left/right navigation buttons on the remote control to button to select the tool you want to use. move the selector and press the OK Press the Option button again to hide the photo tool icons and revert to the standard viewpoint. Rotate the photo 90° Degrees to the right. Rotate the photo 90° Degrees to the left. Rotate the photo 180° Degrees. Zoom into the photo.
Full Manual MD-270 9 Network Media Once your TV Media Player is connected to your network, and you have made the correct network settings, you can play media files through your network. If you want to share media files on your computer in order to let the media player play these files, you have to setup your computer as a UPnP server. We will explain how to setup your computer as a UPnP server in the following steps. Create a UPnP server Your computer does not share media by default.
Full Manual MD-270 Play media though your network (UPnP) 1. Make sure the TV Media Player is turned on. 2. Use the arrow keys to navigate to ‘Network Media’ in the associated Menu (Videos, Music or Photos) and click OK . 3. In the next screen you will see ’UPNP’ and ‘SAMBA’. 4. If there is a UPNP (media) server available in your network, use the arrow keys on the remote control to navigate to ‘UPNP’ and press OK . 5. Now you will see a list of available (media) servers in your network.
Full Manual MD-270 10 Online content Select the Online option in the main menu to view online photo-albums placed on Flickr. Before connecting to Flickr, make sure the network settings of the MD-270 are properly configured. More information on Flickr: www.flickr.com. Flickr Settings Choose between Recently Uploaded Photos, Interesting Photos or your own Flickr account. Recently Uploaded Photos: Interesting Photos: Add a Flickr Contact: This shows the last 1000 uploaded photos by other Flickr users.
Full Manual MD-270 11 Search Use the Search function to locate media files on the USB hard drive. Use the remote button on the remote control to go to any media directory and press the Search control. The available Media types for searching are All, Photo, Video and Music. There are two search modes to choose from: Contains: This mode can be used to locate a file with a name that contains the word typed into the search menu.
Full Manual MD-270 12 Settings Use the Settings menu to change viewing and playback options for the MD-270 TV Media Player interface. Use the navigation buttons on the remote control to select System, Network, Playback, Slideshow and Audio/Video menus. System Use the System menus to configure the general functions and settings for the MD-270. Device Name Use this setting to rename the device. This is also the name with which the device is known in the network. The default setting is “MD-270”.
Full Manual MD-270 View as Thumbnails: This shows thumbnails of cover art for Music and Videos. For photos, a thumbnail of the actual photo is shown. View as Cover Flow: This shows thumbnails in a Cover Flow style.
Full Manual MD-270 Note: In order to show thumbnails correctly, the following policy is used: For music: 1. 2. 3. 4. Display Display Display Display thumbnail if there's a JPG picture with the same name as the current track. folder.jpg if there's no album art from 1. album art if there's embedded album art in the music file. default album art if there's no jpg in the current folder. For video: Put a JPG file with the same filename as the video file in the same folder as the video file.
Full Manual MD-270 1. Go to www.sitecom.com and download the latest firmware update. 2. Unzip the firmware package. Make sure you see two files: the firmware file and a SITECOM-VerInfo.txt. 3. Copy both the firmware files to a USB drive’s root folder. 4. Connect the USB drive to the HD media player's USB port. 5. Press Home , then select the Settings bar. 6. Select the firmware upgrade icon, and then press OK . You are prompted to perform the firmware upgrade. 7.
Full Manual MD-270 Network Use the Network menu to view the current network status of the MD-270. You can view the assigned IP address and other IP settings. The Network menu is also used to set how the device will obtain an IP address so that it can function on the local network. If your network has a functioning DHCP server, such as a broadband router, the DHCP option can be used to automatically assign an IP address. Choose the Static IP option to manually configure an IP address for the media player.
Full Manual MD-270 7. Use the remote control to move the selector to the desired numeral 0-9, press OK to choose a numeral and it appears listed in the spaces provided. Move the selector to the right or left arrow button on the screen to move to the next entry space for the IP address. When the full IP address is entered, move the selector down to the NEXT button and press OK on the remote control. 8.
Full Manual MD-270 Slideshow Use the slideshow menu to configure the slideshow settings for photos. Slideshow Delay Use this setting to set how long a photo will be displayed on the screen, before jumping to the next photo. The default is 3 seconds. Photo Display Mode Use this setting to choose how the photo will be displayed on the screen. The default is Fit to screen. Available options are: • • • Original size Fit to screen : The photo is shown in it’s original resolution.
Full Manual MD-270 Audio/Video Use the Audio/Video menu to configure the settings for the output to your Home Entertainment System. Aspect Ratio Use this setting to set the aspect ratio used on your TV. The default setting is Widescreen. Available options are: • • Normal (4:3) Widescreen (16:9) Video Output Use this setting to set the video output between Composite or HDMI. The default setting is Composite.
Full Manual MD-270 • • Stereo - Recommended if you are using a 2- or 4-speaker entertainment unit. Digital - Select this option if you are using an S/PDIF (optical) connection to output surround sound to your Home Cinema receiver. Note: DTS (Digital True Surround) can only be outputted through the S/PDIF connection.
Full Manual MD-270 Parts of the firmware of the MD-270 TV Media Player are subject to the GNU general public license. Appendix A: Licensing Information This product includes third-party software licensed under the terms of the GNU General Public License.. You can modify or redistribute this free software under the terms of the GNU General Public License. Please see Appendix B for the exact terms and conditions of this license.
Full Manual MD-270 referring to freedom, not price. Our General Public Licenses are designed to make sure that you have the freedom to distribute copies of free software (and charge for this service if you wish), that you receive source code or can get it if you want it, that you can change the software or use pieces of it in new free programs; and that you know you can do these things.
Full Manual MD-270 You may copy and distribute the Program (or a work based on it, under Section 2) in object code or executable form under the terms of Sections 1 and 2 above provided that you also do one of the following: a) Accompany it with the complete corresponding machine-readable source code, which must be distributed under the terms of Sections 1 and 2 above on a medium customarily used for software interchange; or, b) Accompany it with a written offer, valid for at least three years, to give any
Full Manual MD-270 the Free Software Foundation. If the Program does not specify a version number of this License, you may choose any version ever published by the Free Software Foundation. 10. If you wish to incorporate parts of the Program into other free programs whose distribution conditions are different, write to the author to ask for permission. For software which is copyrighted by the Free Software Foundation, write to the Free Software Foundation; we sometimes make exceptions for this.