
Operation Manual


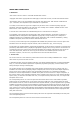

NetUSB Printing using Auto-Connect Printer
After the driver is installed, you can see a newly created printer in the Control Panel.
Follow the steps below to perform NetUSB printing.
In the Control Center, click the MFP server that has the desired printer (or
MFP) attached.
Click the desired printer (or MFP).
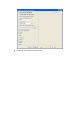
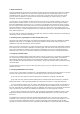
Click the “Auto Connect Printer” button and choose “Set Auto-Connect
Printer”. The following figure will appear.
Choose the desired printer. The desired printer must be the Windows printer
(this is a logical printer) that matches the printer attached on the MFP server
(this is a physical printer). Then click the “Apply” button.
Then, the printer will be marked as an “Auto-Connected Printer” in red. If you
choose “Auto-Connected Printer List” in the “Tools” menu, you can see a newly
created item that describes the association between the Windows printer and
the physical printer on the server.
Then try to issue a print job to the desired printer. You will see the Control
Center will automatically do a connect operation and, once the print job
finished, it will hold the connection. However, the connection will be released
immediately when another user do the printing afterward. At the same time,
the printer is automatically disconnected with your PC.