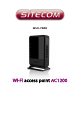
WLX-7000 Wi-Fi access point AC1200
Introduction Thank you for purchasing the Sitecom WLX-7000 AC1200 Wi-Fi Dual-band Access Point. This Access Point lets you upgrade your home network to enjoy a bigger Wi-Fi range, faster speeds and better connections. It is extremely easy to setup, works with any Internet provider and can be connected to any existing (modem) router or set-top box to improve the home network. You can position the access point standing up, hanging on the wall or flat on the desk.
Table of Contents Key Features ............................................................................................. 6 Package Contents ....................................................................................... 7 Cautions.................................................................................................... 8 Product Layout ........................................................................................... 9 Network + System Requirements ...........................
Key Features Features Advantages Incredible Data Rate up to 300Mbps on 2.4GHz and 866Mbps on 5GHz* Heavy data payloads such as MPEG video streaming IEEE 802.11ac Compliant and backwards compatible with 802.11b/g/n Fully Interoperable with IEEE 802.11b/g/n compliant devices with legacy protection Supports DHCP server function Can act as a DHCP server to handle all DHCP traffic on the network. Easy to use web-based GUI Graphical User Interface for network configuration and management purposes.
Package Contents Open the package carefully, and make sure that none of the items listed below are missing. Do not discard the packing materials, in case of return; the unit must be shipped back in its original package. 1. 2. 3. 4.
Cautions This device’s design and manufacturer has your safety in mind. In order to safely and effectively use this device, please read the following before usage. Usage Cautions The user should not modify this device. The environmental temperature should be within +5 ~ +35 degrees Celsius. Power The router’s power voltage is DC 12V 1A. When using this router, please connect the supplied AC adapter or AC adapter cable to the router’s power jack.
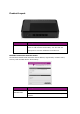
Product Layout Description Network Ports You can use this port to connect to a wired modem or router to add wireless functionality. You can also use these ports to connect additional wired devices. Backlabel and Network Details Folder The Network Details Folder describes the IP address, login details, network name, security code and OPS button functionality. Button Description Press 2 seconds for WPS/OPS mode OPS BUTTON Press both buttons 15+ Seconds to reset to factory defaults.
LED Description From top to bottom: LED Color Description OPS (White) Shows OPS activity. Power (Red) Shows the device is turned on. 5GHz WiFi (Blue) Shows 5GHz WiFi activity. 2.4GHz WiFi (Blue) Shows 2.4GHz WiFi activity. LAN (Blue) Shows the cable is connected. LAN (Blue) Shows the cable is connected. LAN (Blue) Shows the cable is connected. LAN (Blue) Shows the cable is connected. LAN (Blue) Shows the cable is connected.
Network + System Requirements To begin using the WLX-7000, make sure you meet the following as minimum requirements: Network Requirements An Ethernet-based broadband modem Computer with the following: Web-based Configuration - Windows®, Macintosh, or Linux-based operating system - An installed Ethernet adapter or wireless adapter - Supported Browsers: Internet Explorer 9 or higher Firefox Safari 4 or higher Chrome
Product Installation You can place the access point on a desk or other flat surface, or you can mount it on a wall. For optimal performance, place your access point in the center of your home (or your office) in a location that is away from any potential source of interference, such as a metal wall or microwave oven. This location must be close to a power connection and your ADSL/Cable modem. Connect the supplied power-adapter to the power inlet port and connect it to a wall outlet.
Setup your Computer Windows, Manual Connection Click on the icon for wireless connectivity. This is usually located in the System Tray, next to the clock. Select the Sitecom network. The correct network name can be found on the sticker on bottom of the router, or in the Network Details Folder. Fill in the password for the wireless network. The correct password can be found on the sticker on the bottom of the router, or in the Network Details Folder.
Windows, OPS Connection Click on the icon for wireless connectivity. This is usually located in the System Tray, next to the clock. Select the Sitecom network. The correct network name can be found on the sticker on bottom of the router, or in the Network Details Folder. Push the OPS Button on the router. For 2.4GHz, press the 2.4GHz button. For 5GHz, press the 5GHz button. Wait for the icon to display that it’s connected to the network.
Mac OSX Click on the icon for wireless connectivity. This is usually located in the System Tray, next to the clock. Select the Sitecom network. The correct network name can be found on the sticker on bottom of the router, or in the Network Details Folder. Fill in the password for the wireless network. The correct password can be found on the sticker on the bottom of the router, or in the Network Details Folder. Wait for the icon to display that it’s connected to the network.
Configuration LOGIN procedure 1. OPEN your browser (e.g. Internet Explorer). 2. Type http://sitecom.ap in the address bar and press [Enter] 3. Type user name and password (default username is ‘admin’, the password can be found on the back of the Access Point). 4. Click OK. 5. You will see the home page of the WLX-7000.
Status System Status The System status section allows you to monitor the current status of your device, the UP time, hardware information, serial number as well as firmware version information is displayed here.
LAN settings This device provides some control functions including IP address management, and DHCP server function. IP Address You can change the IP address of this device, so it can become a part of your local network. Please remember this address or you will not be able to connect the configuration menu of device. Default Gateway Please input the IP address of default gateway of your network here.
Device Status View the router’s current configuration settings. Device Status displays the configuration settings you’ve configured in the Internet Settings and WiFi Settings sections.
Log This page shows the current system log of the access point. It displays any event that occurred during or after system start up. At the bottom of the page, the system log can be saved to a local file for further processing or the system log can be cleared or it can be refreshed to get the most updated information. When the system is powered down, the system log will disappear if not saved to a local file.
Statistics Shows the counters of packets sent and received on LAN and WLAN.
Wi-Fi Settings You can set parameters that are used for the wireless stations to connect to this access point for the 2.4 GHz radio or 5 GHz radio. Wireless Function Enable or Disable Wireless function here. Click Apply and wait for module to be ready & loaded.
Basic Settings Band Please select the wireless band you wish to use. By selecting a different band setting, you’ll be able to allow or deny the wireless clients on a certain band. SSID Please input the ESSID (the name used to identify this wireless access point) here. You can input up to 32 alphanumerical characters. PLEASE NOTE THAT THE ESSID IS CASE SENSITIVE. Channel Number Please select a channel number you wish to use.
Advanced This tab allows you to set the advanced wireless options. The options included are Channel Bandwidth, Fragment Threshold, RTS Threshold, Beacon Interval, and Preamble Type. You should not change these parameters unless you know what effect the changes will have on the access point. Fragment Threshold Set the Fragment threshold of wireless radio. The default value is 2346. RTS Threshold Set the RTS threshold of wireless radio. The default value is 2347.
TX Power You can set the output power of wireless radio. Unless you’re using this wireless access point in a really big space, you may not have to set output power to 100%. This will enhance security (malicious / unknown users on a distance will not be able to reach your wireless access point).
Security This device provides many types of wireless security (wireless data encryption). When you use data encryption, data transferred by radio signals in the air will become unreadable for those people who don’t know the correct encryption key (encryption password). There are three types of security level you can select: Disable (no security - data encryption disabled), WEP and WPA Pre-shared Key. Please refer to the following sections for detailed instructions.
WPA WPA Unicast Cipher Suite Available options are: WPA (TKIP), WPA2 (AES), and WPA2 Mixed. You can select one of them, but you have to make sure your wireless client supports the cipher you selected. Pre-shared Key Format Please select the format of pre-shared key here, available options are ‘Passphrase’ (8 to 63 alphanumerical characters) and ‘Hex (64 hexadecimal characters – 0 to 9 and a to f). Pre-shared Key Please input pre-shared key according to the key format you selected here.
WPS Wi-Fi Protected Setup (WPS) is the simplest way to establish a connection between the wireless clients and the wireless router. You don’t have to select the encryption mode and fill in a long encryption passphrase every time when you try to setup a wireless connection. You only need to press a button on both wireless client and wireless router, and WPS will do the rest for you.
Mode In Client mode the device is set to connect to your existing network. In Registrar mode the device is set to connect to your clients. WPS via Push Button Press the button to start the WPS process. The device will wait for the WPS request from the wireless devices within 2 minutes. WPS via PIN You can fill-in the PIN code of the wireless device and press the button to start the WPS process. The router will wait for the WPS request from the wireless device within 2 minutes.
Toolbox Settings Firmware If there is a new firmware available, you can upload the firmware to the device to get extra functions or problem fixes. Click the ‘Browse’ button. You’ll be prompted to provide the filename of the firmware upgrade file. Please download the latest firmware file from our website, and use it to upgrade your device. After a firmware file is selected, click the ‘Apply’ button, and the device will start the firmware upgrade procedure automatically.
Back-up You can back up all configurations of this device to a file, so you can make several copies of access point configuration for security reasons. Restore to Factory Default Click this button to remove all settings you made and restore the configuration of this device back to factory default settings. Backup Settings Press ‘Save...’ button, and you’ll be prompted to download the configuration as a file. The default filename is ‘config.bin’.
Reset When you think the device is not working properly, you can use this function to restart the device; this may help and solve the problem. This function is useful when the device is far from you or unreachable. However, if the device is not responding, you may have to switch it off by unplugging the power plug and plugging it back again after 10 seconds.
Addendum A: GNU/GPL Information Parts of the firmware of the WLX-7000 Wi-Fi AC1200 Gigabit Access Point are subject to the GNU general public license. Licensing Information This product includes third-party software licensed under the terms of the GNU General Public License. You can modify or redistribute this free software under the terms of the GNU General Public License. Please see Appendix B for the exact terms and conditions of this license.
Availability of source code This product contains open source software, including software licensed under the GNU General Public License (GPL) v2/v3 and/or the Lesser/Library General Public License (LGPL) v2/2.1/3 as specified in the “Licensing Information” available above. As per the license terms of these licenses Sitecom Europe B.V.
TERMS AND CONDITIONS FOR COPYING, DISTRIBUTION AND MODIFICATION 0. This License applies to any program or other work which contains a notice placed by the copyright holder saying it may be distributed under the terms of this General Public License.
or rights, from you under this License will not have their licenses terminated so long as such parties remain in full compliance. 5. You are not required to accept this License, since you have not signed it. However, nothing else grants you permission to modify or distribute the Program or its derivative works. These actions are prohibited by law if you do not accept this License.
Revision 1.0 © Sitecom Europe BV 2016 Note: All the information contained in this manual was correct at the time of publication. However, as our engineers are always updating and improving the product, your device’s software may have a slightly different appearance or modified functionality than presented in this manual.