Metal Garden Shed 8'X10'FT G37009
Products services Why choose us? We offer a diverse range of products to meet the needs of customers. We continue to supply high quality and reliable products while maintaining a balance of price and product, and strive to provide consumers with quality at a good price.
Thank you for your purchase our product. 1. If there is any damage, please kindly send clear photos of damaged parts to us as attachment, we will check and offer you best solution soon. 2. We attach great importance to the customer experience of our products. If there's any concern,please contact us at any time, we will provide effective solutions. 3. lt is recommended to finish assembling by more than two people, so that it will be easier and also save your time.
WARNING For your safety concern,please do not stand under the metal shed in heavy wind or snow days. For safety, please use expansion screws to reinforce the posts to the ground. In extreme weather conditions,you can use a rope to pull the four corners of the gazebo to keep it stable. Please clear the snow off the roof in time for the heavy snowfall. · Make sure all screws are tightened before use. Repeat to confirm all screws, buckles and straps every 90 days.
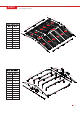
Before installation, please place the parts in the position as shown in the figure below.
Before installation, please place the parts in the position as shown in the figure below.
Before installation, please place the parts in the position as shown in the figure below.
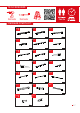
TOOLS REQUIRED PACKAGE C PART LIST K810-1 K810-1R K810-2 K810-2R K810-3 K810-3L K810-4 K810-4R K810-5L K810-5R K810-6 K810-6R K810-8 K810-9L K810-9R K810-10 K810-10R UA C3 C4 4 4 4 4 4 07
PACKAGE C PART LIST DA DLA DBA GF DDA DRA 1PC 4 T-F GE 4 4 DC C2 F2 F3 DH 472 V2 50 GL F4 4 4 4 F1 4 1PC GC 32 SL 4 86 M20 1 70 ST PACKAGE AB PART LIST K810-7M W5-C K810-7R 8PCS 17 2 W3 K810-7L W5 W5-K W5-HL W2-HR 4 08
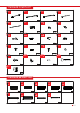
PRODUCT ASSEMBLY 1 Find the corresponding numbered parts and install them as shown in the picture, and then install "T-F" at the four corners to strengthen the stability F1 F1 F1 F1 K810 -1 F1 F1 F1 F1 K810 -1R F1 K810-1R K810-1 K810-2R K810-2 T-F T-F K810-1R K810-1 K810-1R K8 10- 2R F1 F1 K810-2 K810-2R F1 T-F K8 10- 2 T-F K810-1 F1 F1 K810 -1 K810-2 K810-2R F1 K810- 1R Please install the shed by placing it on a absolute flat floor, otherwise you may encounter some troubles du
PRODUCT ASSEMBLY 2 Mount the 4 "W5-C" on the Shed Base Frame Assemble as shown. W5-C W5-C W5-C W5-C W5-C W5-C W5-C W5-C K810-1R K810-1 K810-2 W5-C K810-2R K810-2R K810-1R K810-2 K810-1 K810-1 K810-1R K810-2 K810-2R K810-2R K810-2 K810-1 K810-1R F1 F1 F1 Note:The colored side should be facing out. The left and the right panel should under the back panel. PART NO. QTY.
PRODUCT ASSEMBLY 3 1.Connect "K810-3L" and "K10-3".Connect "K810-4R" and "K10-4". 2.Install the "K810-3" assembly on the "W5-C" (as shown in the picture). 3.Use "C2" to connect the "K810-4" assembly and the "K810-3" assembly.
PRODUCT ASSEMBLY 4 Mounted on both sides using 10 "W5" and 2 "W3". W5-C W5-C W5 W5 W5 W5 F1 W5 W5 W5 W5 W3 F1 F1 F1 F1 F1 F1 F1 W3 W5 W5 W5-C W5-C W5 PART 5 W5-C NO. QTY. W5 10 W3 2 F1 92 F2 14 W3 W5 W5 W5 W5 W5 W3 W5 W5 W5 W5 F2 F2 Install five pieces of "W5" on the back. W5 W5 W5 W5 W5 W5-C W5 W5 W5 W5 W5 W5 W5 W5 W3 W3 W5 F1 F2 W5 W5-C PART W5-C NO. QTY.
PRODUCT ASSEMBLY 6 Install "W5" on the left and right sides of the front. W5 W5 F1 F1 F1 F1 F2 F1 PART 7 NO. F1 F1 F1 QTY. W5 2 F1 16 F2 2 Install the two door frames "UA" on the other side of "W5". F1 F1 UA F2 F1 UA UA F1 PART NO. QTY.
PRODUCT ASSEMBLY 8 Put "K810-5L" and "K810-5R" together as shown in the picture, and then install 4 pieces of "C4" in the designated position, and use "F2" screws to fix. K810 K810 -5L C4 -5R F1 V2 F1 V2 F1 V2 F1 V2 PART QTY. 2 K810-5R 2 C3 4 C4 4 F2 4 V2 8 F1 8 F2 C3 C3 F2 Install the "GF" window in the position shown in the figure GF F2 F2 F2 F2 9 NO. K810-5L C4 GF PART NO. QTY.
PRODUCT ASSEMBLY 10 1. Combine "K810-6R" and "K810-6" into four beams. 2. Fix the two beams back to back and install them in the position shown in the picture. -6 K810 -6R K810 F1 F1 F1 F1 K810 K810 K810 PART NO. -6R -6R F2 F2 -6 K810 -6 F2 F2 C3 QTY. K810-6 2 K810-6R 2 F2 6 F1 8 11 Install the rest of the assembled beams on the left and right sides of the roof frame. K810 K810 -6 -6R F1 F1 F1 F1 F1 F1 C4 PART NO. K810-6 QTY.
PRODUCT ASSEMBLY 12 Install the Shed Top Frame as shown. F1 V2 F1 V2 PART NO. QTY.
PRODUCT ASSEMBLY 14 Shed Top Panels Assemble Install Shed Top Panels in the order shown. F1 V2 K810-7L K810-7M K810-7M K810-7M K810-7M K810-7R F1 F1 V2 V2 V2 F1 V2 F1 V2 V2 F1 F1 F1 F1 V2 F1 F1 V2 F1 V2 V2 V2 V2 F1 K810-7R K810-7M K810-7M K810-7M K810-7M K810-7L PART NO. QTY.
PRODUCT ASSEMBLY 15 Shed Top Panels Assemble 1. Install "K810-8" "K810-9L" and "K810-9R" around the roof. 2. Install "K810-10" and "K810-10R" at the highest part of the roof, and install "GE" at the front and rear. 3. Install corner "GC" on the four corners of the roof.
PRODUCT ASSEMBLY 16 Door Assemble Combine "W5-K" and "W2-HL" to make the door panel on the left. F2 PART 17 NO. QTY. W5-K 1 W2-HL 1 F2 2 W5-K W2-HL W2-HL W5-K Install the rest of the assembled beams on the left and right sides of the roof frame. 4 Back 1 4 DDA F1 F1 F1 F2 F2 DBA F1 DA DLA F1 PART NO. QTY.
PRODUCT ASSEMBLY 18 Door Assemble Combine "W5-K" and "W2-HR" into the right door panel. F2 W2-HR PART 19 NO. QTY. W5-K 1 W2-HR 1 F2 2 W5-K W2-HR W5-K View from the front, the vertical rod covers the horizontal rod.The larger hole is always covered over the small hole. 4 Back 1 4 DDA F1 F1 F1 F2 F2 F1 DBA 2 PART NO. QTY.
PRODUCT ASSEMBLY Door Assemble the latch "DC", hinge "DH" and door lock "GL" in the designated position as shown the figure. 20 inInstall DL DR F1 F3 F1 F1 DC PART NO. DH QTY. DH 4 DC 2 F3 16 GL 1 F1 4 DR 21 Mount the door to the door frame using "F3" screws. F3 DL PART NO. QTY.
PRODUCT ASSEMBLY SL Install protective caps SL for those exposing srews on C4 SL C4 SL SL Install protective caps SL for those exposing srews on C8-8 and G8-8R Install protective caps SL for those exposing srews on C8-9 ,G8-10L,G8-10R,G8-11and G8-11R. K810 K810 -6R F1 F1 PART NO. QTY.
23