Operating Instructions AirChek® XR5000 SKC Inc.
Table of Contents Description .......................................................................................................................1 Performance Profile ........................................................................................................2 Setup.................................................................................................................................4 Charging the Battery Pack (Li-Ion) ................................................................
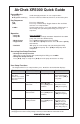
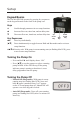
AirChek XR5000 Quick Guide Keypad Basics (star key) (up/down arrow keys) Scrolls through parameters in user setup functions. Increase or decrease flow rate, timed run, and run delay time. Key Sequences [] Press keys individually. Press keys simultaneously. Toggles between Run and Hold and exits user setup functions. Security code to access user setup functions. With pump in a non-running state (no flashing blue LED), press keys in sequence. Operation Press and hold .
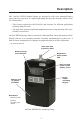
Description SKC AirChek XR5000 Sample Pumps are designed to offer users enhanced battery power and easy operation in a lightweight pump that provides accurate airflows from 5 to 5000 ml/min. • Three battery options provide flexibility and economy for different applications including long run times. • The large three-button keypad and straightforward user setup functions offer userfriendly conveniences.
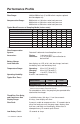
Performance Profile Flow Range: 1000 to 5000 ml/min (5 to 500 ml/min requires optional low flow adapter kit) Compensation Range: 5000 ml/min at 10 inches water back pressure 4000 ml/min at 20 inches water back pressure 2000 ml/min at 50 inches water back pressure Typical Back Pressure of Sampling Media (inches water) Flow Rate (L/min) 1.0 1.5 2.0 2.5 3.0 3.5 Filter/Pore Size (μm) 25-mm MCE/0.8 6 9 12 15 18 21 25-mm MCE/0.45 14 22 28 35 40 44 37-mm MCE/0.8 2 3 4 5 6 7 37-mm PVC/5.0 1 1 2 2 2.
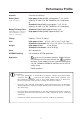
Performance Profile Auto-off: 5 minutes of inactivity Battery Pack: High-power Li-Ion (4 cell), rechargeable, 7.4 V, 4.4-Ah capacity, 32.6 Wh (Cat. No. P85004 for UL Listed pump) or Standard Li-Ion (2 cell), rechargeable, 7.4 V, 2.2-Ah capacity, 16.3 Wh (Cat. No.
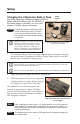
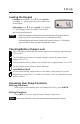
Setup Charging the Lithium-Ion Battery Pack For models containing a lithium-ion battery pack only. Shown with single charger (Cat. No. 222-241). A five-station charger is available; see Accessories on page 18. Follow charger instructions. STOP! Completely charge a new battery pack before operating the pump. It may be necessary to charge the battery a few times before maximum battery capacity is achieved. Intrinsic safety circuitry inside the battery causes the pump to selfdischarge during storage.
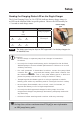
Setup Reading the Charging Status LED on the Single Charger The Li-Ion Charging Unit (Cat. No. P22300) indicates battery charge status via an LED on the unit that blinks in specific patterns. Observe the LED steadily for > 5 seconds to read charge status. Power supply jack LED Action Charge Status ON steady Charge in progress ON 2 sec OFF .25 sec ON 2 sec (Repeats) Approximately 80% charged OFF 2 sec ON .
Setup Keypad Basics The AirChek XR5000 operates by pressing key sequences on the keypad located on the front of the pump case. Keys Scrolls through parameters in user setup functions Increases flow rate, timed run, and run delay time Decreases flow rate, timed run, and run delay time Key Sequences Up arrow key Star key Down arrow key Press keys individually. [] Press simultaneously to toggle between Hold and Run modes and to exit user setup functions. Security code.
Setup Locking the Keypad Locking: In any mode, press 5 times quickly. A flashing “L” will appear in the lower right corner of the display. Unlocking: Press 5 times quickly. The flashing “L” will disappear from the display. The keypad may be operated normally. Note • While the keypad is locked, the key will still operate to allow manual pump shut off in a non-running state (no flashing blue LED). • A locked keypad will remain locked until the user unlocks it.
Setup User Setup Functions Function Overview User setup functions are listed below in the order in which they display. Note that the CLr function for clearing accumulated run time is only available when accumulated run time exists. No Accumulated Run Time ADJ Flow Set Timed Run Set Run Delay Accumulated Run Time CLr ADJ Flow Set Timed Run Set Run Delay Clearing Accumulated Run Time 1. 2. With the pump in a non-running state (no flashing blue LED), press .
Setup Setting a Timed Run Program the AirChek XR5000 from its keypad to run from 1 to 9999 minutes. With pump in a non-running state (no flashing blue LED): 1. Press to enter user setup functions. 2. Press until a flashing Set Timed Run and min appear on the display. 3. Press to increase or to decrease minutes. 4. Press [] to accept timed run setting and to exit user setup functions. The setting will appear on the display and the pump will be ready to run. 5. Press [] to run the pump.
Setup During a run delay with continuous run: a. The blue LED on top of the pump case will flash during the run delay even though the pump is not running. b. Run delay time remaining will count down in minutes and display on the LCD. c. Once the run delay time has elapsed, the pump will start running. Accumulated run time will count up in minutes. d. Run can be paused (Hold) by pressing []. The accumulated run time display will freeze. Run can be resumed by pressing [].
Setup f. g. At the end of the run, the pump will stop and “Timed Run Remaining” and “0” will display. To display accumulated run time, press and hold . To return to “Timed Run” display, press []. This will also clear accumulated run time. Note If pump goes to sleep following the timed run and is awakened, the pump will display “Timed Run Remaining” and “0.” Accumulated run time from the run remains and can be displayed by pressing and holding .
Calibration Calibration (High Flow: 1000 to 5000 ml/min) Before use, allow pump to equilibrate after moving it from one temperature extreme to another. 1. Run pump for 5 minutes before performing calibration. 2. Connect pump inlet to the outlet of a primary standard calibrator with representative sample medium in line. With pump in a non-running state (no flashing blue LED): 3. Press to enter user setup functions. 4. Press until ADJ and FLOW flash on display. Press to increase flow.
Calibration Calibration (Low Flow: 5 to 500 ml/min) Requires Constant Pressure Controller (CPC) and Adjustable Low Flow Tube Holder see Accessories, Low Flow Adapter Kit on page 18. The low flow tube holder (low flow adapter kit, Cat. No. 210-500) used with CPC allows up to four tube samples to be taken simultaneously, each at different flow rates if desired. Before use, allow pump to equilibrate after moving it from one temperature extreme to another.
Sampling Sampling • Before use, allow pump to equilibrate after moving it from one temperature extreme to another. • Use of any device or battery pack other than P85004 and P84002 to power the pump voids the UL Listing for intrinsic safety. • Charge pump battery completely before calibration and sampling. 1. 2. 3. Calibrate pump flow rate (see Setting Flow Rate and Calibration). Replace representative sampling media with new unexposed media. To start a continuous or timed sample run, press [].
Sampling Note A low battery fault may occur instead of a flow fault when there is a low battery charge at the time of the fault, excessive back pressure, and/or when there is a very short distance between the restriction and the pump inlet (e.g., finger fault versus pinched tubing). The flow fault icon will not appear and auto-restart will not be activated under these conditions. A low battery fault icon (see page 7) will appear instead and the pump will go to Sleep.
Battery Replacement Replacing the Li-Ion Battery Pack For models containing a lithium-ion battery pack only To retain display data, ensure pump is placed in Hold before disconnecting the battery pack. Display data will not be retained if battery is removed while pump is running. Removing Existing Battery Pack 1. Release the battery pack by removing the two screws on the bottom of the battery pack housing. 1 2. Pull battery pack housing away from pump case.
Maintenance Resetting Pump to Manufacturer Settings If the pump does not operate as expected, perform the following procedure: 1. Remove the battery pack (see Removing Existing Battery Pack). 2. On the pump keypad, press and hold and simultaneously while attaching the pump to the new battery pack. The LCD should display the software version 2 number (525X). Do not release hold on the two keys until the pump is firmly attached to the battery pack. 3. 4. 5. Release and . Press 2 times.
Accessories Description Cat. No.
Replacement Parts Description Cat. No. Battery Packs 4-cell Li-Ion* Battery Pack 2-cell Li-Ion* Battery Pack P85004 P85002 Accessories Belt Clip Filter/O-ring, pk/3 Inlet/Filter Housing Inlet Filters, pk/50 Battery Pack Cover P20139 P20140 P20142 P40011 P20419 * Li-Ion batteries may be subject to special shipping regulations. Cautions: • For safe operation in hazardous locations, ensure the pump label logo and the battery pack label contains Cat. contains the No. P85004 or P85002.