
Owner's manual


Sampling
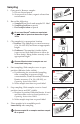
1. Open pouch. Remove sampler.
a. Do not discard pouch.
b. Store pouch in a clean, organic solvent-free
environment.
2. Record the following:
a. Sample ID on pouch and sampler I.D. label
b. Sampling location on pouch
c. Date sample taken on pouch
Do not use Sharpie
®
markers or equivalent
to mark label or pouch as these can off-gas
VOCs.
3. Clip sampler(s) in appropriate location.
a. Indoors: Clip sampler(s) to stand accessory
(Cat. No. 690-302) and locate at appropriate
height.
b. Outdoors: Clip sampler(s) inside shelter
(open on two ends and bo om to allow air
to fl ow freely). Hang shelter securely at the
appropriate height.
Ensure diffusion holes in sampler are not
obstructed in any way.
4. Start sampling: Slide sampler cover to open
position (diff usion holes visible).
a. If performing for an extended sampling
time or sampling in an area of high
concentrations, install Secondary Diff usion
Barrier accessory (Cat. No. 690-300); see
Operating Instructions 39008.
b. Write sample start time on pouch label.
5. Stop sampling: Slide sampler cover to closed
position (arrow and SKC visible).
a. Remove Secondary Diff usion Barrier, if used,
and then slide cover to closed position; see
Operating Instructions 39008.
b. Write sample stop time on pouch label.
6. Place sampler in its resealable pouch
immediately a er sampling.
Ensure sample ID on sampler matches sample
ID on pouch.
1
2
3a
3b
Sampler
I.D. label
4
5
6
Clip
Diffusion holes
(sample sorbent
compartment)
Sliding cover
Blank/
correction
sorbent
compartment
Clip
Sample compartment
Sliding cover
Blank/
correction
compartment