
User Manual


- use a target surface of at least 3 x 3 m, when
measuring long distances (12 - 15 m)
- ensure that no other ultrasonic sources are in the
vicinity
- when measuring through door en window openings,
ensure a correct result by measuring from two or
three different positions and compare the results
- the ultrasonic waves do not penetrate glass/windows
- in case of severe temperature changes, allow the tool
to adjust to the ambient temperature for half an hour
before starting new measurements
- fluctuations in air pressure and humidity, wind noise
and other sources of noise may lead to faulty
measurements
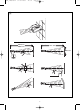
● Single measurement 8
- press button F 3
- aim the tool towards the target surface
- press "Read" button; measurement appears on top
line of display
- measurement is repeated continuously until "Read"
button is released (ticking sound)
- each new single measurement erases the previous
one
● Multiple measurement 9
- press button H 3
- aim the tool towards the first target surface
- press "Read" button; first measurement appears on
top line of display
- aim the tool towards the second target surface
- press "Read" button; second measurement appears
on top line of display (small figure 2 appears in upper
right corner of display and sum of two measurements
appears on bottom line of display)
- in the multiple measuring mode a maximum of
10 measurements can be added
- the small figure in upper right corner of display
indicates the measurement number (1 - 10)
- press button H 3 again for starting a completely new
multiple measurement
● Surface measurement 0
- press button G 3 once
- aim the tool towards the first target surface (length)
- press "Read" button; measured length appears on top
line of display
- aim the tool towards the second target surface
(width)
- press "Read" button again; measured width appears
on top line of display while calculated surface
appears on bottom line of display
- press button G 3 twice for starting a completely new
surface measurement
● Volume measurement !
- press button G 3 twice
- aim the tool towards the first target surface (length)
- press "Read" button; measured length appears on top
line of display
- aim the tool towards the second target surface
(width)
- press "Read" button again; measured width appears
on top line of display while calculated surface
appears on bottom line of display
- aim the tool towards the third target surface (height)
- press "Read" button again; measured height appears
on top line of display while calculated volume appears
on bottom line of display
- press button G 3 twice for starting a completely new
volume measurement
● Recall of previous measurements
Press "Recall" button for reviewing previous
measurements, starting with the last measured distance
(10 at the maximum)
● Correction of multiple measurement
- press "Recall" button; last measurement and
corresponding small figure starts to blink
- press "Recall" more often until measurement to be
corrected is found
- press "Clear" button; measurement is replaced by 0
and sum of remaining values appears on bottom line
of display
- aim the tool towards target surface for new
measurement
- press "Read" button; new measurement replaces 0
and new value is added to the sum
- for continuing multiple measurement, press "Read"
button again and small figure jumps to next empty
memory place
- corrections are possible for 10 previous
measurements at the maximum
● Correction of surface/volume measurement
- press "Recall" button; last measurement and
corresponding line of length/width/height starts to
blink
- press "Recall" more often until measurement to be
corrected is found
- press "Clear" button; measurement is replaced by 0
and recalculated value appears on bottom line of
display
- aim the tool towards target surface for new
measurement
- press "Read" button; new measurement replaces 0
and value on bottom line of display is recalculated
again
- press "Read" button again for continuing
surface/volume measurement
● Faulty measurement
- when the measurement is unsuccessful, symbol @
appears on display
- press "Read" button or restart the tool
● Belt bag for easy and convenient storage #
MAINTENANCE
● Do not expose the tool to continuous vibration or
extremely hot or cold temperatures
● Always store the tool indoors in its protective
carton/case
● Always keep the tool free of dust, moisture and direct
sunlight
6
SKIL_IB0520v2 07-01-2009 14:34 Pagina 6