
Use and Care Manual


Attaching the Smart Guard
System
To prevent personal injury, always dis con nect
plug from power source before attaching or
removing the Smart Guard System.
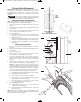
POSITIONING THE RIVING KNIFE
1. Remove table insert using finger hole.
2. Raise the blade as high as it will go and set it perpendicular
to table (0° on bevel scale) (Fig. 8).
3. Rotate the riving knife release lever 1 clockwise, so that it
points upward (Fig. 8).
4. Pull riving knife 2 towards release lever to disengage it from
the pins 3.
5. Slide the riving knife 2 up to its highest position, so that it is
directly over the center of the blade (Fig. 9).
6. Align holes in riving knife with pins 3 and lock the release
lever 1 by rotating it counterclockwise. Push/pull riving knife
to verify that it is locked in place (Fig. 9).
7. Replace table insert (Fig. 10).
13.
FIG. 8
FIG. 9
1
2
1
3
2
WARNING
!
SM 2610028628 01-13 E_SM 2610028628 01-13 E.qxp 1/11/13 2:46 PM Page 13