
Use and Care Manual


21.
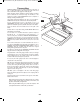
ON
FIG. 31
Safety Power Switch
NOTE: This table saw has a safety feature that helps pre vent
accidental starting.
To turn saw on: lift switch lever by pinching side walls and pulling
up. This action starts the saw (Fig. 31).
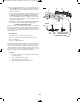
To turn off power: push switch lever down to its original position
(Fig. 32).
To prevent unauthorized use, the switch can accommodate a
padlock with a long, 3/16" or 1/4
" diameter shackle (not provided
with table saw) (Fig. 32).
Basic Table Saw Operation
OFF
1
2
3
FIG. 32
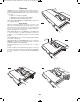
FIG. 33
Smart Guard System
The Skil Smart Guard has been designed for modularity,
enabling the use of multiple combinations of the three main
components – Main barrier guards, Anti-kickback device and
riving knife. Additionally, the riving knife can be quickly adjusted
to three positions (high, middle and stored), depending on the
application requirement.
Component Parts (figure 33):
∂
Riving Knife
The Riving Knife is the central element of the Skil Smart
Guard blade guarding system, serving as the attachment
point for both the Main Barrier Guard and the Anti-Kickback
Device. In the event that the Main Barrier Guard and Anti-
Kickback Device are removed, the Riving Knife maintains its
functionality as material splitter, and is adjustable to three
positions. Because of this adjustability, the Riving Knife can
be appropriately positioned for all cutting applications.
Note: The highest position of the Riving Knife is used for
all “thru-cutting.” The middle position of the Riving Knife is
for “non thru-cutting” with a 10" blade. The lowest position
of the Riving Knife is used for dado cutting (up to 8" dado
blade can be used with this saw). When the Riving Knife is
at its lowest position and mounted to a workbench, do not
lower the dado blade to more than slightly below the table
saw top. Otherwise, there may be interference of the
Riving Knife to the workbench.
∑
Main Barrier Guard
The main guard is comprised of a pair of plastic barriers
attached to the upper barrier guard. The side barriers (one to
the left and one to the right of the blade) operate
independently of one another, maintaining maximum blade
coverage during cutting operations. The main guard
incorporates a quick-connect attachment point and can be
attached or removed from the blade guarding system
independent of the Anti-Kickback Device and Riving Knife.
Note: To best secure the main guard for transport, adjust
the blade to its lowest position. This keeps the guard tight
to the table surface and prevents damage related to the
guard swinging during transport.
∏
Anti-Kickback Device
In the event of kickback, the Anti-Kickback Device, (also
known as dogs, or pawls) is intended to help prevent the
board from being thrown in the direction of the user. The
sharp teeth of the pawls are intended to “catch” the material
in the event of kickback.
SM 2610028628 01-13 E_SM 2610028628 01-13 E.qxp 1/11/13 2:46 PM Page 21