
Use and Care Manual


24.
Using the Miter Gauge
CROSSCUTTING, MITER CUTTING, BEVEL CUTTING,
COM POUND MITER CUTTING and when RABBETING across the
end of a narrow workpiece, the MITER GAUGE is used.
For your own safety, always observe the following
safety precautions in addition to the safety
instructions on pages 2–6.
Never make these cuts freehand (without using the miter gauge or
other auxiliary devices) because the blade could bind in the cut and
cause a KICKBACK or cause your fingers or hand to slip into the
blade.
Always lock the miter gauge securely when in use.
Remove rip fence from table during any operations which utilize the
miter gauge.
When cross cutting and the blade set at 90° to the table, the miter
gauge can be used in either slot on the table. When cross cutting
and the blade is tilted, use slot on right side of table where the
blade is tilted away from your hands and miter gauge.
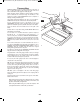
To adjust the miter angle:
Loosen lock knob 1 and set the miter gauge body 2 so the pointer
3 is at desired angle, then tighten lock knob 1 (Fig. 42).
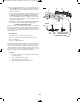
Miter Gauge Auxiliary Facing
Select a suitable piece of smooth straight wood, drill two holes
through it and attach it with screws and washers 5 (Fig. 42).
Example:
A. Drill 1/4" dia. holes through miter gauge.
B. Drill 5/32" dia. holes through (board 3/4" thick, 3" high, and
desired length).
C. Attach with two No. 12 round head wood screws 1-1/2" long
with washers, 5, not included (Fig. 42).
Be sure screws never protrude above outside surface of facing.
Be sure facing does not interfere with the proper operation of the
saw blade guard.
NOTE: When bevel crosscutting, attach facing so that it extends to
the right of the miter gauge and use the miter gauge in the groove
to the right of the blade.
WARNING
!
5
1
2
3
4
FIG. 42
SM 2610028628 01-13 E_SM 2610028628 01-13 E.qxp 1/11/13 2:46 PM Page 24