
Use and Care Manual


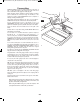


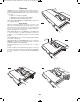


FIG. 43
25.
Crosscutting
CROSSCUTTING is known as cutting wood across the grain, at
90°, or square with both the edge and the flat side of the wood.
This is done with the miter gauge set at 90° (Fig. 43).
Make sure blade guard is installed for all “thru-sawing” operations
(when sawblade cuts entirely through the thickness of the
workpiece). Replace guard IMMEDIATELY after com pletion of
dadoing, molding or rabbeting cuts.
Have blade extend approximately 1/8" above top of work piece.
Additional blade exposure would increase the hazard potential.
Do not stand directly in front of the blade in case of a
THROWBACK (small cut-off piece caught by the back of the blade
and thrown toward the operator). Stand to either side of the blade.
Keep your hands clear of the blade and out of the path of the
blade.
If blade stalls or stops while cutting, TURN SWITCH OFF before
attempting to free the blade.
Do not reach over or behind the blade to pull the work piece
through the cut … to support long or heavy workpieces … to
remove cut-off pieces of material or FOR ANY OTHER REASON.
Do not pick up small pieces of cut-off material from the table.
REMOVE them by pushing them OFF the table with a long stick.
Otherwise they could be thrown back at you by the rear of the
blade.
Do not remove small pieces of cut-off material that are close to or
may become TRAPPED inside the blade guard while the saw is
RUNNING. THIS COULD ENDANGER YOUR HANDS or cause a
KICKBACK. Turn the saw OFF. After the blade has stopped
turning, lift the guard and remove the piece.
If workpiece is warped, place the CONCAVE side DOWN. This will
help prevent it from rocking while it is being cut.
The graduations on the miter gauge provide accuracy for average
woodworking. In some cases where extreme ac curacy is required,
when making angle cuts, for example, make a trial cut and then
recheck it with an accurate square or protractor.
If necessary, the miter gauge head can be swiveled slightly to
compensate for any inaccuracy.
TIP: The space between the miter gauge bar and the groove in the
table is held to a minimum during manu fac turing. For maximum
accuracy when using the miter gauge, always “favor” one side of
the groove in the table. In other words, don’t move the miter gauge
from side to side while cutting but keep one side of the bar riding
against one side of the groove.
TIP: Glue a piece of sandpaper to the face of the miter gauge
head. This will help prevent the workpiece from “creep ing” while it
is being cut.
The miter gauge may be used in either of the grooves in the table.
Make sure it is locked.
When using the miter gauge in the LEFT hand groove, hold the
workpiece firmly against gauge head with your left hand, and
grip the lock knob with your right hand.
When using the RIGHT hand groove, hold the workpiece with
your right hand and the lock knob with your left hand.
SM 2610028628 01-13 E_SM 2610028628 01-13 E.qxp 1/11/13 2:46 PM Page 25