
Use and Care Manual


28.
10. Do not pick up small pieces of cut-off material from the
table. REMOVE them by pushing them OFF the table with a
long stick. Otherwise they could be thrown back at you by
the rear of the blade.
11. Do not remove small pieces of cut-off material that may
become TRAPPED inside the blade guard while the saw is
RUNNING. THIS COULD ENDANGER YOUR HANDS or
cause a KICKBACK. Turn the saw OFF and disconnect
power source. After the blade has stopped turning, lift the
guard and remove the piece.
12. If workpiece is warped, place the CONCAVE side DOWN.
This will prevent it from rocking while it is being ripped.
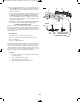
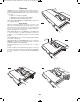
RIP FENCE AUXILIARY FACING
When using dado or molding head accessories, an auxiliary
facing board should be used. This will help prevent damage to
the aluminum fence. The facing should be made of 3/4" thick
wood – Figure 47 shows dimensional plans to make a facing
board to fit this saw.
Parts Required:
3/4" thick wood board (solid or plywood) cut to size
Two (2) 1/4" x 20 x 1-3/4" long hex. head machine screws
Two (2) 1/4" Washers
Two (2) 1/4" x 20 machine nuts
The facing is made to the same height (2") as the fence and can
work with the blade guard system in place when moving the
fence to contact the blade. The taller facing design (4-1/4") is
optional and can be used for clamping on other accessories. Cut
the board to the size shown, drill through 9/32" holes, then
counter-sink each hole (down 3/8") using a 3/4" drill bit.
Assembly:
1. Install each machine screw 1 through the holes 2 in the
rear fence housing.
2. Place facing board 3 over screws.
3. Place washers over screw threads.
4. Thread and tighten the nuts onto the screws.
6-1/8˝
6-5/8˝
1˝
2˝
4-1/4
3/4˝
19-3/8˝
3/4˝
DIA.
9/32˝
HOLE.
1/4˝X 20 X 1-3/4˝ LONG
STANDARD HEX HEAD.
WASHER
TALLER AUXILIARY FACING
NUT
3/8˝
3
1
2
FIG. 47
SM 2610028628 01-13 E_SM 2610028628 01-13 E.qxp 1/11/13 2:46 PM Page 28