
Use and Care Manual


29.
FIG. 48
2-6”
FIG. 49
Ripping
RIPPING is known as cutting a piece of wood with the grain, or
lengthwise. This is done using the rip fence. Position the fence to
the desired WIDTH OF RIP and lock in place. Before starting to
rip, be sure:
A. Rip Fence is parallel to sawblade.
B. Riving knife is properly aligned with sawblade.
C. Antikickback pawls are functioning properly.
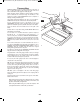
When ripping LONG BOARDS or LARGE PANELS, always use
a work support (Fig. 48).
BEVEL RIPPING
When bevel ripping material 6" or narrower, use fence on the
right side of the blade ONLY. This will provide more space
between the fence and the sawblade for use of a Push Stick. If
the fence is mounted to the left, the sawblade guard may
interfere with proper use of a Push Stick.
When “WIDTH OF RIP” is 6" and WIDER use your RIGHT hand
to feed the workpiece, use LEFT hand ONLY to guide the
workpiece … do not FEED the workpiece with the left hand
(Fig. 48).
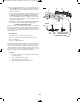
When “WIDTH OF RIP” is 2" to 6" wide USE THE PUSH STICK
1 to feed the work (Fig. 49).
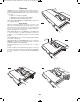
When WIDTH OF RIP is NARROWER than 2" the Push Stick
CANNOT be used because the guard will interfere … USE the
AUXILIARY FENCE, and PUSH BLOCK.
Attach auxiliary fence 2 to rip fence with two “C” clamps
(Fig. 50).
Feed the workpiece by hand until the end is approx. 1" from the
front edge of the table. Continue to feed using the PUSH BLOCK
3 on top of auxiliary fence UNTIL THE CUT IS COM PLETE
(Fig. 51).
FIG. 50 FIG. 51
SM 2610028628 01-13 E_SM 2610028628 01-13 E.qxp 1/11/13 2:46 PM Page 29