
Operation Manual


10
• This tool is not suitable for wet cutting
• Always disconnect plug from power source before
making any adjustment or changing any accessory
• Never use the tool when cord is damaged; have it
replaced by a qualied person
• Do not work materials containing asbestos
(asbestos is considered carcinogenic)
• Dust from material such as paint containing lead, some
wood species, minerals and metal may be harmful
(contact with or inhalation of the dust may cause allergic
reactions and/or respiratory diseases to the operator or
bystanders); wear a dust mask and work with a dust
extraction device when connectable
• Certain kinds of dust are classied as carcinogenic (such
as oak and beech dust) especially in conjunction with
additives for wood conditioning; wear a dust mask
and work with a dust extraction device
when connectable
• Follow the dust-related national requirements for the
materials you want to work with
• Only use a saw table provided with a switch that prevents
restarting of the motor after interruption of voltage
• Only use a saw table provided with a kerf guide
ACCESSORIES
• SKIL can assure awless functioning of the tool only
when original accessories are used
• Use only accessories with an allowable speed matching
at least the highest no-load speed of the tool
• Use only saw blades with a minimum diameter of
184 mm, a maximum diameter of 190 mm and a
spindle hole of 16 mm
• Never use saw blades made of high speed steel (HSS)
• Never use grinding/cutting discs with this tool
BEFORE USE
• Always check that the supply voltage is the same as the
voltage indicated on the nameplate of the tool (tools with
a rating of 230V or 240V can also be connected to a
220V supply)
• Avoid damage that can be caused by screws, nails and
other elements in your workpiece; remove them before
you start working
• Remove all obstacles on top of as well as underneath the
cutting path before you start cutting
• Secure the workpiece (a workpiece clamped with
clamping devices or in a vice is held more securely than
by hand)
• Use suitable detectors to find hidden utility lines or
call the local utility company for assistance (contact
with electric lines can lead to re or electrical shock;
damaging a gas line can result in an explosion;
penetrating a water pipe will cause property damage or
an electrical shock)
• Use completely unrolled and safe extension cords with a
capacity of 16 Amps (U.K. 13 Amps)
DURING USE
• The noise level when working can exceed 85 dB(A);
wear ear protection
• Never use the tool without the original protection
guard system
• Do not attempt to cut extremely small workpieces
• Do not work overhead with the tool
• In case of jamming or electrical or mechanical
malfunction, immediately switch o the tool and
disconnect the plug
• If the cord is damaged or cut through while working, do
not touch the cord, but immediately disconnect the plug
AFTER USE
• When you put away the tool, switch o the motor and
ensure that all moving parts have come to a
complete standstill
• After switching o your circular saw, never stop the
rotation of the saw blade by a lateral force applied
against it
WHEN CONNECTING NEW 3-PIN PLUG (U.K. ONLY):
• Do not connect the blue (= neutral) or brown (= live) wire
in the cord of this tool to the earth terminal of the plug
• If for any reason the old plug is cut o the cord of this tool,
it must be disposed of safely and not left unattended
USE
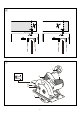
• Mounting saw blade 3
! disconnect the plug
- take blade wrench A from storage B
- push spindle-lock button C and hold it while you
remove blade bolt D with blade wrench
! push spindle-lock button C only when tool is at
a standstill
- release spindle-lock button C
- remove ange E
- open lower guard F with lever G and hold it while you
mount saw blade with saw teeth and arrow printed on
saw blade pointing in same direction as arrow on
lower guard
- release lower guard F
- mount ange E
! make sure that clamping surfaces H of flanges
are perfectly clean and face the blade
- push spindle-lock button C and hold it while you
tighten blade bolt with blade wrench 1/8 turn past
nger tight (ensures slippage of saw blade when it
encounters excessive resistance thus reducing motor
overload and saw kickback)
- release spindle-lock button C
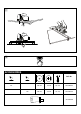
• Adjusting cutting depth (0-64 mm) 4
- for an optimal quality cut the saw blade should not
extend more than 3 mm below the workpiece
- loosen lever J
- raise/lower foot K until desired cutting depth is set on
scale using indicator L
- tighten lever J
• Adjusting cutting angle (0-45°) 5
- loosen knob M
- tilt tool until desired cutting angle is set on scale using
indicator N
- tighten knob M
! when bevel cutting, cutting depth does not
correspond with value on cutting depth scale
• 90° Cutting angle check 5
- adjust and tighten foot K to maximum cutting depth 4
- adjust and tighten cutting angle to 0°
- check for a 90° angle between the blade and bottom of
foot with a square