
Use and Care Manual

11
OPERATING INSTRUCTIONS
WARNING
Disconnect the plug from the power source before any assembly, adjust-
ments or accessory changes. Such preventive safety measures reduce the
risk of starting the tool accidentally.
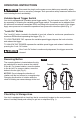
Variable-Speed Trigger Switch
Your tool is equipped with a variable-speed trigger switch. The tool can be turned “ON” or “OFF”
by squeezing or releasing the variable-speed trigger switch. The speed can be adjusted from
the minimum to maximum nameplate RPM, according to the pressure you apply to the trigger.
Apply more pressure to increase the speed and less pressure to decrease speed (Fig. 1).
“Lock-On” Button
The “Lock-On” button, located in the handle of your tool, allows for continuous operation at a
maximum RPM without squeezing the trigger (Fig. 1).
TO LOCK TRIGGER “ON”: squeeze the variable-speed trigger, depress the lock-on button,
and release the trigger.
TO UNLOCK THE TRIGGER: squeeze the variable-speed trigger and release it without de-
pressing the “Lock- On” button.
WARNING
If the “Lock-On” button is continuously depressed, the trigger cannot be
released.
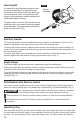
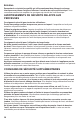
Reversing Button
The reversing button is located above the trig-
ger switch and is used to reverse the rotation
of the bit. For forward rotation, move the button
to the far left. For reverse rotation, move the
button to the far right (Fig. 2).
NOTICE:
Do not change the direction of
rotation until the tool comes to a complete stop.
Changing the direction of rotation while the
chuck is rotating can cause damage to the tool.
Chuck Key & Storage Area
Your tool is equipped with a chuck key that is conveniently located on the cord protector,
where it is always handy and unlikely to get lost or misplaced (Fig. 1).
Fig. 2
Forward Reverse