
Warranty


-14-
!-:>1+-
:->-6<1>- 5)16<-6)6+-
8-:.7:5-,*A=6)=<07:1B-,
8-:;766-4 5)A :-;=4< 16 51;84)+16/ 7.
16<-:6)4 ?1:-; )6, +75876-6<; ?01+0
+7=4, +)=;- ;-:17=; 0)B):, We
recommend that all tool service be performed
by a Skil Factory Service Center or
Autho rized Skil Service Station.
"# "
Your Skil tool has been properly lubricated and
is ready to use. However it is recommended
that the gears be relubricated only with Skil
lubricants: No. 80111 (8 oz. tube).
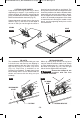
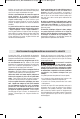
Always check the oil level before using the saw.
To check and add oil: Remove plug from power
source and place the saw’s foot on a horizontal
surface with tool set to maximum depth of cut.
Remove oil plug/lock button assembly using
the same wrench used to remove the saw
blade. The oil level should never be below
bottom threads in the housing. When adding
oil, fill until oil reaches bottom threads of the
housing. Do not over fill. Replace oil plug/lock
button assembly when finished (Fig. 14).
" If oil is dirty or thick, replace the oil
plug/lock button assembly and run the saw for
one minute to warm up the oil. Then remove oil
plug/lock button assembly and turn saw upside
down, to remove all oil. Add fresh Skil lubricant.
With a new saw, change the oil after the first
ten hours of use.
#!!
The brushes and commutator in your tool have
been engineered for many hours of
dependable service. To maintain peak
ef ficiency of the motor, we recommend every
two to six months the brushes be examined.
The brushes should be free from dust and dirt.
Brushes should be replaced when they have
worn down to 3/16" in length. The brushes
should slide freely in and out of the holders
without sticking.
To check brushes: Disconnect plug from
power source. Unscrew the brush caps on the
motor housing and lift out the brushes; note
which way they face, so that the brushes can
be returned to their original position. To
replace the blade side brush the tool needs to
be set to minimum depth of cut. Clean the
brush holder openings with com pressed air or
a clean cloth and replace the brushes and
caps.
Only genuine Skil replacement brushes
specially designed for your tool should be
used.
!
Bearings which become noisy (due to heavy
load or very abrasive material cut ting) should
be replaced at once to avoid overheating or
motor failure.
4-)616/
The tool may be cleaned most effectively with
compressed dry air. 4?)A; ?-): ;).-<A
/7//4-; ?0-6 +4-)616/ <774; ?1<0
+758:-;;-,)1:
Ventilation openings and switch levers must
be kept clean and free of foreign matter. Do
not at tempt to clean by inserting pointed
objects through openings.
-:<)16 +4-)616/ )/-6<;
)6, ;74>-6<; ,)5)/-
84);<1+ 8):<; Some of these are: gasoline,
carbon tetrachlo ride, chlo rinated cleaning
solvents, ammonia and house hold detergents
that contain ammonia.
)16<-6)6+-
!
CAUTION
!
WARNING
"7 )>71, )++1,-6<; )4?)A; ,1;+766-+< <0- <774 .:75 <0- 87?-: ;=884A
*-.7:-+4-)616/7:8-:.7:516/)6A5)16<-6)6+-
!
WARNING
FIG. 14
OIL PLUG/LOCK
BUTTON ASSEMBLY
OIL LEVEL
INSTRUCTIONS
SM 1619X06997 09-13_SM 1619X06997 09-13.qxp 9/6/13 9:47 AM Page 14