
Warranty


-16-
":7=*4-!077<16/
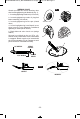
Read instruction manual first! Remove plug from the power source before
making adjustments or assembling the blade.
" #!%%"!" "
1. Power cord is not plugged in.
2. Power source fuse or circuit breaker tripped.
3. Cord damaged.
4. Burned out switch.
5. Trigger does not turn tool on.
' 1. Plug saw in.
2. Replace fuse or reset tripped circuit breaker.
3. Inspect cord for damage. If damaged, have cord replaced by an Authorized Skil
Service Center or Service Station.
4. Have switch replaced by an Authorized Skil Service Center or Service Station.
5. Have switch replaced by an Authorized Skil Service Center or Service Station.
" #!"#"!
1. Extension cord too light or too long.
2. Low house voltage.
' 1. Replace with adequate cord.
2. Contact your electric company.
" #&!!$$ "
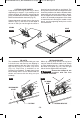
1. Blade out of balance.
2. Workpiece not clamped or supported properly.
' 1. Discard Blade and use different blade.
2. Clamp or support workpiece as shown on pages 10 and 13.
" #"!# #"% !!#""
1. Foot not adjusted properly.
' 1. See “Operating Instructions” section, “Bevel Adjustment” (page 10), “Line Guide”
(page 10, “Cutting Large Sheets (page 13) and “Rip Cuts” (page 13).
" ##"!# !!"!" %
1. Dull blade with improper tooth set.
2. Warped board.
3. Blade binds.
4. Improper workpiece support.
' 1. Discard blade and use a different blade.
2. Make sure concave or hollow side is facing “DOWN” feed slowly, see (page 13).
3. Assemble blade and tighten Vari-Torque clutch per “Assembly Instructions”, see
(page 9)
4. Clamp or support workpiece as shown on pages 10 and 13.
" #!
1. Tool does not cut workpiece.
' 1. Assemble blade and tighten Vari-Torque clutch per “Assembly Instructions”, see
(page 9)
!
WARNING
SM 1619X06997 09-13_SM 1619X06997 09-13.qxp 9/6/13 9:47 AM Page 16