
Use and Care Guide

11
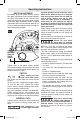
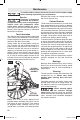
DEPTH ADJUSTMENT
Disconnect plug from power source. Loosen
the depth adjustment lever located between
the guard and handle of saw. Hold the foot
down with one hand and raise or lower saw by
the handle. Align the bottom contour of depth
adjustment lever with the desired depth of cut
mark on calibrated depth bracket and tighten
lever. Check desired depth.
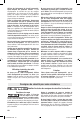
Tighten lever at the depth setting desired.
Check desired depth. Not more than one tooth
length of the blade should extend below the
material to be cut. (Fig 3).
SWITCH
When starting the tool,
hold it with both hands.
The torque from the motor can cause the tool
to twist.
To turn tool “ON”, squeeze the trigger switch.
To turn the tool “OFF”, release the trigger
switch, which is spring loaded and will return
to the off position automatically.
Your saw should be running at full speed BE-
FORE starting the cut, and turned off only
AFTER completing the cut. To increase switch
life, do not turn switch on and off while cutting.
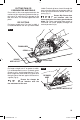
GENERAL CUTS
Always hold the saw by the main handle with
one hand and the auxiliary handle with the
other.
After completing a cut
and the trigger has been
released, be aware of the nec es sary time it
takes for the blade to come to a com plete
stop during coast down. Do not allow the
saw to brush against your leg or side,
since the lower guard is retractable, it
could catch on your clothing and expose
the blade. Be aware of the necessary blade
ex posures that exist in both the upper and
lower guard areas.
When cutting is interrupted, to resume cutting:
squeeze the trigger and allow the blade to
reach full speed, re-enter the cut slowly and
resume cutting.
Always make sure saw foot rests on portion of
work surface that does not drop off.
Always be sure either
hand does not interfere
with the free movement of the lower guard.
Maintain a firm grip and operate the switch
with a decisive action. Never force the saw.
Use light and continuous pressure.
This tool is intended for cutting unhardened
ferrous metal. Refer to the accessories sec-
tion for a list of compatible blades based on
application.
The following guidelines are to be followed to
reduce the risk of injury:
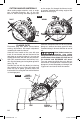
• Do not cut stacked materials. Cut one piece
at a time.
• Cut at least 1/2” from the edge of the work-
piece
• Do not cut hardened steel.
• Clamp material and cut with the wider edge
of the foot over the clamped side.
• Do not touch the chip tray cover, the saw
blade, workpiece, or cutting chips with bare
hands, immediately after cutting; they may
be hot and could burn skin.
• Cut through the thinnest mateial section;
adjusting the cutting angle of the blade to
do so.
When cutting is interrupted, to resume cutting:
squeeze the trigger and allow the blade to
reach full speed, re-enter the cut slowly and
resume cutting.
Only use 8” metal cutting
blades rated 3900/min or
greater. Do not use wood cutting blades or
abrasive wheels. Using blades not recom-
mended in this manual can result in a hazard-
ous situation.
Operating Instructions
NOT MORE
THAN ONE
TOOTH
LENGTH
Fig. 3
1619X09342.indb 11 12/16/15 8:28 AM