OWNER’S MANUAL AND INSTALLATION INSTRUCTIONS for Models 55 and 86 Under Duct Whole-House Humidifiers Includes Safety, Installation, Operating and Maintenance Instructions plus Warranty CAUTION: Read these instructions thoroughly before beginning installation or maintenance Save this manual for future reference Model No. Serial No.
Table of Contents Thank You!................................................................................................ 1 Warranty Validation Notice........................................................................ 1 Skuttle Limited One-Year Product Warranty.............................................. 2 How Your Humidifier Works....................................................................... 3 Safety Precautions.............................................................................
Thank you for purchasing a Skuttle Under Duct Humidifier. We appreciate your business and are pleased to add your name to our list of valued customers. We sincerely hope you are satisfied with our product and its performance. Skuttle is the oldest manufacturer of residential humidifiers, having been in business since 1917. In addition to humidifiers, we manufacture air filters, make-up air controls and other IAQ accessories.
Skuttle Limited One-Year Product Warranty This limited one-year warranty covers the Skuttle product as designated on the return portion of the warranty registration card, excluding wiring, plumbing and installation. Skuttle Manufacturing Company warrants that this product is free from defects in material and workmanship under normal, non-commercial use and service.
How Your Humidifier Works Your Skuttle Under Duct Humidifier uses the same principle of evaporation that you see in nature: a warm breeze passing over an expanse of water will evaporate the water and raise the relative humidity, just as it does after a summer shower. Model 55 When you home is drier than your selected humidity setting, the humidistat (your humidifier’s sensor and control device) turns on the unit’s internal low-voltage solenoid, allowing water to flow across the evaporator pad.
Safety Precautions IMPORTANT: Please read these precautions before installing the Skuttle Under Duct Humidifier. Skuttle Mfg. Co. assumes no responsibility under warranty if the user and/or installer do not follow directions found in this manual. Do not install a humidifier where the heating temperatures will exceed 180°F (82°C). Excessively high temperatures will damage your humidifier, possibly resulting in humidifier overflow and water damage to the home.
How Your Skuttle Under Duct Humidifier Must Be Installed WARNING: For warranty validation, this humidifier must be installed by a licensed HVAC contractor. Tools and Materials Needed The following tools and materials are necessary for proper installation of your humidifier: 1. Safety goggles 2. Tin snips or aviation snips 3. Electric drill or hand drill 4. 3/8" (0.95 cm) and 7/64" (0.28 cm) drill bits 5. Pliers 6. Screwdriver (medium-sized flat point) 7. Pencil or grease pencil 8. Level 9. Hammer 10.
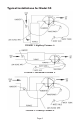
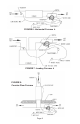
Typical Installations for Model 55 FIGURE 1: Highboy Furnace FIGURE 2: Horizontal Furnace FIGURE 3: Lowboy Furnace Page
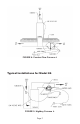
FIGURE 4: Counter-Flow Furnace Typical Installations for Model 86 FIGURE 5: Highboy Furnace Page
FIGURE 6: Horizontal Furnace FIGURE 7: Lowboy Furnace FIGURE 8: Counter-Flow Furnace Page
Referring to the appropriate Figure, choose a location on the horizontal part of the duct that is at least 12 inches wide and, if possible, 2 or more feet from the furnace. This distance allows air turbulence to subside slightly before entering the humidifier. When such distance is not obtainable, additional ductwork baffling may be needed to permit adequate humidification.
FIGURE 9: Humidifier Frame 2. Mark and drill two or three of the mounting holes 7/64" (0.28 cm) in diameter, and temporarily attach the mounting frame with #8 sheet metal screws. Mark the remaining holes and center the opening, as shown in Figures 10 (Model 55) and 11 (Model 86), below. DANGER: Do not cut or drill into air conditioning or electrical accessories during installation.
3. Remove the frame and drill the remaining mounting holes 7/64" (0.28 cm) in diameter. Drill a 3/8" (0.95 cm) diameter hole within the center section, and cut and remove the rectangular section as previously marked. NOTE: When mounting Model 55, an additional notch is required as shown in Figure 10 (page 10). Measure and mark as indicated, and cut out this section. 4. Using #8 sheet metal screws, attach the mounting frame to the duct, as shown in Figures 9, 10 and 11 (page 10).
AIR FLOW FIGURE 13: Final Positioning of Model 55 Installing the Humidifier Pan (Model 86) 1. To install the drum assembly, insert the drum shaft through the evaporator pad and drum ends, then into the round bearing in the side of the pan, as shown in Figure 14, below. (You’ll need to apply some force to deflect the retaining spring on the outside of the pan.) Insert the drum shaft into the slotted opening in the motor coupling.
2. Install the baffle in the inside of the ductwork, as shown in Figure 15, below. Reaching through the hole previously cut in the bottom of the duct, mark two holes on the top inside of the duct by holding the baffle in place about 6" (15.24 cm) from the side of the opening, then drill two holes 7/64" (0.28 cm) in diameter through the top inside of the duct and attach with two #8 sheet metal screws. FIGURE 15: Installation of Baffle in Duct 3.
C. After attaching the tubing to the saddle valve, thoroughly flush the supply tubing to clear the line of debris, which could block water flow at the float valve. D. Route the tubing to the humidifier float valve. CAUTION: Be sure to keep the tubing off of hot surfaces and away from sharp edges. E. Connect the waterline. 1) For Model 55, connect the waterline as shown in Figure 16, below. NOTE: Pay close attention to the proper orientation of parts for assembly and disassembly.
FIGURE 17: Water Level Adjustment for Model 86 5. Attach the humidifier housing (i.e., the pan) to the mounting frame by inserting the hinge pins in the mated hinge halves. 6. Raise the unit into its closed position and securely fasten it in place. 7. Test the humidifier for proper operation by activating the furnace blower. Installing the Drain Tubing Models 55 and 86 Attach vinyl drain tubing (1/2" [1.27 cm] I.D., not supplied) with a clamp.
How to Operate Your Humidifier Your humidifier’s output is controlled by a humidistat which monitors the relative humidity in your home, and activates or deactivates the humidifier accordingly. It is installed either on the cold air return of your HVAC system or on an interior wall of your home. Refer to the chart below for recommended humidistat settings. Notice that the settings increase as the outdoor temperature rises. This is to guard against condensation. (See FAQs on page 24.
How to Maintain Your Humidifier DANGER: To avoid electrical shock or burn, turn off the power supplying this equipment before servicing. To maintain high evaporating efficiency of your Model 55 or Model 86 humidifier, replace the evaporator pad at least once a year (e.g., at the end of each heating/humidifying season). In hard water areas, cleaning may be required every three-to-four weeks; in soft water areas, cleaning may be required every four-to-eight weeks. At the end of each humidification season (i.
For standard maintenance of Model 86, follow these instructions: 1. Shut off the water supply and drain the unit by removing the threaded plug in the bottom of the humidifier. 2. Remove the drum and disassemble the unit by reversing the final assembly instructions for Model 86 on page 12. 3. Remove the evaporator pad from the drum by squeezing the finger prongs on the clip, holding the drum end in place and pulling. (See Figure 19, page 20.) 4.
Key No. Part No. Description (Name) Qty.
Model 86 Parts List FIGURE 19: Model 86 Parts NOTE: Due to Skuttle Indoor Air Quality Product’s ongoing research and development program, specifications are subject to change without notice. Parts may vary in appearance from illustrations.
Key No. Part No. Description (Name) Qty.
Model 55 Trouble Shooting Guide Problem Evidence Solution(s) Low humidity No water flow in humidifier Turn thermostat up to activate heat blower operation then check the following: • Turn water on at saddle valve. • Turn water off and check for obstruction in saddle valve and filter. • Set humidistat higher. • Check for blown circuit breaker. • Check all wiring connections. • Check output voltage of transformer (24 to 29 V.A.C.). • Test solenoid; connect good transformer directly to leads.
Model 86 Trouble Shooting Guide Problem Evidence Solution(s) Low humidity Low water level (less than 2" deep in reservoir) Turn thermostat up to activate heat blower operation, then check the following: • Turn adjustment screw counterclockwise () to raise water level. No water in reservoir • Turn water on at saddle valve. • Turn off water main and check for possible obstruction in saddle valve or float valve. Drum not rotating • Set humidistat higher. • Check for blown circuit breaker.
FAQs about IAQ (Frequently Asked Questions about Indoor Air Quality) Why do I need a humidifier? More and more homeowners are realizing that, during the winter months, they live in a “sick house”. Family members suffer from dry, itchy skin, parched throats and annoying coughs. Furniture creaks, floors moan, the piano slips out of tune and static electricity zaps the cat.
Skuttle Automatic Flushing Timer Reduces Humidifier Cleaning to Once a Year in Most Areas Now programmable to 10-, 20- or 30-second flushes per flushing cycle The Skuttle Model S-HAFT Flushing Timer... • provides flow-thru technology for steam- and reservoir-type humidifiers. • automatically flushes the humidifier water pan with fresh, clean water every two hours. • is programmable to 10-, 20- and 30-second flushes per cycle. • reduces or eliminates servicing during the humidification season.
Skuttle Model 216 Make-Up Air Control Delivers Controlled, Fresh Air; Solves Problems Caused by Negative Indoor Air Pressure The Skuttle Make-Up Air Control... • draws outside air into the furnace, where it is filtered, heated or cooled, and circulated through your home’s duct system. • combats interior air pollution created by today’s tightly constructed homes. • reduces drafts and uncontrolled air infiltration to provide months of comfort.
Skuttle High-Efficiency Air Cleaners Models DB25-20, DB20-20 and DB25-16 Help Homeowners Breathe Easier Skuttle Air Cleaners... • trap most of the in-home, airborne contaminants that are potentially harmful to your health. • provide high-efficiency, high-capacity filtration with minimal airflow resistance. • feature deep-pleated filter media to permit extended, high-volume service—up to 12 months. • have a tough, injection-molded thermoplastic door with a racy S-curve to dress up any installation.
The Skuttle “Happy House” — Your Assurance of Enhanced IAQ Healthful indoor air (often called indoor air quality or IAQ) is significantly cleaner than the air in many of today’s homes. It also contains appropriate levels of moisture and fresh outside air to aid the health and comfort of residents. Humidification In cold weather, dry indoor air often makes homes drier than a desert. Acting like a sponge, the parched air absorbs moisture wherever it can find it—furniture, plants, pets...even people.
v ventilation A primary cause of “sick house syndrome” is negative air pressure buildup, resulting from a lack of fresh-air exchanges throughout the home. It also may contribute to mold growth. To help eliminate these problems, Skuttle manufactures two ventilation products: • The Make-Up Air Diffuser supplies additional combustion air to appliances that have inadequate combustible air sources.
If you have questions about your Skuttle humidifier, or to learn which Skuttle IAQ products are right for your home, contact your local heating and air conditioning contractor: Or contact: Skuttle® Indoor Air Quality Products 101 Margaret Street, Marietta OH 45750 Phone: (800) 848-9786; Fax: (740) 373-9565 Email: customerservice@skuttle.com Web: www.skuttle.com ©Skuttle Mfg. Co. 2006 Skuttle and the “Happy House” character are registered trademarks of Skuttle Mfg. Co. Part No. 000-0756-248 HBP Rev.