
Install Instructions

Page 14
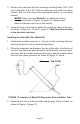
C. After attaching the tubing to the saddle valve, thoroughly ush the
supply tubing to clear the line of debris, which could block water
ow at the oat valve.
D. Route the tubing to the humidier oat valve.
CAUTION: Be sure to keep the tubing off of hot sur-
faces and away from sharp edges.
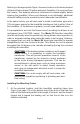
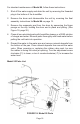
E. Connect the waterline.
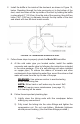
1) For Model 55, connect the waterline as shown in Figure 16,
below.
NOTE: Pay close attention to the proper orienta-
tion of parts for assembly and disassembly. This
will assist you when cleaning the orice tting and
evaporator pad.
FIGURE 16: Waterline Connection for Model 55
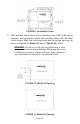
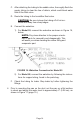
2) For Model 86, connect the waterline by following the instruc-
tions for copper tubing, found in the parts bag.
F. Check the tubing for leaks. Stop leaks by further tightening the
ttings.
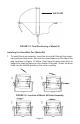
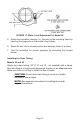
Prior to mounting the pan on the duct, set the pan on a at surface
to check and adjust the water level to approximately 2" (5.08 cm), as
shown in Figure 17 (page 15.).
4.