N AT U R A L B O R N R A C E R Anakin User guide V1.
TABLE OF CONTENT INTRODUCTION 1. SAFETY ADVICE 2. GENERAL INSTRUCTIONS AND GUIDELINES FOR USE 3. REQUIRED EQUIPMENT PREPARE YOUR ANAKIN 1: CONNECT YOUR RX 2: INSTALL VTX ANTENNA 3: CALLIBRATION OF FLIGHT CONTROLLER & ESC’S 4: SETUP ANAKIN SETTINGS IN FLIGHT CONTROLLER 5: LOAD A SKY-HERO ANAKIN PID PROFILE FILE ANAKIN FRAME ADJUSTEMENTS 1. ARMS’ GEOMETRY 2. MOTORS TILT ANGLE 3. CAMERA ANGLE 4.
GENERAL INSTRUCTIONS AND GUIDELINES FOR USE The aircraft should not be flown by children and definitely not anyone under the age of 14 Failure to follow and comply with the safety advice and recommendations in this manual, can result in serious injury to you, others or property. You should always check the local laws and regulations of the country where you will operate the aircraft, to ensure you are in com- pliance with them.
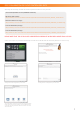
PREPARE YOUR ANAKIN STEP 1: CONNECT YOUR RX This instruction is for se ng up the inbuilt CC3D flight controller that comes with your ANAKIN FPV ARF. If you use Sky-Hero Link 9 radio with its receiver go to page XX Mount your receiver on the upper frame with double-sided tape.
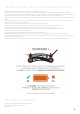
advantage of such a PPM signal is that only one signal wire is needed instead of all the individual wires. For PPM receiver, the HITE and REY wire of the multi colored signal wire needs to be swapped FIRST, then connect the the PPM output of your receiver, no other wires need to be connected. See below: REY RED BLACK plug to S.BUS The S.Bus is another communication protocol from Futaba that can also be used on other radios like Taranis and Radiolink.
DSM2/DSMX satellite receiver signal wire swap For DSM Spektrum R please use black, red, white cable Original DSM se knife tip or similar to pull the BLACK and RED wire out of the plug and put back in reverse order. DSM Satellite Receiver iring How it should looks when completed. Then turn on your radio and create a new fixed-wing airplane model, assign a 3 position switch to channel . STEP 2: INSTALL TRANSMITTER (VTX) ANTENNA ERY IMPORTANT ARNIN CONNECT THE ANTENNA TO YOUR VTX .
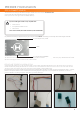
STEP 3 CALLIBRATION OF FLIGHT CONTROLLER & ESC’S This step is mandatory if you’are not using a LINK9 After wiring and radio se ng, download and install the OpenPilot CS software to setup the CC3D. Download OpenPilot So ware (VERSION 15.02.02) Download OpenPilot Software (VERSION 15.02.02) Windows NSIS installer: Windows NSIS installer: http:/www.sky-hero.com/softwares/Anakin/OpenPilot/15.02.02/OpenPilot_WIN32_15.02.02.exe http www.sky-hero.com softwares OpenPilot 1 . . OpenPilot IN3 1 . . .
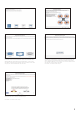
Select Multirotor and click Next Keep the default On the ESC menu we have Standard ESC, Rapid ESC and OneShot ESC. Now the basic configuration has completed, review the se ngs and click Next . Now you will proceed with the sensors calibration for the CC3D. Put the ANAKIN FP on a flat surface, click Calculate button to start the calibration, and click Next when done.
Click Next Now the wi ard will calibrate the output of the highlighted motor in the diagram. Please double check if the motor s rotating direction is the same as the one showing in the diagram. Follow the instructions to find the neutral rate (slowest constant speed) of the first motor and click Next , then do the same for the three other motors. Click Next to continue. se the default se ng here unless you know what you are doing, then click Next . Click the Save button to save all previous se ngs.
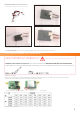
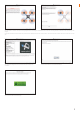
STEP 4: SETUP ANAKIN SETTINGS IN FLIGHT CONTROLLER This step is mandatory if you’are not using a LINK9 Now the basic setup of CC3D is completed, you need to double check that everything is done correctly. o back to OpenPilot homepage and click Configuration tab at the bottom and have a look at the H Se ngs . If you’ve chosen PPM receiver in the wi ard Click Hardware tab on left, check the Flexi Port and Main Port se ngs and make sure they are the same as on the screenshot.
Select Acro then click Next . Select the correct mode according to your transmitter and click Next , carefully follow the screen prompt until the calibration process is finished. Make sure you fully understand the arming process and select the preferred arming combination under “Arming Settings”. Don t forget to click Save to save all the se ngs. Click “Attitude” tab from the left, and make sure you put 1 into the Roll se ng.
STEP : L A A S ER ANA IN PI PR ILE ILE (AIR RA T E AVI R) This step is not mandatory! Whether you use Link9 or a another radio controller. Please make sure to use a Sky-Hero profile file. You can d nl ad en il t r le le on the Sky-Hero website. FOR YOUNG PILOTS (beginners): FOR YOUNG PILOTS (beginners): Early beginners setup: http www.sky-hero.com softwares PIDS beginner.uav. ip Early beginners setup: http:/www.sky-hero.com/media/downloads/PIDS/beginner.uav.zip Gentle setup: http www.sky-hero.
A A ANAKIN FRAME ADJUSTMENTS AD STEMENTS Anakin has been conceived to be adjustable in many ways. You can play with several frame adjustments to make a perfect match between your profile and the flight behaviour of the frame Arm s geometry, Motor Tilt Angle Camera Angle. A They can be combined almost to infinity. To make changes on the frame, please refer to the Anakin Assembly Instruction Manual (AIM) Anakin AIM v1. .pdf (click on the link or go to www.sky-hero.
3. CAMERA ANGLE Anakin has been conceived to be adjustable in many ways. You can play with several frame adjustments to make a perfect match between your profile and the flight behaviour of the frame Arm s geometry, Motor Tilt Angle Camera Angle. 0. 10° = Flat vision, ideal to start and learn 10. 20° 4.
USING LINK9 CONFIGURATION PROCEDURE This step is mandatory if you are using a LINK9 To use your Anakin ARF with your Link9 YO M ST first upgrade the Sky-Hero CC3D flight controller with the latest firmeware. To do so, you must previously download the OpenPilot Software ( ERSION 1 . . ) - see page - and do the following Discard the message warning you do not have the latest version by clicking OK . Then click on the Firmeware Tab at the bottom of the application.
BASIC COMMANDS See hereunder how to control your Anakin. ODE 1 LEFT STICK RIGHT STICK LEFT STICK T : it cannot hold the central position when released. Roll: it can return to the central position when released. Pitch: it can return to the central position when released Yaw: it can return to the central position when released. RIGHT STICK Pitch: it can return to the central position when released Roll: it can return to the central position when released.
STARTING SEQUENCE STARTING AND STOPPING MOTORS P SH O H ON ROLS O ORNER POSI ION HIS AY E HAN ED IN OPENPILO SOF ARE MODE 2 BEFORE TAKE OFF 1: OPERATE YOUR AIRCRAFT SAFELY Refer to and follow all safety precautions mentioned in the eneral Instructions and uidelines for use section of this manual. Ensure that you always turn on your transmitter before connecting the aircraft battery power. After flying, make sure that you always disconnect the aircraft battery before turning off the transmitter.
LIMITED WARANTY WARRANTY AND REPAIRS SKY HERO I O SKY HERO SKY HERO : I F I - WARRANTY PERIOD E : SKY HERO P P WARRANTY LIMITATIONS ( P P Y A SKY HERO S SKY HERO SKY HERO I : SKY HERO SKY HERO SKY HERO D ATTENTION R DAMAGE LIMITATION SKY HERO I - SKY HERO SKY HERO SKY HERO I QUESTIONS, ASSISTANCE AND REPAIRS P SKY HERO SKY HERO REPAIRS UNDER WARRANTY I P P SKY HERO P P SKY HERO - - 18 17
www.sky-hero.