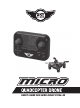
User’s Guide for Model DR107 v1736-02
Warnings & Precautions Important Safety Instructions • • • • • • • • • • • • • • • • • Read and follow all instructions. Keep these instructions for future reference. Heed all Warnings. Intended for children ages 14 and higher. Adult supervision is required. Only use attachments/accessories specified by the manufacturer. Before flying, always check the body, rotors, and battery for any damage or obstructions. Battery should be free from cracks or swelling.
Table of Contents SkyRider Micro – 5 Flying Tips & Features – 14 Features Includes Tips for Safe Operation Speed Setting Flips & Tricks Headless Mode Auto-Reverse Overview – 6 Craft Layout & Features Remote Control Repair – 16 Batteries & Charging – 8 Parts Replacement Rotor Replacement Battery Charging Procedure Remote Control Batteries Troubleshooting – 18 Flying – 10 Customer Support – 19 Craft/Remote Link Contact Information International Support Warranty Trim Adjustment – 12 Setting Trim
SkyRider Micro Features • 360° flips & tricks • 6-axis gyroscope • 3 speeds • Control distance: up to 98 feet • LED navigation lights • Operating time: 4-5 minutes • Charge time: 20 minutes Includes • 2.4 GHz remote control: requires 2 AAA batteries (not included) • Built-in rechargeable lithium polymer battery • USB cable for battery recharge • 4 replacement rotors • User’s guide & warranty Remote holds drone and thumbsticks for easy and compact storage.
Overview Craft Layout & Features LED Formation Lights Blue LEDs indicate the front of the craft.
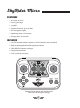
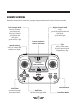
Remote Control Remove thumbsticks from the storage compartment and insert into the controls. Left Control Stick Increase Throttle: push forward Decrease Throttle: pull backward Yaw/Spin: push left or right Right Control Stick Pitch: push forward/backward Roll/Bank: push left/right Power Switch & Status Indicator Speed Setting Press to select low, medium or high. Flip Press, then move Right Control Stick to perform a flip. Storage Compartment Pitch Trim Correct forward/ backward drift.
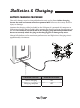
Batteries & Charging Battery Charging Procedure The craft’s battery must be charged before the unit can be flown. Before charging, be sure t he craft and remote control are powered OFF. Failure to do so may result in injury or damage. Connect the charging cable (included) to the USB port of a powered ON computer or USB power adaptor (not included), then connect the charging plug to charging port on the unit. For correct fit, the small tab on the charging plug should be pointed down.
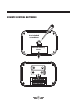
Remote Control Batteries Use included screwdriver Remove Battery Cover 2 x 1.
Flying Craft/Remote Link Before flying, the craft and the remote must be linked together and the gyroscopes on the craft must be allowed to calibrate. Begin with the craft and remote powered off. Step 1 Place the craft on a flat, level surface. This is necessary for the craft’s gyroscopes to properly align. Step 2 Power the craft ON. The LED formation lights will blink in unison as the craft searches for a signal from the remote. Step 3 Power the remote control ON.
Step 4 Push the Left Control Stick directly forward, then backward. A chime will sound when the craft is calibrated and ready to fly. Step 5 Push the Left Control Stick (throttle) forward to take off. Use both thumbsticks to control the craft. If you notice a tendency to drift, you may need to adjust the trim controls to fine tune the handling (see next section). When You’re Done Flying... After safely landing, keep the Left Control Stick (throttle) in the lowest position (OFF) and power OFF the remote.
Trim Adjustment Setting Trim & Countering Drift Adjusting the trim settings to correct drift and provide better control of the craft. To avoid potential damage, adjust the trim while attempting a stable hover. Try to avoid making any exaggerated movements with the flight controls and adjust one trim setting at a time to avoid confusion. Remember, the blue LEDs indicate the front of the craft. While adjusting the trim will help with drift, it is not guaranteed to eliminate it entirely.
Reset If the craft is still experiencing difficulty flying or is behaving erratically, the craft and remote may need to be reset to default settings. Be sure that the remote and craft are linked and begin on a flat level surface. Reset by simultaneously pulling both Control Sticks in the manner shown below. The LED lights on the craft will blink and the remote will beep while the reset is being performed. When the lights are solid again and the beeping has stopped the craft is ready to fly again.
Flying Tips & Features Tips for Safe Operation • Only fly in large, open spaces free of obstacles like power lines, trees, ceiling fans, etc. • It is best to fly 2 to 3 ft. from the ground and any obstacles. Flying low to the ground directs turbulence from the rotors back towards the craft, making it more difficult to control. Avoid walls and ceilings, as the craft may be drawn towards them if closer than 2 to 3 feet.
Flips & Tricks Before attempting any stunts, be sure that there is ample clear space around the craft, ideally 3 to 5 ft.. in every direction. It is not recommended to attempt to flip around or through any obstacles, as this may result in unintended damage. Press the Flip button once, then move the Right Control Stick in any direction. Craft will perform flip in the desired direction. Headless Mode Headless Mode disables the normal orientation of the craft, where the blue LEDs indicate the front.
Repair REMINDER: Pilots are responsible for any damage caused by improper use. Parts Replacement Standard parts such as extra batteries and remotes are available online for purchase when in stock. However, any non-standard parts such as cameras, screws, bodies, SD cards etc. can be ordered by placing an inquiry with our parts department at: partsinfo@dpiinc.com. Rotor Replacement To replace a rotor, gently pull it upwards and off of the motor shaft and replace it with a new one.
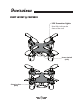
FRONT Rotor A Rotor B Rotor A Rotor B Matching rotors should be diagonally opposed.
Troubleshooting If you are experiencing problems using or flying the craft, consult this table. PROBLEM POSSIBLE CAUSES SOLUTION Craft does not respond to controls. • No power to remote or craft. • Craft is out of receiver range. • Check remote batteries, replace if needed. • Check craft’s battery, charge if needed. • Be sure the remote has an unobstructed line of sight to the craft. • Remain within the remote’s 98 ft. range. Craft is difficult to control or flies erratically.
Customer Support Contact Information Warranty Website: www.gpx.com See included 30 Day Warranty for warranty information. Warranty and the most up-to-date version of this User’s Guide can also be found at: http://gpx.com/dr107.html Email Support: prodinfo@dpiinc.com Email Parts: partsinfo@dpiinc.com Phone Support: 1-888-999-4215 International Support To download this User’s Guide in English, Spanish, and French, or to get answers to frequently asked questions, visit the support section at: www.gpx.