
Owner manual


24
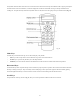
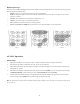
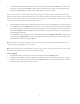
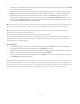
Dual Purpose Keys:
Thesekeys,picturedinFig. 38 and Fig. 39,rangefromthemiddletothebottomofthehandcontrol.Theyservetwodistinctpurposes–
data entry and quick reference hot keys:
• TOUR key takes you on a preset tour across the sky you are currently under
• RATE
key changes the speed rate of the motors when the directional keys are pressed. There are 10 speeds to choose from: 0
(slowest)to9(fastest)
• UTILITYshowsfunctionssuchasShowPosition,DisplayTime…etc
• USERkeygivesaccesstoupto25user-denedcoordinates
• IDkeyidentiestheobjectthetelescopeiscurrentlypointingto
• NGC, IC, M, PLANET and OBJECTkeysallowdirectaccesstoSynScandatabaseofover42,900objects
AZ GoTo Operation
Initial Setup
1. Makesurethemountisleveltotheground.Thereisabubblelevelbuiltintothebasetohelplevelthemount.
2. Point the telescope roughly to the brightest star in the sky seen by your naked eyes.
3. Make sure the hand control and power supplies are plugged in correctly and toggle the power switch located on the top of the
mounttothe“on”position.
4. The initial screen displayed on the hand control is the Version Screen. Press ENTER to proceed. The hand control will display
“OPERATING MODE:” Use the scroll keys to select “Astronomical Mode” and press ENTER.
5. ThehandcontrolwilldisplayawarningtonotpointthetelescopeattheSunwithoutproperequipment.Ifyouhavereadthe
messagealready,pressingENTER will bypass the message and skip to the next step.
Hint: The hand control’s red light will become dimmer and the keypad’s backlight will turn off if idle for 30 seconds. Pressing any key
turns it back on.
Fig. 37 Fig. 38 Fig. 39