INSTRUCTION MANUAL Star Discovery Mount SL26032014 V1 Copyright © Sky-Watcher
CONTENT Part I: Introduction A simple mount, yet efficient .............................................................................................. 2 Part II: Getting Started Parts description ................................................................................................................ 3 Installing the Star Discovery mount for an observation....................................................... 3 Preparing the telescope for an observation ..........................................
Part I: Introduction Part I : Introduction A simple mount, yet efficient When designing the Star Discovery mount, Sky-Watcher engineers kept these words in mind. A simple mount that can really do astronomy, helps beginners to discover the night sky efficiently and will become a tool that can fulfill your passion. The Star Discovery mount is not only designed to drive a telescope, but is also a multi-role platform for cameras and video recorders.
Part II: Getting Started Parts description When unpacking the mount box, depending on your controller model, you will find the following parts enclosed: Star Discovery SD-Track bundle Star Discovery SD-GoTo bundle Common Parts: Common Parts: 1. The Star Discovery mount 2. The tripod with adjustable legs 3. The accessory tray 1. The Star Discovery mount 2. The tripod with adjustable legs 3.
Part II: Getting Started Install the mount’s head on the base so the three threads [shown by arrows in (Fig. 2)] are aligned with the three screws on the base [shown by arrows in (Fig. 1)]. Tight the three screws from the base onto the head threads [shown by an arrow in (Fig. 3)]. Be sure the head is secure onto the base. Fig. 4 Fig. 5 Fig. 6 If not done yet, please install 8xAA cells inside the box located on the external side of the mount’s arm. To open the box, gently lift the panel with one finger.
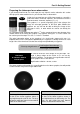
Part II: Getting Started Preparing the telescope for an observation If you already know how to use a telescope you may skip this section, otherwise this section will help you to understand the basics you need to make an observation. Fig. 8 Inside the instrument box you will find two eyepieces, one with a gold band written “23mm 60° Aspheric” and a shorter one with a blue band noted “10mm 60° Aspheric” (Fig. 8).
Part II: Getting Started The 23mm eyepiece delivers a larger view of objects with fewer enlargement, as if “seen from a further distance” than with the 10mm. When observing it is advisable to first use the 23mm to center the object inside the field of view to get an “overview” of the surroundings, then use the 10mm to get “closer” and discern more details. Needless to say the graphical representation is just for understanding.
Part II: Getting Started Aligning the finder scope The 6x24 finder scope is a small fixed magnification scope mounted on the optical tube. When it is correctly aligned with the telescope, objects can be quickly located and brought to the center of the field. The alignment should be done at first use and over time if the alignment is no more accurate.
Part III: Astronomy with the Hand Control Part III: Astronomy with the Hand Control If you are using the SynScan version 4 (different hand controller from the one pictured below) please refer to page 16 for proper setup instructions. In order to allow the celestial object tracking function to work properly, the Star Discovery mount needs the input of the local latitude. Without this information the mount will not be able to track objects in the sky.
Part III: Astronomy with the Hand Control (Continued) To set the northern latitude: 4. Rotate the altitude axis to enable the altitude scale to read local latitude (according to the enlarged view to the right – set to 21° on image as example). 5. By pressing the handset button 2 and 3 simultaneously, the Star Discovery Mount will recognize the local latitude. Aim the telescope towards the object under observation: the mount will begin auto tracking.
Part III: Astronomy with the Hand Control Using the Hand Controller for Astronomy The basic movements of the Star Discovery mount are directional movement, slewing, and tracking. The tracking rate is sidereal rate. Sidereal rate means the Star Discovery mount will move automatically on both vertical and horizontal axis to keep a sky object centered on the field of view. The directional keys (Fig.1) are used to move the mount.
Part IV: Terrestrial Photography Part IV: Terrestrial Photography The Star Discovery mount is also perfectly suited to shoot amazing panoramic images or do video cruising automatically. But not only… It is also perfect for lightweight astrophotography, time lapse photography, wide view and panorama photography, video panning and so many more activities.
Part IV: Terrestrial Photography It is also possible to attach two devices on the mounting bracket by using the secondary accessory plate. You will find the secondary accessory plate and two screws inside the box. To mount the secondary accessory plate: locate two threads on the internal side of the mounting bracket (part 1) and use the two screws (part 2) to assemble the secondary accessory plate (part 3) on the mounting bracket (part 1).
Part IV: Terrestrial Photography Camera Cruising Function The hand control can control a camera to take pictures at up to 6 preset positions (a to f) using the SNAP interface of the Star Discovery mount. The camera used for this application should have an external shutter control port which can connect to the mount's SNAP port with a proper cable. The SNAP port is a 2.5 mm 3-segment stereo jack and the trigger signal connects to the tip and base segments.
Part IV: Terrestrial Photography 1. Press one of the buttons 1-5 to choose a slewing speed. Speed 1, 2, 3 are for time-lapse photography, speed 4, 5 are for normal video recording. Here is the speed table: • • • • • Speed 1: 1 rotation per 24 hours. Speed 2: 1 rotation per 6 hours. Speed 3: 1 rotation per 3 hours. Speed 4: 1 rotation per 1.5hours. Speed 5: Approximate 2.5 degree/second 2. Press buttons (GO) and (DOWN) to activate the Video Cruising function.
Part IV: Terrestrial Photography 2. Set the lowest altitude angle of photography: look through the view finder of the camera and use the (DOWN)/(UP) buttons to slew the altitude axis to the desired lowest point of photography, and then press button (SET) and button (DOWN) to save the position. 3.
Part V: Astronomy with the SynScan Version 4 Part V: Astronomy with the SynScan Version 4 Do you know that the SynScan Version 4 hand controller is able to fully drive the huge EQ8 mount? “The EQ8 High Precision EQ mount is pier tripod - based. It comes with a SynScan Version 4 hand controller, […].
Part V: Astronomy with the SynScan Version 4 The following table lists the available speeds: Key Speed Usage 0 0.5X One turn in 48h: very slow speed to accurately center objects inside a high magnification eyepiece field of view. 1 1X One turn in 24h: quite slow speed to center objects inside an eyepiece field of view. 2 8X One turn in 3h: slow speed to quickly re-center objects. 3 16X One turn in 1.
Part V: Astronomy with the SynScan Version 4 4. Time Zone: The LCD screen will display “Set Time Zone” in the first line, and display the current time zone in the second line. • Use the scroll keys to change the leading “+” or “-” sign when the cursor is on it. The “+” sign is used for time zones in the Eastern Hemisphere (Europe, Africa, Asia, Oceania), while the “-” sign is used for time zones in the Western Hemisphere (North and South America).
Part V: Astronomy with the SynScan Version 4 3. The hand control will generate a list of the brightest stars within the selected horizontal region. The list is sorted by the brightness of the star and with the brightest stars at the top of the list. Users can use the scroll keys to browse the list. An example of the screen display is shown in the left picture. Note: the selected object can also be a bright planet. 4. The screen will display “Point scope to “RR ZZ.Z’ TT.
Part V: Astronomy with the SynScan Version 4 4. If the 1st alignment star is not a planet, the SynScan hand control will now display “Alignment Successful”. Press (ENTER) to complete the alignment process. After pressing (ENTER) to complete the alignment process the SynScan hand control will display the alignment menu again. Press the button (ESC) twice until the SynScan hand control displays « CHOOSE MENU » The 2-Star Alignment Method Aligning the 1st Star: 1.
Part V: Astronomy with the SynScan Version 4 4. The SynScan hand control will now display “Alignment Successful”. Press (ENTER) to complete the alignment process. After pressing (ENTER) to complete the alignment process the SynScan hand control will display the alignment menu again.
Part V: Astronomy with the SynScan Version 4 Locating Planets and the Moon Press the (PLANET/7) shortcut key. The screen will display “SOLAR SYSTEM” in the top row. Use the two scrolling keys to select the planet through a list in the bottom row, which includes: Mercury, Venus, Mars, Jupiter, Saturn, Uranus, Neptune, Pluto, and the Moon. Press (ENTER) key to proceed to the next step (continued on p24). The Object Menu Press the (OBJECT/8) key.
Part V: Astronomy with the SynScan Version 4 The User Defined Objects menu (up to 25 objects can be defined) Defining New Objects: Press the (USER/9) shortcut key. The screen will display “USER OBJECT”. Press the scroll keys until “New Object” is displayed on the screen, then press the (ENTER) key. The screen displays “New Object 1)RA-Dec 2)Mount”. Press “1” to enter R.A./Dec. coordinates for a celestial object; press “2” to enter coordinates for a land object. If the “R.A.-Dec.
Part V: Astronomy with the SynScan Version 4 The Tour menu The SynScan hand control can generate a list of the most famous deep sky objects which appear in the current sky. Any proposed object can be selected and the SynScan hand control can point the telescope toward it automatically. This is the “Deep Sky Tour” function. Press the (TOUR/1) shortcut key. The screen will display “Deep Sky Tour” in the top row.
Part V: Astronomy with the SynScan Version 4 6. Press the (ENTER) key to select an identified object and then use the scroll keys to read its data, such as the J2000 celestial coordinates, magnitude (MAG=), rising time (Rise: ), transit time (Transit: ), setting time (Set: ), size (Size=) and associated constellation (Constellation: ), etc. 7.
Appendix: Tips for observing the sky Appendix: Tips for observing the sky Sky conditions Sky conditions are usually defined by two atmospheric characteristics, seeing, or the steadiness of the air, and transparency, light scattering due to the amount of water vapor and particulate material in the air. When you observe the Moon and the planets, and they appear as though water is running over them, you probably have bad "seeing" because you are observing through turbulent air.
We want to ensure that your experience with a SkyWatcher product is the best it can be. To make that happen we have a comprehensive technical and customer support available, alongside with the list of distributors and dealers worldwide, on our worldwide internet site: http://www.skywatcher.