
User Manual


Part IV: Terrestrial Photography
14
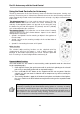
1. Press one of the buttons 1-5 to choose a slewing speed. Speed 1, 2, 3 are for time-lapse
photography, speed 4, 5 are for normal video recording. Here is the speed table:
• Speed 1: 1 rotation per 24 hours.
• Speed 2: 1 rotation per 6 hours.
• Speed 3: 1 rotation per 3 hours.
• Speed 4: 1 rotation per 1.5hours.
• Speed 5: Approximate 2.5 degree/second
2. Press buttons (GO) and (DOWN) to activate the Video Cruising function. During the
cruising, the mount will send shutter release signal periodically.
3. During the cruising, user can press the (SET) button to pause/resume the mount.
4. By default, when the mount sends shutter release signal from the SNAP port every 3
seconds for time-lapse photography. User can press button (a) to (f) and button (DOWN)
to change the interval to 1,2, 3, 4, 10, 40 and 60 seconds during the cruising.
5. Press buttons (DOWN) and (RIGHT) to stop the cruising.
If one of (a) to (f) preset position is stored with the position which is the same its
previous one, then it will be skipped during the cruising. For example, if (b), (c)
and (d) are preset with the same position which is different from (a) and (e) then
the cruise sequence will be a->b->e positions while c and d positions are
skipped.
A position which is not set after turning on power will also be skipped during
cruising.
If both axes positions are changed between two preset points, the axis with
shorter slewing distance will slew at lower speed; both axes will stop at
approximate the same time.
Panoramic/Matrix Photography
The hand control can control a camera to take panoramic photos with the SNAP interface.
The camera must have an external shutter control port (see Camera Cruising Function
paragraph about SNAP interface), and a proper bracket should be used to attach the camera
on the mount (see Assembling and Installing the Mounting Bracket paragraph about
using the mounting bracket).
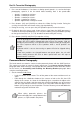
1. Set the camera’s field of view
• Level the camera on the mount. Turn off the power of the mount and then turn it on
again.
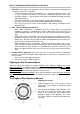
• Look through the viewfinder window of the camera or look at the life view LCD
display of the camera. As shown in the following figure, remember the object at the
corner of the view finder, and then rotate the azimuth and altitude axes of the mount
with the hand control to move the center of the view finder onto that object. Press
buttons (SET) and (a) to save the position. The Star Discovery mount will double the
movement to get the full field of view.
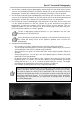
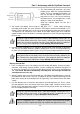
When taking panoramic pictures, the
mount will apply 30% overlap between the
pictures, as represented in the picture.