
Installation Guide


Cop
yright © 2017 Alarm.com | www.alarm.com | May 2017
3
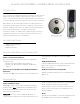
Wi-Fi Doorbell Camera - HD and Slim Line Editions | Installation Guide
HARDWARE INSTALLATION
Use Alarm.com Doorbell Camera Hardware
Alarm.com’s Doorbell Camera hardware must be used:
• Alarm.com Wi-Fi Doorbell Camera
• Alarm.com Slim Line II Doorbell Camera
S
kyBell HD consumer hardware is not supported. Slim
Line Doorbell Camera hardware is not supported on
the SkyBell platform or other service provider
platforms.
Remove Existing Doorbell Button
Take care to prevent the existing doorbell wires from
slipping into the wall.
Attach the Doorbell Mounting Bracket to the
Wall
Feed the existing doorbell wires through the hole in the
center of the bracket. Affix the bracket firmly to the
wall by driving the provided wall screws through the
top and bottom holes in the bracket. Failure to make
the bracket flush on the wall could cause a poor power
connection between the bracket and the doorbell
camera.
Connect Power Wires to the Mounting Bracket
Loosen the terminal screws and insert the wires
beneath the screws. Do not short (touch together) the
wires during this process. Tighten the screws. The wires
must be of approximately equal thickness, and the
screws should be tightened approximately the same
amount so that the screwheads are flush.
If the wires are thick, splice short lengths of additional
thinner wire. The splice joints can be hidden inside the
wall, and the thinner wire can be used to connect to
the mounting bracket.
Attach the Doorbell Camera to the Mounting
Bracket
Slide the top of the doorbell camera down on to the
mounting bracket and push the front of the doorbell
camera toward the wall. Tighten the set screw located
on the bottom of the camera, being careful not to
damage it (power tools should not be used with the set
screw). The camera’s LED should begin to illuminate.
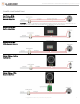
Connecting the Digital Doorbell Adapter
If the home has a mechanical chime, you may skip this
section. If the home has a digital chime, a Digital
Doorbell Adapter is required.
Remove the cover from the digital chime and locate
the wire terminals. Completely remove the screws
from the terminals and temporarily move the wires out
of the way.
Connect the Digital Doorbell Adapter wires to the
chime:
•
J1 -> “Front” Terminal (on Digital Doorbell)
•
J3 -> “Trans” Terminal (on Digital Doorbell)
Connect the J2 wire to a wire from the wall, and
connect the J4 wire to a wire from the wall.
Reassemble and reinstall the digital chime in its original
location.
SYNCING WITH ALARM.COM
Ready to Sync
The Doorbell Camera is ready to sync when the LED is
alternating Red and Green. This LED pattern indicates
that the camera is in Wi-Fi Access Point (AP) mode. In
this mode, the camera broadcasts a temporary Wi-Fi
network. During the syncing process, you will connect
to this network when instructed by the app. The app
will configure the Doorbell Camera.
If the LED is not alternating Red and Green, see the
troubleshooting section below.