
Installation Guide


C
opyright © 2017 Alarm.com | www.alarm.com | May 2017
4
Wi-Fi Doorbell Camera - HD and Slim Line Editions | Installation Guide
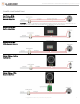
Log In to the Alarm.com App
Use the login and password for the account that will
have the Doorbell Camera.
Select Add a New Doorbell Camera
Navigate to the Doorbell Camera page by selecting the
Doorbell Camera tab in the left navigation bar. If a
Doorbell Camera is already installed on the account,
you can add a new camera by selecting the Settings
icon on the existing Doorbell Camera’s screen.
Note: If you do not see the Doorbell Camera tab, the
Doorbell Cameras service plan add-on needs to be
added to the account. You may also need to check the
customer’s login permissions to ensure they have
permission to add a Doorbell Camera.
Follow the On-Screen Instructions
Keep your mobile device on the home’s Wi-Fi network
(or on LTE) and follow the on-screen instructions. You
will be prompted to provide a name for the camera.
When Instructed, Connect to the Doorbell
Camera’s Temporary Wi-Fi Network
The syncing process will instruct you to connect to the
Doorbell Camera’s temporary Wi-Fi network. The
network is named Skybell_123456789 (or
SkybellHD_123456789), where 123456789 corresponds
to the device’s serial number. On iPhone or iPad, you
must leave the Alarm.com app, enter the Settings app,
select Wi-Fi and select the SkyBell network. On
Android, this process is completed within the app.
Enter the Home’s Wi-Fi Password
Very carefully enter the home’s Wi-Fi password. If you
must configure static IP addresses or the customer has
a hidden Wi-Fi network, use the Manual Configuration
tab.
Enable Push Notifications & Recording
Schedules
The mobile device that is syncing the doorbell camera is
automatically added as a notification recipient.
Enable the Digital Doorbell in the App
If you installed a Digital Doorbell Adapter, the device
must be enabled from the Alarm.com app.
Open the Alarm.com app and select the Doorbell
Camera tab. Select the Settings icon for the camera
and turn on the option to enable the Digital Door
Chime. Select Save.
NOTIFICATIONS & RECORDING SCHEDULES
Notifications
Notifications are alerts that are sent immediately to
the customer’s mobile phone when activity is detected
by the Alarm.com Wi-Fi Doorbell Camera. Push
notifications help the customer take full advantage of
their new Doorbell Camera.
Acknowledging a Doorbell Camera push notification
will route the user directly to the call screen and enter
a two-way audio call.
Button Pushed – Receive a notification when the
doorbell button is pushed. By acknowledging the
notification, you will automatically join a two-way
audio call and receive a live video feed from the
camera.
Motion – Receive a notification when the doorbell
detects motion. By acknowledging the notification, you
will automatically join a two-way audio call and receive
a live video feed from the camera.
Importance of Push Notifications
Enabling push notifications and adding the necessary
recipients are critical to the success of a Doorbell
Camera installation. Push notifications allow the
customer to instantly see, hear and speak to visitors at
the door.
We recommend the customer select the “Keep me
logged in” option on the Login screen in the Alarm.com
app so that the customer will be able to respond to
push notifications from the Doorbell Camera more
quickly.
Recording Schedules
Recording schedules control the times and events
during which the Doorbell Camera records clips.
Call (Button Pushed) – Record a clip when the doorbell
button is pushed.
Motion – Record a clip when the doorbell detects