
User's Manual
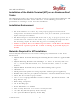
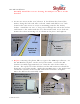
Table Of Contents

GLS MT Installation
4/1/2004 VER 2.8 DOC
6
4. Wipe and clean the area within the tape using the alcohol solution and
a clean towel. Ensure any dirt, films, oils, waxes, release agents, or
other contaminants are removed from within the mounting area.
5. Use the Scotch-Brite pad to abrade the area within the masking tape
where the Bracket and Tether Guard will make contact with the roof.
Using a circular motion will increase the bonding of the primer and
adhesive. It is not necessary to completely remove all surface
oxidation.
6. Wipe the abraded surface down using the alcohol cleaning solution and
a clean towel. Repeat the cleaning again with a new clean towel until
the clean towels show no sign of any remaining contamination.
Thoroughly wipe the surface dry with another clean towel.
Be diligent as this is the most important step to acquiring a secure
bond of the adhesive!
7. Prepare the 3M Primer 94 per the manufacturer’s instructions. Use a
small brush to apply the primer to the cleaned and abraded roof
surface. Allow the primer at least 10 minutes to dry completely.
8. Remove the plastic film from the bracket VHB tape to expose the VHB
tape adhesive.
Be careful not to touch the exposed adhesive or primed surface as
any contamination will impede the bond strength.
Carefully place the MT/Bracket assembly on the roof within the
boundaries of the masking tape template.
FRONT
Expose the VHB
Tape adhesive
and install the
MT Bracket to
the roof within
the template
Firmly apply pressure along
each side of the bracket
Firmly push down, back and forth several times, along the entire
perimeter of the bracket.
Remove and discard the masking tape.