
Manual


I-TJ4013B Pg 4
SBE500-L SWAY BAR END LINK,REAR SGL 2
HB-142118-4 HARDWARE BAG FOR SBE500 1
142118 ES34 SLEEVE/404094 1.66" 4
:
1. Secure & properly block the tires of the vehicle on a level concrete or
asphalt surface.
2. Jack up the front of the vehicle & install jack stands under the frame
behind the lower link rear brackets.
3. Remove the front tires & OEM front shocks.
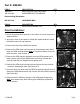
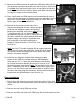
4. Remove the OEM lower track bar bolt on the passenger side end &
lower the OEM track bar down. It may be necessary to pry the
track bar loose. (See Photo # 1)
5. Remove the OEM drag link assembly from the OEM pitman arm &
lower it down. Remove the OEM pitman arm using a pitman arm
puller & install the new Skyjacker drop pitman arm.
6. Remove the OEM sway bar end link lower bolts at the axle on both
the driver & passenger side. (See Photo # 2)
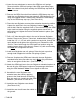
7. Lower the front axle down until the OEM coil springs become loose &
remove the OEM bottom bolt & clip from the left front OEM coil spring.
(See Photo # 3)
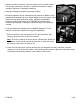
8. Remove both the OEM coil springs & the OEM upper bump stops.
Use channel lock pliers working the OEM bump stop back &
forth to remove.