
Instructions / Assembly


The Wireless Garage Door Monitor
TM
is designed to monitor the status of
your garage door and advise you if the door is open. By placing the
sensor on the door panel, you will be alerted when the door is open.
When the garage door is open, receiver will flash along with alert
beeping or alarm.
In this package, you should find a Garage Door Monitor
TM
Sensor, a
Household Alert
®
Long Range Receiver, an adapter, 3V lithium battery
(installed) and other mounting accessories.
Please follow the instructions below to set up your garage door monitor
and the receiver.
The sensor must be programmed to the Household Alert
®
Long Range
Receiver before they can communication. You may program the sensor
to one of the 4 zones. Follow the instructions below;
1. Plug in an AC adapter to the receiver.
2. Power up the Receiver unit. The green LED will be on indicating it
is turn on.
3. Open the back cover and there is a learn button. Press and hold
this learn button for 5 seconds, until both green LED and zone 1
red LED flash. You may now release the learn button.
4. If you would like to program the sensor to zone 1, activate the
sensor while the zone 1 red LED is flashing. Activate the Sensor
by position the sensor vertically to allow the detection rod to drop.
5. If you would like to program the sensor to other zones, press the
learn button again, until the red LED flashes at the zone you want
to program the sensor to, then activate the sensor.
6. Once the sensor is programmed, the green LED will be steadily on
and none of the red zone LEDs will be on.
Note: Each zone can program up to 4 sensors. If you try to program a
fifth sensor into a zone, the first programmed sensor will be erased.
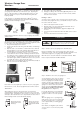
1. INTRODUCTION
Model GM-434RTL
2. PROGRAMMING
Learn Button
Mounting
Accessories
Test Sensor
After learning the sensor to the Receiver unit, you may test the
communication by pushing the detection rod on the sensor to its fully
retracted position. If program the sensor to Zone 1, position the sensor
vertically to allow the detection rod to drop while the receiver’s Zone 1
LED is flashing and the receiver will emit the beeping.
1) Zone LED of this sensor will flash.
2) Beeping according to the zone number [Operating mode is set to
“Alert”]. 1 beep for zone 1, 2 beeps for zone 2 and etc, until the
detection rod is retracted.
Erasing a sensor
You cannot erase a specific sensor. You must erase all sensors from
the receiver, then program the ones you would like to keep. To erase all
the sensors from the receiver:
1. Remove the adapter from the receiver.
2. Open the back cover, press and hold the learn button. Do not
release the learn button until step 4.
3. While holding onto the learn button, plug in the adapter to the
receiver.
4. You may release the learn button when the LEDs on the receiver
are on.
5. You have erased all sensors from the receiver.
2. PROGRAMMING (CONT)
Detection rod is
fully extended
When the detection rod is
fully retracted, the receiver
will not beep.
When the detection rod is
fully extened, the receiver
will beep and zone LED will
flash.
3. INSTALLATION
Unplug the power cord of your garage door opener
before installation to ensure power is not connected.
WARNING
Step 1 – Select a spot on your garage door to mount the sensor
Before you install the sensor onto the garage door, make sure the
garage door is closed. The sensor assembly should be mounted on one
of the vertical supports of your garage door near the bottom.
When the door is closed, the detection rod should be retracted. When
the door is open, the detection rod will be extended.
One of
Verti cal
Supports
Door closed
Door open
Note:
When the garage door is opening/closing,
make sure the sensor does not interfere with
the safety reversing sensor or safety beam
sensor supplied with your existing garage
door opener.
Step 2 – Mount the sensor onto your garage door
You can mount the sensor onto your garage
door with double-sided foam tape if the sur-
face of your garage door is smooth and clean
enough to provide a good adhesive surface,
such surface can usually be found on a metal
garage door. Please ensure the surface is
smooth and clean. Important: The bottom
of the sensor should be 1/2 inch above
the ground. (Refer to Diagram A)
For wooden garage doors, it is recommended
to mount the sensor with screws onto the
garage door with 3 x 18 screws provided.
4 Screws
Double-sided
foam tape
1/2 Inch
Note: Ensure you straighten up the antenna
on the receiver to receive the best possible
reception.
Diagram A
Récepteur
Household Alert
MD
Plug in the adapter to the receiver
Wireless Garage Door
Monitor
TM
Adapter
Garage Door
Monitor
TM
Sensor