
User's Manual

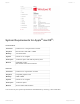

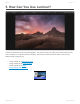
Table Of Contents
- Table of Contents
- 1. Welcome to Luminar 4
- 2. Benefits of Luminar 4
- 2.1. New & Improved features in Luminar 4
- 3. Installing & Activating Luminar
- 3.1. Installing & Activating Luminar for Windows
- 3.2. Installing & Activating Luminar for macOS
- 3.2.1. Installing Luminar from the Mac App Store
- 3.3. Upgrading from Luminar 3
- 4. Technical Requirements
- 5. How Can You Use Luminar?
- 5.1. Supported File Types
- 5.2. Using Luminar as a Single Image editor
- 5.3. Using Luminar with other software
- 5.3.1. Installing Plug-ins
- 5.3.2. Using Luminar with Adobe Photoshop
- 5.3.3. Using Luminar with Adobe Lightroom Classic
- 5.3.4. Using Luminar with Adobe Photoshop Elements
- 5.3.5. Using Luminar as a Photos for macOS Extension
- 5.3.6. Using Luminar with Apple Aperture
- 5.4. Using Luminar as an external editor
- 5.4.1. How to User Skylum’s Luminar 4 with Capture One
- 6. User Interface Overview
- 6.1. Library View
- 6.1.1. Library Toolbar
- 6.1.2. Library Sidebar
- 6.2. Edit View
- 6.2.1. Edit Toolbar
- 6.2.2. Edit Sidebar
- 6.2.2.1. Histogram
- 6.2.2.2. Current Photo Actions
- 6.2.2.3. History
- 6.2.3. Additional Tool Controls
- 6.3. Info View
- 6.4. Filter to Tool Migration
- 7. Opening Images for Editing
- 7.1. Editing a Single Image
- 7.2. Adding a Folder with Images
- 7.3. Importing from a Memory Card
- 8. Working with the Essential Tools
- 8.1. Light Tool
- 8.2. AI Enhance Tool
- 8.3. AI Structure Tool
- 8.4. Color Tool
- 8.5. Black & White Conversion Tool
- 8.6. Details Enhancer Tool
- 8.7. Denoise Tool
- 8.8. Landscape Enhancer Tool
- 8.9. Vignette Tool
- 9. Working with the Creative Tools
- 9.1. AI Sky Replacement Tool
- 9.1.1. AI Sky Replacement Guidelines
- 9.2. AI Augmented Sky Tool
- 9.3. Sunrays Tool
- 9.4. Dramatic Tool
- 9.5. Matte Look Tool
- 9.6. Mystical Tool
- 9.7. Color Styles (LUT) Tool
- 9.8. Texture Overlay Tool
- 9.9. Glow Tool
- 9.10. Film Grain Tool
- 9.11. Fog Tool
- 10. Working with the Portrait Tools
- 10.1. AI Skin Enhancer Tool
- 10.2. AI Portrait Enhancer Tool
- 10.3. High Key Tool
- 10.4. Orton Effect Tool
- 11. Working with the Professional Tools
- 11.1. Advanced Contrast Tool
- 11.2. Adjustable Gradient Tool
- 11.3. Dodge & Burn Tool
- 11.4. Color Enhancer Tool
- 11.5. Photo Filter Tool
- 11.6. Split Toning Tool
- 12. Working with Canvas Tools
- 12.1. Crop & Rotate Tool
- 12.2. Erase Tool
- 12.3. Clone & Stamp Tool
- 12.4. Lens & Geometry Tool
- 13. Luminar Looks
- 13.1. Working With Luminar Looks
- 13.2. Loading Additional Luminar Looks Collections
- 13.3. Customizing Luminar Looks
- 13.4. Adding a Custom Luminar Look Pack
- 14. Working with Layers
- 14.1. An Overview of Layers
- 14.2. Using an Adjustment Layer
- 14.3. Using an Image Layer
- 14.4. Creating a Stamped Layer
- 14.5. Transforming a Layer
- 14.6. Using Blending Modes with Layers
- 15. Masking Options in Luminar
- 15.1. Creating a Layer Mask
- 15.2. Creating a Tool Mask
- 15.3. Using a Brush Mask
- 15.4. Using a Radial Mask
- 15.5. Using a Gradient Mask
- 15.6. Using a Luminosity Mask
- 15.7. Additional Mask Controls
- 16. Rating Images
- 16.1. Understanding Rating Controls
- 16.2. Rating Images in the Library View
- 16.3. Rating Images in the Single View
- 16.4. Useful Keyboard Shortcuts When Rating Images
- 17. Organizing Images
- 17.1. Using Shortcuts to Find Your Photos
- 17.2. Using Folders to Organize Images
- 17.3. Moving Images Between Folders
- 17.4. Reconnecting Missing Folders and Images
- 17.5. Deleting Files from Folders
- 17.6. Using Albums to Organize Images
- 17.7. Moving Images from the Single Image Edits Collection to an Album
- 18. Navigating & Managing Your Library
- 18.1. Filtering the View of Your Images
- 18.2. Handling Raw + JPEG Pairs
- 18.3. Sorting Images
- 18.4. Syncing Adjustments
- 18.5. Revealing Original Images
- 18.6. Working with the Trash folder
- 18.7. Reconnecting Lost Edits
- 19. Working with Catalogs
- 19.1. What is a Catalog?
- 19.2. Working with Multiple Catalogs
- 19.3. Backing Up a Catalog
- 19.4. Backing Up Your Photo Edits
- 20. Saving & Exporting Files
- 20.1. Saving Adjustments in a Catalog
- 20.2. Exporting an Image
- 20.2.1. Saving an Image File
- 20.2.2. Supported File Formats
- 20.3. Sharing an Image
- 20.3.1. Sharing an Image to 500px
- 20.4. Batch Processing Photos
- 21. Keyboard Shortcut Keys
- 21.1. macOS Keyboard Shortcuts
- 21.2. Windows Keyboard Shortcuts
- 22. Keeping Luminar Up To Date

4. Technical Requirements
System Requirements for Microsoft
®
Windows
®
:
recommended:
Processor
Intel® Core™ i7 7th generation or better,
AMD Ryzen™ 7 2nd generation or better
Graphics Discrete GPU with 4GB+ of RAM
Memory 16+ GB of RAM
System
Windows 7® (only 64-bit OS), Windows 8.1® (only
64-bit OS), Windows 10® (only 64-bit OS)
Disk space 10 GB free space with SSD as primary drive
Monitor
Calibrated monitor
with at least 1920×1200 resolution
minimum:
Processor Intel® Core™ i5 generation or better
Graphics Open GL 3.3 or later compatible
Memory 8 GB of RAM
System
Windows 7® (only 64-bit OS), Windows 8.1® (only
64-bit OS), Windows 10® (only 64-bit OS)
Disk space 10 GB free space
Monitor At least 1280×768 resolution
You can check your system specifications by opening Settings and clicking About.
Skylum Luminar - 4
©2020 Skylum Page 25 of 309