Operational Panel BND /END PS ISR/SEN NAVI/AV IR 1
Changes or modifications to this unit not expressly approved by the party responsible for compliance could void the user’s authority to operate the equipment. NOTE: This equipment has been tested and found to comply with the limits for a Class B digital device, pursuant to Part 15 of the FCC Rules. These limits are designed to provide reasonable protection against harmful interference in a residential installation.
the following measures: Reorient or relocate the receiving antenna. Increase the separation between the equipment and receiver. Connect the equipment into an outlet on a circuit different from that to which the receiver is connected. Consult the dealer or an experienced radio/TV technician for help. This equipment complies with FCC/IC RF radiation exposure limits set forth for an uncontrolled environment.
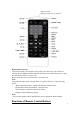
stored in memory are cleared. [AUX1 JACK] •AUX 1 Connector. [ ], [ ] Buttons • Press to search previous or next station or channel in Tuner, SiriusXM modes. • Press to search previous or next track or chapter in CD, MP3/WMA, iPod and DVD video modes. • Press and hold to fast forward or fast backward by 2x, 4x, 8x, 16x step in CD, MP3/WMA and DVD video modes. • Press and hold to fast forward or fast backward in iPod mode.
[ISR/SEND] Button ISR Function: When in tuner mode, press and hold this button for 3 seconds to save current station and band to ISR memory, and at the same time, the tuner will enter ISR mode with current station. Note: In ISR mode, the tuning operation is disabled. Press this button again to quit ISR mode. When in the other mode but not tuner mode, press this key will go to ISR memory station directly, it likes a shortcut. Press this key again to go back to previous mode.
Replacing the batteries 1. Press the retention tab and pull out the battery tray and remove the old battery. 2. Insert the new CR2025 battery and slide the battery tray back in the remote control the same direction that you removed it. Please ensure the tray is inserted in the correct direction. Note: Using batteries improperly can cause them to explode. Take note of the following points: • When replacing batteries, replace both batteries with new ones. • Do not short-circuit, disassemble or heat batteries.
[ / ] Button • Press this button to play or pause video and audio media. • Press this button more than 1 second to stop video and audio media. •Press to MUTE in Tuner mode. [MUTE] Button Mute or unmute the speaker. •The symbol on upper right area of the screen indicates that speaker is muted. [POWER/SRC] Button • Press this button to move the focus to next available source item on main menu. • Press this button to power on when the unit is power off.
[ROOT] Button Press to go to the root menu on the DVD. [RPT] Button • Press to perform repeat chapter / repeat title / repeat off while playing DVD mode. • Press to perform track repeat/repeat All while playing CD. • Press to perform repeat track /repeat folder/ repeat All while playing MP3/WMA, or video files on disc. • Press to perform repeat track /repeat folder while playing MP3/WMA, or video files in USB memory. • Press to perform repeat one /repeat all/ repeat off in iPod mode.
• Press to display Audio menu in iPod mode. [OPEN] Button Press this button to OPEN or CLOSE the TFT panel. Please ensure there are no obstructions before starting the operation.
18 19 22 20 23 21 1- Tuner---Press the button to display the Tuner mode. 2- Disc Audio---Press the button to display the Disc Audio mode. 3- SiriusXM---Press the button to display the SiriusXM mode. 4- Pandora--- Press the button to display the Pandora mode. 5- USB Audio---Press the button to display the USB Audio mode. 6- iPod Audio---Press the button to display the iPod Audio mode. 7- Rear Button---Press the button to display the rear menu.
1. Press any quadrate icon on Main Men more than 2 seconds, the icon will float on Main Menu. 2. Scrolling the floating icon to any position you want. DVD Video Player Operations Change DVD System Settings Note: If the setup operation is performed in the middle of DVD video play, the disc will restart from the beginning. Selecting DVD Setup Menu 1. Press the [Setting] button on the Main Menu to access the Video setup menu. 2. Press [Video] button. The video menu is displayed.
Input a new password and touch the [OK] key. Input the same new password again, and touch the [OK] key. Note: When a disc with view restrictions is inserted, you will be prompted to input this password. The disc will not be viewable until the correct password is entered. Set rating for parental level control 1. Select Others screen while in Setting mode. 2. Press [Parental Control] button. 3. Enter right password. 4. Press the desired rating for level control. Use this table to set the parental level.
Note: • Never insert foreign objects into the disc insertion slot. • If the disc is not inserted easily, there may be another disc in the mechanism or the unit may require service. • 8cm (single play) discs cannot be used. 2. Disc starts playing automatically. Ejecting a disc 1. To eject a disc press eject [ ] button. The play mode then switches to the Tuner mode. If the disc is left in the ejected position for 15 seconds, the disc is automatically reloaded.
12 13 14 15 16 17 1 - Next page Buttons 2 - Previous Track /Fast Backward Button 3 - Play/Pause Button 4 - Next Track/Fast Forward Button 5- Elapsed playing time 6- Seek bar 7- Total time 8- Menu Button 9- System time 10- Bluetooth status 11- DVD playback info 12- Previous page Button 13- Repeat switching Button 14- Audio Channel switching Button 15- Subtitle switching Button 16- INFO Button 17- Direct chapter or title searching Button Operate the DVD Player menu You can select the button items displ
Chapters are skipped down or up from current locations, as many times as the button is pressed, and playback starts. Skip use seek bar Press the triangle [ ] on seek bar and drag it to any position where you want to start playback. Fast Forward/Fast Backward Press [ ] or [ ] button and hold 2 seconds to start fast backward or fast forward during playback. The playback speed starts at 2x, then will increase to 4x, 8x, and 16x. Release the button will continue playing with normal speed.
• Title A large segment to divide the data area of the disc. • Chapter A small segment to divide the data area of the disc. 2. Input the number of the title/chapter that you want to play with the [0] to [9] key. 3. Touch the [ ] button. Playback starts from the scene of the input title number or chapter number. NOTE: *If the input title/chapter number does not exist or searching with a title/chapter number is not allowed, the screen image will not change. 4. Touch [ ] button to close the key pad.
*Depending on the disc, items may not be selected with the directional buttons. 4. Touch [ ] button to fix on the selected item. 5. Touch [ ] button. Switching Audio On discs in which two or more audios or audio languages have been recorded, you can switch among the audio languages during playback. 1. Showing the DVD Video menu, touch [ ] button during playback. • Each time you touch the button, you can switch among audio languages. • It may take time to switch among audios.
Play disc video files This system can play video files (AVI/MP4, etc) stored on disc. Showing video files Player mode screen 1. After disc with video files is loaded, touch [Disc Video] button on Main Menu to show video files player mode screen. 2. Touch the screen of the playing video file to display Video files player menu,touch the screen again to return the playback screen. The display will return to the playback screen, if you do not touch the screen for 10 seconds.
1 - Next page Button 2 - Previous Track /Fast Backward Button 3 - Play/Pause Button 4 - Next Track/Fast Forward Button 5- Elapsed playing time /Seek bar 6- List Button 7- System time 8- Bluetooth status 9- Playback info 10- Previous Row Buttons 11- Repeat Button 12- Audio Button 13- Subtitle Button Operate the Video files Player menu You can select the button items displayed in the Video files player menu by directly touching it. Play/Pause Playback 1. Touch [ ] button to pause during playback. 2.
Note: *No audio is reproduced during fast forward and fast backward operation. *The fast forward and fast backward speed may differ depending on the disc. Stop Playback 1. Press the [ ] button on remote control more than1 second. Playback is stopped. ] button. 2. To resume playback, press the [ Playback resumes from current playing time. Repeat Playback This operation plays back video files recorded on the disc repeatedly. * The repeat set as the factory default is Repeat all. 1.
DVD Audio Player Operations. DVD Audio Player Operations Listening to a disc/Ejecting a disc Please refer to Disc Video Player Operations -watching to a disc and Ejecting a disc. Showing CD Player mode screen 1. After disc is loaded, the play mode is automatically engaged. 2. If disc have been loaded you can touch Disc Audio button on main menu to display CD player mode screen.
1 -Open option menu Button 2- Elapsed playing time indicator 3- Rotation effect 4- Audio files or CD tracks.
• Pressing [ ] button starts playback from the beginning of the next track. •Pressing [ ] button starts playback from the beginning of the current track. When this button is pressed again within 2 seconds, playback starts from the beginning of previous track. Fast Forward /Fast Backward 1. Press [ ] or [ ] button and hold more than 2 seconds to start fast backward or fast forward during playback. The playback speed starts at 2x, then will increase to 4x, 8x, and 1 6x .
• It will play from next track, and each track will display for 10 seconds. • The [Scan ] button will switch to [Scan 3. Touch [Scan ] button. ] button. • It will continue playback from current track. • [Scan ] button will switch to [Scan ] button. *The function will scan all tracks orderly in current folder. After Scan stopped playback will continue. Searching with the Track Number This operation allows searching using the track numbers recorded on the CDs. ] Button to show [ 1. Touch [ 2.
1. Touch [ ] Button to show [Rotation effect] button 2. Press button [ ] will turn on the Rotation effect. 3. Press button [ ] will turn off the Rotation effect. Listening To MP3/WMA This unit is an ID3 Tag compatible model. This unit supports the ID3 TAGs of the Version 2.4, 2.3, 1.1 and 1.0. In displaying, this unit gives priority to the Version 2.3 and 2.4 TAGs. Note: • Some CDs recorded on CD-R/RW mode may not be usable.
• Electronic Shock Protection 10 seconds for CD-DA (CDA) 45 seconds for MP3 recorded at 44.1 kHz, 128 kbps 90 seconds for WMA recorded at 44.1 kHz, 128 kbps • Folder structure 1. A disc with a folder having more than 8 hierarchical levels will conflict with the ISO9660 and playback will be impossible. • Number of files or folders 1. The maximum allowable number of folders is 255 (including root directory); the maximum allowable number of files is 512 (max. 255 per folder).
The player will only recognize three folder levels and does not display folders containing other folders. In the example above, the unit will display folders 2, 3, 5 and 7, but 1 and 6 since they do not contain others. Playback MP3/WMA menu 2 1 3 1. Repeat Playback While playing MP3/WMA touch button can switch between Repeat Folder, Repeat All and Repeat Track.
2. Folder Touch the folder title on the display list, the file list will display files and folders in selected folder. 3. Current Folder • Showing title of current folder. • The number on the folder symbol is the number of files and folders number in current folder. • Touch the title of current folder, play list will show files and folders in upper folder. Stop Playback 1. Press the [ ] button on remote control more than 1second. Playback is stopped. 2. To resume playback, press the [ ] button.
For WMA files: 32, 48, 64, 80, 96, 128, 160, or 192 kbps • Add the following file extension using single byte characters: For MP3 files: ".MP3" or ".mp3" For WMA files: ".WMA" or ".Wma" • Notes on the folder structure • The folder hierarchy must be within 8 hierarchical levels. Otherwise, playback may be impossible. • The maximum allowable number of folders is 65535 (including root directory and folders with no MP3/WMA file). • The maximum allowable number of files in a folder is 65535.
9 15 10 8 11 7 12 6 13 4 2 14 1 3 5 17 16 18 1 -Open option menu Button 2- Play/Pause Button 3- Repeat Button 4- Random Button 5- Next Track/Fast Forward Button 6- MP3/WMA files in list 7- Folders in list 8- System time 9- Bluetooth status 10- Playback status info 11-Album Art 30
12- Current ID3 info area 13- Elapsed playing time indicator/Seek bar 14- Previous Track /Fast Backward Button 15- Folders browse control 16- Scan Button 17- Direct Button 18 - Close option menu Button Playing MP3/WMA files in USB memory Play/Pause Playback 1. Touch [ 2. Touch [ ] button to pause during playback. ] button again to resume playback. Switch to Previous/next file Press [ ] or [ ] button during playback to play previous /next file.
Random Playback 1. Touch [ ] button to random the tracks in playing folder during playback. 2. Touch this button again to turn off the feature. Album Art work If current audio file contains album art image in ID3, the picture will be displayed in this area. ID3 info area This area display ID3 info of playing file: song title, artist information, album information, number of current file/total number in current folder, elapsed playing time/total time of current file.
1. Touch [ ] Button to show [Scan ] button. 2. Touch [Scan ] button during playback. • It will play from next track, and each track will display for 10s. • The [Scan ] button will switch to [Scan 4. Touch [Scan ] button. ] button. • It will continue playback from current track. • [Scan ] button will switch to [Scan ] button. *The function will scan all tracks orderly in current folder. After Scan stopped playback will continue.
USB Video Operations This system can play USB video files (MP4, 3GPetc) stored in an USB memory which is recognized as "USB Mass Storage Class device" You can use your USB memory as an audio device by simply copying desired audio files into it. Note: • This system will not operate or may operate improperly with some USB memory. • Files protected with any DRM cannot be played. Notes on using USB memories • General notes • When no support files, the file list display nothing.
* The display will return to the playback screen, if you do not touch the screen for 10 seconds. 1 2 7 8 9 3 4 5 6 1-Previous Track Button 2- Play/Pause Button 3- Next Track Button 4-Elapsed playing time indicator/Seek bar 5-Menu Button (Go to list menu mode) 6- Repeat Button 7- System time 8- Bluetooth status 9- Playback info Play/Pause Playback 2. Touch [ ] button to Pause playback. 3. Touch [ ] button to resume playback.
• Pressing [ ] button starts playback from the beginning of the next track. • Pressing [ ] button starts playback from the beginning of the current track; when this button is pressed again within about 5 seconds, playback starts from the beginning of previous track. Repeat Playback * The repeat set as the factory default is Repeat Folder. Touch the [ ] button once for Repeat Track, again for Repeat Folder. Note: The repeat in all USB files function is not available.
16 17 18 1 -Open option menu button 2- Play/Pause Button 3- Repeat Button 4- Random Button 5- Next Track/Fast Forward Button 6- Video files in list 7- Folders in list 8- System time 9- Bluetooth status 10- Playback status info 11- Album Art 12- Current file info area 13- Elapsed playing time indicator/Seek bar 14- Previous Track /Fast Backward Button 15- Folders area 37
16- Direct Button 17- Scan Button 18 - Close option menu button Play/Pause Playback *On USB Video menu screen, playback status is pause. ] button to resume playback. The screen will go to video screen Touch [ automatically. Switch to Previous/next file Press [ ] or [ ] button during playback to play previous /next file. • Pressing [ ] button starts playback from the beginning of the next track.
This operation is same as this in USB Audio mode. Selecting a track on the display List This operation is same as this in USB Audio mode. Folders area This operation is same as this in USB Audio mode. Scanning the Tracks This operation is same as this in USB Audio mode. Searching with the Track Number This operation is same as this in USB Audio mode. iPod/iPhone Options iPod/iPhone can be connected by the special connector cable (CCA-748) separately sold.
The playback starts after a while, from where the iPod/iPhone has been paused. When iPod/iPhone is already connected. Touch the [iPod Audio] key on the Main Menu screen. The system changes to the iPod Audio mode, and starts playback from the previous position. Press Menu button on Operational Panel to return to the Main Menu. Controlling the iPod/iPhone •iPod audio mode screen 11 13 10 12 9 14 15 4 1 1- [ 5 2 6 3 7 8 ]Settings Button Displays the Options screen.
2- [ ]Repeat Button Use to repeat the selected track. Press once to start a Repeat one. Press again to activate a repeat all. To turn repeat off, press same button again. Repeat symbols are displayed in the info window in the upper left area of the screen. [ ]: All repeat. ]:1-Track repeat. [ [ ]: Repeat off. ]Shuffle Button 3- [ Use to switch the shuffle mode on or off. When enabled, this function performs playback of tracks in random order, regardless of the order in which they are recorded.
12- MUTE Status 13- Playback Status 14- Art Work 15- Progress bar •iPod audio settings mode screen 16 17 16- Simple Control: ]. The screen will become to Simple Control If the Simple Control is set to [ Mode. It can also display the iPod/iPhone’s video regardless it is iPod Audio or iPod Video mode. But only “Previous Track”、“Play/Pause” and “Next Track” can be operated.
19 20 21 22 23 24 18- Display iPod/iPhone’s video. Follow operation steps to display iPod/iPhone’s video in Simple Control Mode. Connect the iPod to head unit. Select iPod Audio mode. Press the [ ] button on iPod audio mode screen to display Settings page. Set the Simple Control to “On”. Press button. Set iPod Video settings TV Out to “ON” in iPod. Now play video from iPod iPod’s video will display on the screen.
(3). Touch the desired track name on the list to play it. •iPod audio List mode screen 25 26 27 25- Return to the Previous Level Folder [ ] If the list is in root, press the button can close the list. 26- [ ]Closed the List 27- Search with the first alphabet in current list. Selecting the iPod Video mode Connect your iPod/iPhone to the USB connector via CCA-748 cable. The system will automatically detect the connected device and the iPod Video button will be enabled for operation on the Main Menu screen.
Video mode, and starts playback from the previous position. Press Menu button on Operational Panel to return to the Main Menu. • Viewing video data in the iPod/iPhone (only for the iPod/iPhone with video features) When you connect an iPod/iPhone with video features by using the optional connector cable for iPod/iPhone with video, you can enjoy the video data and slide show data stored in the iPod/iPhone and show them on the display of this unit (and the rear monitor if connected).
•iPod Video Simple Control Mode Screen • iPod Video play mode screen.
1- iPod Video Title. 2- Elapsed playing time. 3- [ ]Menu: Press the Menu button can display the iPod Video mode screen. 4- [ ]Repeat Button: Use to repeat the selected track. Press once to start a single Repeat one. Press again to activate a Repeat all. To turn Repeat off, press same button again. Repeat symbols are displayed in the info window in the upper left area of the screen. In iPod Video mode screen, there are three repeat icons: [ ]: Repeat All. [ ]: Repeat one. [ ]: Repeat off.
8 9 1 10 11 12 2 13 3 4 5 6 7 1- Art Work 2- Progress bar 3- [ ]Settings Button 4- [ ]Thumbs-down Press this button Thumbs-down current track and play next track. 5- [ ]Next track Button 6- [ ]Play/Pause Button Use to control playback and pause. (1). Touch the key during playback. Playback pauses. (2). To resume playback touch the key again. 7- [ ]Thumbs-up 8- System time 9- [ ]Button Press this button to show List Screen 10- Current station name 11- Current title.
•Skipping a track (Pandora mode) Press [ ] button during playback, tracks are skipped and starts playback from the beginning of the next track. Note: • Some track are not able to be skipped. • If skip limit has been reached(Skip 6 tracks in 1H),this fuction will not available. •Track rating Press [ ] or [ ] button to thumbs-down or Thumbs-up current track, and the button will light. Note: •Press [ ] button will skip to next track (skip limit has not been reached).
2- [ ]button Press this button to sort the list by first letter,press again to sort the list by date. 3- Station list,touch to select station play. When the desired station is not displayed, press and flick the station list up or down. • Add New Station 1.Press [ ] button on Pandora mode ID 3 Information Screen to enter Pandora mode Setting screen. 3.
Selecting the Bluetooth Audio mode 1. Touch the [Bluetooth Audio] key to select the Bluetooth Audio mode. The system changes to the Bluetooth mode. If the connection with a Bluetooth audio player has been already established, you may select the Music function. 2. Press Menu button on Operational Panel to return to the Main Menu. • When the connection with a Bluetooth audio player has been established, the [ ] icon is displayed at the top of the screen.
If you want to change the Pin Code setting of this unit, perform the following steps. • The factory default setting is “1234”. 3. Touch the text box of the Pin Code item to display the Ten-Key Pad screen. 4. Enter your desired 4-digit PIN number, and then touch the [ ] button. Note: MIC Gain is disabled in Bluetooth Audio mode settings. Registering your Bluetooth audio player (Pairing) You can register up to 3 Bluetooth audio players. 1.
4. Touch your desired Device and press [ ] button to register for the Bluetooth audio player. 5. If entering the Pass Key code is prompted on your Bluetooth audio player, enter the Pass Key code set to this unit. • You can add the favorite icon to the connected device. There are 10 favorite icons for selection.
To change the current Bluetooth audio player to the other device which is already registered, perform the following operation. 1. Touch the Device key to [ ] display the Device Select screen. 2. Touch the currently connected device, then press the [ ] button to disconnect the active device. ] button to select it as 3. Touch the desired Device key you wish to use. Press [ your active device. The corresponding cellular phone is set as current telephone. 4.
hear for the other party in accordance with the communication condition or the used telephone, please use the optional microphone (RCB-199), and set the Microphone Select setting to “External”. The sound will be improved, but noises may still be heard depending on the communication condition. Select the BT Phone mode 1. Touch the [Bluetooth Telephone] key to select the Bluetooth Telephone mode. The Telephone screen is displayed. 2. Press Menu button on Operational Panel to return to the Main Menu.
You can confirm various information concerning about the Bluetooth Interface features. 1. Touch the [ ] button to display the information on the screen. 2. Perform setting for the desired item. See the following sections for detail. 3. When you finish confirming the Bluetooth information, touch the [ ] button to return to the previous screen. If you want to change the Pass Key setting of this unit, perform the following steps. 1. Touch the text box of the Pass Key item to display the Ten-Key Pad screen.
level. Note: • The input level of the microphone can be affected by its surroundings. Adjust the level if the person on the other end of the telephone has a reception problem. Register your cellular phone (Pairing) You can register up to 3 cellular phones. The registering method is as same as “Registering your Bluetooth audio player” 1. Turn on the power of the cellular phone you wish to register. 2. Touch the Device key [ 3. Touch the [ ] to display the Device Select screen.
4. Touch your desired Cellular key to select the key for the cellular phone to be registered, and press [ ] button to register for the Bluetooth audio player. • You cannot select the Cellular key of which another cellular phone is already registered. Select a blank Cellular key. 5. If entering the Pass Key code is prompted on your cellular phone, enter the Pass Key code set in this unit. • You can change the Pass key setting of this unit from the BT Info screen under the Telephone Settings screen.
When the pairing operation completes, the registered cellular phone is set as the current telephone, and the display returns to the Telephone screen. • To delete the cellular phone registration 1. Touch the [ ] key to delete the device. A confirmation screen is displayed. 2. Touch the [ ] key to confirm delete. Select the cellular phone To change the current cellular phone to the other device which is already registered, perform the following operation. 1.
3. Touch the [ ] (Send) key to call the entered number. • The following Telephone Interrupt screen is displayed during phone call. • Touch the [ ] key to talk by using the cellular phone and canceling the hands-free function (Private Mode). To return to the hands-free mode, touch the [ key again. ] •Touch the [ ] key to mute the microphone.Now you can hear the other side, but the other side cannot hear your side.
4. When the call is finished, touch [ ] key to hang up. Note: • Depending on some special cellular phone, the Telephone Interrupt screen may be closed and the connection with this system may be disconnected when entering the Private mode. Making a call using the Phone Book You can use the Phone Book data obtained from the cellular phone to make a call from this unit. Note: • Before using this function, the Phone Book data must be sent from the cellular phone.
• When the call is finished, touch the [ ] key to hang up. Answering to an incoming call When a call comes in, the following Telephone Interrupt screen appears. You can answer to the incoming call on this system by the following operation. ] key to answer the call. 1. Touch the [ 2. When the call is finished, touch the [ ] key to hang up. Radio Operations Listening to the Radio 1. Touch the [Tuner] button on the Main menu display. The tuner mode screen is displayed. 2.
1. Preset Scan Button 2. Direct Button 3. Preset List Button 4. Frequencies Display 5. Tune Up 6. Tune Down 7. Band Display 8. LOC/DX Display 9. Bluetooth Display 10. Time Display Seek Tuning 1. Press the [FM1/2/3/AM] button to select the radio band (FM or AM). 2. Touch the [ ] key, and then flick the BIG Frequency up and down to search for next available station. • When flick the frequency up, the station is searched in the direction of higher frequency.
Auto Store The Auto Store is a function for storing up to 6 stations that are automatically searched in sequentially. If the number of receivable stations cannot reach to 6, the previous stored station remains. 1. Touch the [FM1/2/3/AM] key to select the desired band. (FM or AM) 2. Press the [ ] key, and then press the [ ] key to start the Auto Store. A beep sounds and the stations with good reception are stored automatically to the preset list.
HD Radio™ Receiver Operations This function is available when an HD Radio tuner is connected. This unit can control the following HD Radio tuner: • HD Radio Module (THD400) Note: • Be sure to turn off the ACC power before connecting/disconnecting the HD Radio tuner. • Not all areas offer HD Radio broadcasts • HD Radio stations may not always broadcast sub channels • Volume levels of HD Radio stations may vary. Increase the volume gradually from the minimal setting after the channel is selected.
123456789- Preset Scan Button Direct Button Preset List Button Setting Button Tune Up Tune Down Band Display Bluetooth Status Display Time Display Seek Tuning 1. Press the [FM1/2/3/AM] button to select the radio band (FM or AM). 2. Touch the [ ] key, and then flick the BIG Frequency up and down to search for next available station. • When flick the frequency up, the station is searched in the direction of higher frequency.
searched in sequentially. If the number of receivable stations cannot reach to 6, the previous stored station remains. 1. Touch the [FM1/2/3/AM] key to select the desired band. (FM or AM) 2. Press the [ ] key, and then press the [ ] key to start the Auto Store. A beep sounds and the stations with good reception are stored automatically to the preset list. HD Radio Sub channel Function If the [ ] key is enabled, please touch the [ ] key to tune to next available sub channel.
Selecting a Satellite Radio mode Press the [SiriusXM] button on Main Menu display. The system changes to the SiriusXM Satellite Radio mode. The SiriusXM mode screen is displayed.
Channel Selection 1. Touch the [ ] button on the SiriusXM Menu display to enter channel list preview mode. You can select any channels in list directly. 2. Select the channel with[ ][ ]. Only channels that can be received are selected. Channels that are locked and channels not covered by the contract will be skipped. The receiver seeks the next available channel below or above the current channel. Channel Selection with the channel number 1.
2. Touch the [ ] button to save the current channel to the first empty place in presets list. Deleting a Preset If current channel is already in presets list, the [ key, press [ ] key will become to [ ] ] key to remove current channel from presets list. Receiving Stations by Category Satellite Radio allows you to select broadcast channel category (contents). 1. Touch [ ] button to enter category mode. 2. Press and flick the category list up or down. 3.
1. Touch [ ] button to enter setting page. 2. Touch [ ] button in password item to set a new pass code following the screen indicator. If you enter a wrong number, you can cancel it by touching the [ ] key. Note: You must input the correct code to enter lock list. When you try to tune to a locked channel by direct tune keypad, it will display password keypad. Only entering correct code can tune to that channel, otherwise it will go back to the previous channel. The default pass code is 0000.
1 2 3 6 4 5 1- Playback Status 2- Fast Backward Button 3- Play/Pause Button 4- Fast Forward Button 5- Back to list interface 6- Show broadcast schedule and time display AUX1/AUX2 Operations External peripheral devices, including a game console, camcorder, navigation unit, iPod/iPhone, etc. can be connected to the AUX 1 or AUX 2 connector on the front or back of this unit using the A/V media cables.
Camera Operations Switching to Camera mode Press [Camera] button on Main Menu to select desired mode. The LCD will display the external camera video. The screen will display "No Video Signal" menu, if a valid camera is not connect to this head unit. Press Menu button on Operational Panel to return to the Main Menu.
Note: If the reverse cable is connected correctly to the car, the head unit to go to camera mode automatically when the car is in reverses. Rear Source Operations If a monitor is installed in the rear zone and connected to the rear zone AV output, passengers in the back seat can control the DVD output using the rear zone remote control. See “Multi-Zone Remote Control” for instructions. Rear Source includes Disc Video, AUX1, AUX2 and iPod Video.
2 1 1- Press the button to access the front source. 2- Press the button to close the rear source. Multi-Zone Operation Independent sources can be played simultaneously on the unit. For example, a FM/AM console can be playback on the front screen while DVD video is available to rear passengers. But now can’t select DVD video in front. Access Rear-Zone ] on Main Menu to access the Rear Source. 1. Touch the Rear button [ 2. Use the Multi-Zone Remote Control to access the Rear-Zone and select a source to play.
7 1 2 3 8 4 9 5 6 10 11 12 ]: Next Row Buttons 1- [ Press the button can display the hidden button. 2- [ ]: Previous video. 3- [ ]: Play or Pause video. 4- [ ]: Next video. 5- Elapsed playing time indicator.
7- [ ]:Front/Rear switching button If the screen displays Rear Source, press [ If the screen displays Front Source, Press [ 8-[ ] to switch to Front Source. ] to switch to Rear Source. ]: Audio Channel switching Button. Use to repeat the Title or Chapter. Press once to start Repeat Chapter. Press again to activate Repeat Title. To turn Repeat off, press same button again. Repeat symbols are displayed in the info window in the upper left area of the screen.
NOTE: More detail please refer to DVD Video Front source.
iPod Video in Rear iPod Video Rear Source Control Play Mode 2- [ ]: Previous video. ]: Play or Pause video. 3- [ 4- [ ]: Next video. 5- Elapsed playing time indicator. 5-[ ] Menu: Press the Menu button can display the iPod Video Rear Source mode screen. 6-[ ] Repeat Button (Same as iPod function of front source ) 7 -[ ]/[ ]:Front/Rear button If the screen displays Rear Source, press [ ] to switch to Front Source. If the screen displays Front Source, Press [ ] to switch to Rear Source.
NOTE: 4. If the source is selected as the front, the source in rear can’t be selected. 5. If the source is selected as the rear, the source in front can’t be selected. to access the front main menu but the rear source 6. Press the Front Button will keep running. Setting Operation Press [ ] button on the Main menu screen. The Setting menu screen will be displayed.
Clock: Set system clock. AM/PM: Set AM or PM when current time mode is 12HR mode. 24-Hour Format: Set the time display mode. Beep: Turn on or turn off the beep confirmation sound. Bluetooth: Set the Bluetooth ON or OFF. Wallpaper: Choose the desired wallpaper.
Input Aux Sense: Auxin input switch, including Low, Mid, High. Dimmer Mode: Select screen dimmer mode. There are three options, Day, Night and Auto. Tel Speaker: There are two options, Left and Right. For example, if current setting is Left, when BT phone is coming in, only left speaker can hear the phone. PANDORA: Set PANDORA On or Off. TFT Auto Open: There are two options, On and Off. If current setting is On, the TFT screen will slide out automatically when the system is power on.
DVD Wide Screen Mode: Set the DVD wide screen mode on or off. Brightness: Set brightness value from 0 to 20. Audio Setup Menu This menu includes: Balance, Fader, Select EQ, Sub Woofer Ctrl, Sub Woofer Phase, High Pass Filter, low Pass Filter, Amp Cancel and Magna Bass EX. Balance: Choose the desired volume for left and right speaker. Fader: Choose the desired volume for front and rear speaker. Select EQ: Choose the desired mode: Bass Boost, Impact, Excite, Custom and OFF.
This menu includes: GPS Time, Navi Interrupt, and Voice Guidance GPS Time: Set the system time to be synchronized with GPS local time or not. Navi Interrupt: There are three choose: On/Popup/Off. “On”: The navigation screen will cover to AV screen when reaching some key point. “Popup”: When small turn info window will pop up in the top of the AV screen to indicate the key point. “Off”: Turn off this function. Voice Guidance: Enable or disable the navigation voice guidance.
Set password: Set the password for DVD parental control. Parental control: Set the rating of the age. It contains Kid Safe/ G/ PG/ PG- 13/PG-R / R / NC- 17 / Adult. Audio Language: Set the Language for DVD Audio. Subtitle Language: Set the Language for DVD subtitle. System Language: Set the Language for system screen. Blinking LED: Select the blinking LED On/Off. Screen Calibrate: The function of it is to select the TS Calibrate YES or NO.
When the Anti-theft is “On”, you need enter correct Anti-theft code to turn the unit on. If you enter wrong code three times, the unit is locked, and must be unlocked by the professionals. 2. If your unit is secured, hold the [ ] more than 2 seconds, then the Anti-Theft setting mode will display. The numerical keypad is displayed; enter the right code to unlock.