
Operation Manual

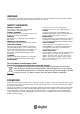


NAME OF MICROPHONE
1. Grill
2. Low Battery led Indicator
3. ON/STB/OFF/SWITCH
4. Body-phone
5. Battery cover
USING GUIDE INSTRUCTION
OPERATION
Put the receiver near the audio adjustor, connect with power and the signal protected cord with A.OUT,
B.OUT or MIX.OUT. And then connect with the amplifier or the microphone of the audio adjustor (MIC IN).
Draw out two antennas completely. Put on the power switch, The power indicator shines. This receiver is
being standing by. (Don't put the receiver in a corner in order to work in a good condition)
Unscrew the cover of battery case, install the battery correctly, then light it up. (There are labels on battery
and battery case, don't install the battery oppositely)
Put the switch to ON position. The signal lamp will shine at that time. the signal on the receiver available to
the signal channel on. It means that the signal is available for the receiver from the microphone. Adjust the
signal volume switch and the volume switch on the amplifier, keep this system a bit of volume. Speak to the
microphone and output the signals.
If the signal on the microphone is off or dusky, the battery is being low voltage. means that it needs to
replace a new battery.
Notice
When the power pressure is lower than 7V, il may cause the instability of signal, the shorter effective distance
and the timbre maybe not as good as normal, so please change new battery to avoid these.