
Operation Manual


4. DESCRIPTION
4.1 Features
Compact DMX-controller with Joystick
192 control channel for 12 projectors with up to 16 channels • 16 bit resolution for fine Pan/Tilt movements •
6 chaser with up to 240 scenes can be programmed • 8 Preset Scenes • Copy-function for the scenes,
programs and records • Blackout-function • Sound control via built-in microphone or Audio input socket • 19"
mounting dimensions with 3 units
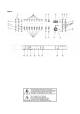
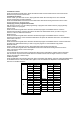
4.2 Overview
Overview on the control elements
1) PROJECTOR SELECT BUTTONS
With the Projector select buttons you can choose the desired projector.
2) Fogger
To activate the fog machine.
3) PAGE-BUTTON
In the manual mode, you can switch the channel faders from CH 1-8 to CH 9-16 by pressing the Pagebutton.
4) MIDI/REC-BUTTON
5) PROGRAM-BUTTON
6) SCENE-BUTTONS
7) CHANNEL FADERS
For adjusting the different DMX-values. The channels 1-8 can be adjusted directly after pressing the
respective projector select button. The channels 9-16 can be adjusted after pressing the Page-button.
8) AUTO/DEL-BUTTON
9) MUSIC/BANKCOPY-BUTTON
If this LED is on, the controller is in Audio-mode (operation with sound-control).
10) SPEED-FADER
11) FADE TIME-FADER
12) DISPLAY
13) JOYSTICK
14) OVERRIDE-BUTTON
15) BANK UP-BUTTON
16) BANK DOWN-BUTTON
17) TAPSYNC DISPLAY-BUTTON
18) BLACKOUT-BUTTON
The Blackout-function closes the light output of all connected projectors via the shutter.
19) CHASE-BUTTONS
20) MODE-BUTTON
21) FINE-BUTTON
Rear panel:
22) Audio input socket
23) MIDI input socket
24) DMX POLARITY selector
25) DMX output socket
26) DMX input socket
27) Power supply socket
28) Power switch
29) Fog machine input
30)
5. SETUP
5.1 Installation
Install the device on a plane surface or install it in rack.
Rack-installation: This device is built for 19" racks (483 mm). The rack you use should be a Double-Door-
Rack where you can open the frontpanel and the rear panel. The rack should be provided with a cooling fan.
When mounting the controller into the rack, please make sure that there is enough space around the device
so that the heated air can be passed on. Steady overheating will damage your device.
You can fix the controller with four screws M6 in the rack.
Connect the connection cable of the power-unit with the DC IN-socket. Plug the power unit into your outlet.