
Operation Manual


5.2 Sound-control
The sound-control works via the built-in microphone or the Line In socket. Connect the sound-signal from the
mixer (e.g. Master 2) with the RCA-socket on the rear panel (input sensitivity 0.1 V - 1 V).
5.3 DMX-512 connection with the projector
The wires must not come into contact with each other, otherwise
the fixtures will not work at all, or will not work properly.
Only use a stereo shielded cable and 3-pin XLR-plugs and connectors in order to connect the controller with
the fixture or one fixture with another.
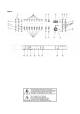
Occupation of the XLR-connection:
You can adjust the XLR polarity via the DMX POLARITY selector.
Building a serial DMX-chain:
Connect the DMX-output of the 154.092 with the DMX-input of the nearest projector. Always
connect one output with the input of the next fixture until all fixtures are connected.
Caution: At the last fixture, the DMX-cable has to be terminated with a terminator. Solder a 120 . resistor
between Signal (–) and Signal (+) into a 3-pin XLR-plug and plug it in the DMX-output of the last fixture.
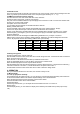
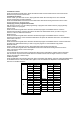
Projector addressing
Please note that the 154.092 assigns the DMX-starting addresses every 16 steps. You have to
address every projector to the respective starting address. Otherwise, the channel assignment will not be
correct. All projectors with the same starting address work synchronically.
Projector
Starting
address
Projector
Starting
address
Projector
Starting
address
1 1 5 65 9 129
2 17 6 81 10 145
3 33 7 97 11 161
4 49 8 113 12 177
5.4 Assign the joystick
Hold the Program-button, until the LED is lit.
Hold the Mode- and Fine-button at the same time until the Assign-LED is lit. If the Reverse-LED is lit hold the
Mode- and Fine-button once more.
Select the Pan- or Tilt-direction via the Bank Up and Bank Down-button.
Press the Tap/Display-button in order to adjust 16-channel or 8-channel mode.
Select the desired projector via the Projector Select-buttons.
Hold the Mode-button and press the Scene-button on whose channel the Pan- or Tilt-channel is located. E.g.
if the Pan-movement is on Fader 1, hold the Mode-button and press Scene-button 1.
Hold the Mode- and Fine-button at the same time in order to leave the Assign-mode.
6. OPERATION
After you connected the device to the mains, the 154.092 is ready for use.
6.1 Manual-mode
6.1.1 Call up projectors manually
In the Manual-mode (Program-LED off), you can call up the connected projectors manually and control them
via the channel faders. Please note that the adjusted settings cannot me memorized.
Select the desired projector via the respective projector select button.
Adust the desired function via the channel faders.
Page Select-button:
Via the Page Select-button, you can adjust the channel faders from CH 1-8 to CH 9-16.
Display-button:
Via the Display-button, you can switch the display of the faderway from DMX-value (0-255) to procent (0-
100).