
Operation Manual


The RCA inputs are for connection of a CD player or a turntable. You can now route the signal via the
“tape/rec to control room level” push button (17) to the studio monitors or to the master routes via the
push button “tape / rec to master” (18). Make sure however that the push button (17) is in the up
position otherwise the signal will be input twice.
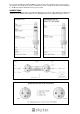
Connect the mixer to an amplifier via the balanced “stereo out” sockets (22). Use 2 6.3mm mono jacks
for this connection. The total output volume is set via the master volume button (19).
The mixer is fitted with a separate headphone output (23). The signal is the same as from the control
room output (27). The volume control (16) sends the signal to the headphones and the monitors. The
L/R meters are the same as the master output
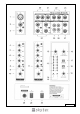
INSTALLATION
Do not mix up the cable in order to avoid wrong connections. Connect the leads one by one and not all
leads on one side first and then all on the other side. In the worst case, you might permanently
damage the unit. Figure 2 shows an example of possible connections.
Prior to connecting the mixer, set all controls to “0”. You can connect microphone or line units to the
mono channels, all kinds of line units to the stereo channels and effect units to the AUX Return. You
can also connect Midi instruments to the AUX Return.
If you connect a microphone, make sure that the phantom power is switched OFF. DO NOT use
unbalanced units when the phantom power is switched on. Do not short-circuit the 48V circuit of the
phantom power to the ground. You might heavily damage the unit.
FIGUUR 2