
Operation Manual


GETTING STARTED
1. Remove speakers, power cable and the speaker cables from the carton.
2. Detach the modules from the speakers. By pressing and sliding the button on the top of the speakers you will
release the module from the speaker. All that is required is a little lift on the module once the button is pressed.
3. If you have purchased speaker stands, you can place the speakers on the stands utilizing the pole mount adaptor
built into the speaker cabinets. Once the speaker is on the pole, tighten the set screw to snug the speaker to the
pole.
4. Connect the Mixer Module to the Speakers
On the right side of the mixer you will notice two ¼" phone jacks – these are your speaker output jacks. Take the
speaker cables and connect them from these jacks to the jacks on the back of the speakers.
5) Connecting the AC Power Cable
Connect the female end of the power cable to the mixer and plug the male end into the wall socket or extension
cord. Turn the “MASTER VOLUME” control to “0”. Now turn the power switch to the “on” position. You should see
the “POWER” indicator illuminated. At this point you are ready to bring in an audio signal and hear the signal
amplified by the system.
, Brass or
Strings
EFFECT MENU
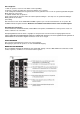
Getting Acquainted with the Powered Mixer
This part of the system houses the mixing board and power amplifier. You will connect all of the microphones,
musical instruments, external sound sources (like MP3 or CD players), headphones in addition to any recording
devices or additional speakers like a personal monitor, subwoofer or “Front of House” feed.
The Basics
While it looks complicated, the mixing board is actually a very simple device. A “mixing board” brings audio sources
“in” (through the inputs) and routes the signal to the outputs (MASTER VOLUME/SPEAKER OUTPUTS or
MONITOR OUTPUTS)). The mixer controls enable the user to affect the tone and/or volume in addition to routing
the signal and adding effects to individual input sources. The abundance of knobs is simply due to the repetitive
nature of the design.
AUDIO INPUTS
The system has 8 inputs: 4 mono inputs and 2 stereo inputs.
All of the inputs will route to the speakers and to the MONITOR OUTPUT SECTION.
MONO MIC/LINE INPUTS
There are 4 identical input strips comprised of a “peak LED”, a combination input connector, MIC/LINE selector,
Treble and Bass controls, an Effect and a channel volume control.