Service and Maintenance Manual Model 3606 8990300 OCTOBER 1999 ANSI
Foreword SKY TRAK Model 3606 Service Manual This manual is designed to provide the service technician with complete information on the maintenance and repair of the Sky Trak International SKY TRAK Model 3606 rough-terrain material handler. Particular effort has been made to produce a manual to serve as a reference handbook for the experienced service technician, but also provide essential step-bystep procedures for the professional development of the less experienced person.
Section Contents Section Subject Page Section 1 1.1 1.2 1.3 1.4 1.5 1.6 Safety . . . . . . . . . . . . . . . . . . . . . . . . . . . . . . . . . . . . . . . . . . . . . . . . . . . INTRODUCTION . . . . . . . . . . . . . . . . . . . . . . . . . . . . . . . . . . . . . . . . . . . OWNERS/OPERATORS MANUAL . . . . . . . . . . . . . . . . . . . . . . . . . . . . . . SAFETY INFORMATION . . . . . . . . . . . . . . . . . . . . . . . . . . . . . . . . . . . . . ACCIDENT PREVENTION TAGS . . . . . . . . . . . . .
Section 6 Transfer Case and Drive Shafts . . . . . . . . . . . . . . . . . . . . . . . . . . . . . . INTRODUCTION. . . . . . . . . . . . . . . . . . . . . . . . . . . . . . . . . . . . . . . . . . . . . . . . . 6.1 GENERAL INSTRUCTIONS . . . . . . . . . . . . . . . . . . . . . . . . . . . . . . . . . . . 6.2 SPECIFICATIONS . . . . . . . . . . . . . . . . . . . . . . . . . . . . . . . . . . . . . . . . . . 6.3 TRANSFER CASE . . . . . . . . . . . . . . . . . . . . . . . . . . . . . . . . . . . . . . . . . .
Section 9 Hydraulic System . . . . . . . . . . . . . . . . . . . . . . . . . . . . . . . . . . . . . . . . . . 9-1 INTRODUCTION. . . . . . . . . . . . . . . . . . . . . . . . . . . . . . . . . . . . . . . . . . . . . . . . . 9-2 9.1 SAFETY INFORMATION . . . . . . . . . . . . . . . . . . . . . . . . . . . . . . . . . . . . . 9-4 9.2 SPECIFICATIONS . . . . . . . . . . . . . . . . . . . . . . . . . . . . . . . . . . . . . . . . . . 9-4 9.3 HYDRAULIC PRESSURE DIAGNOSIS . . . . . . . . . . . . . . . . . . . . .
Section 1 Safety Contents PAR. 1.1 1.2 1.3 1.4 1.5 1.6 Model 3606 • Origin 10/99 TITLE INTRODUCTION . . . . . . . . . . . . . . . . . . . . . . . . . . . . . . . . . . . . . . . . . . . OWNERS/OPERATORS MANUAL . . . . . . . . . . . . . . . . . . . . . . . . . . . . . . SAFETY INFORMATION . . . . . . . . . . . . . . . . . . . . . . . . . . . . . . . . . . . . . 1.3.1 Safety Alert Symbol. . . . . . . . . . . . . . . . . . . . . . . . . . . . . . . . . . 1.3.2 Signal Words . . . . . . . . . . . . . . . .
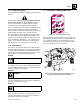
Section 1 1.1 INTRODUCTION WITHOUT CLOSED CAB Sky Trak International (hereafter, Sky Trak) products meet all applicable industry safety standards. Sky Trak actively promotes safe practices in the use and maintenance of its products through training programs, instructional manuals, and the pro-active efforts of all employees involved in engineering, design, manufacture, marketing and service.
Safety 1.3.1 Safety Alert Symbol 1.4 ACCIDENT PREVENTION TAGS The exclamation mark within a triangle is the Safety Alert Symbol. The Safety Alert Symbol means ATTENTION! BECOME ALERT! YOUR SAFETY IS INVOLVED! The symbol is used to attract attention to safety hazards found on vehicle safety decals and throughout this manual. The message that follows the symbol contains important information about Safety. To avoid possible death or injury, carefully read and follow all safety messages.
Section 1 1.5 SAFETY INSTRUCTIONS Following are general safety statements to consider before performing maintenance procedures on the vehicle. Additional statements related to specific tasks and procedures are located throughout this manual and are listed prior to any work instructions to provide safety information before the hazard occurs. For all safety messages, carefully read, understand and follow the instructions before proceeding. 1.5.
Safety SOFT SURFACES AND SLOPES: NEVER work on a vehicle parked on soft surfaces or slopes (inclined ground or hills). Vehicle must be on hard, level surface with wheels blocked when necessary before performing any service. Obtain assistance, block all wheels, and add supports if necessary before beginning any work. SUPPORTS AND STRAPS: Install safe, stable supports, slings or straps beneath or around a component or structural member before beginning any work.
Section 1 Safety Decal List – Earlier Models 1. 2. 3. 4. 5. 6. 7. 8. 9. 10. 11. 12. No Riders WARNING Vehicle Rollaway WARNING Electrocution DANGER Load Chart Booklet Tipover DANGER – Operating Tipover DANGER – Tire Pressure DANGER CONTACTING ELECTRIC POWER LINES can result in electrocution. NEVER operate vehicle within 10 feet (3m) of electric power lines.
Safety Safety Decal List – Later Models 1. 2. 3. 4. 5. 6. 7. 8. 9. 10. 11. 12. No Riders WARNING Vehicle Rollaway WARNING Electrocution DANGER Load Chart Booklet Tipover DANGER – Operating Tipover DANGER – Tire Pressure DANGER NEVER operate vehicle within 10 feet (3m) of electric power lines. CONTACTING ELECTRIC POWER LINES can result in electrocution. VEHICLE TIPOVER can result in death or serious injury. DANGER DO NOT raise boom while on a slope unless load is level.
Section 1 Copies of Accident Prevention Tags are provided on pages 1-9 and 1-10.
Safety OS2180 Model 3606 • Origin 10/99 1-9
Section 1 OS2180 1-10 Model 3606 • Origin 10/99
Section 2 General Information, Specifications, and Maintenance Contents PAR. 2.1 2.2 2.3 TITLE REPLACEMENT PARTS AND WARRANTY INFORMATION . . . . . . . . . . SERIAL NUMBER LOCATIONS . . . . . . . . . . . . . . . . . . . . . . . . . . . . . . . . TORQUE VALUES . . . . . . . . . . . . . . . . . . . . . . . . . . . . . . . . . . . . . . . . . . 2.3.1 Fastener Rating . . . . . . . . . . . . . . . . . . . . . . . . . . . . . . . . . . . . . 2.3.2 Straight Thread O-ring Fitting (non-adjustable) . . . . . . . .
Section 2 2.11.4 After Brake System Service . . . . . . . . . . . . . . . . . . . . . . . . . . . 2.11.5 After Fuel System Service. . . . . . . . . . . . . . . . . . . . . . . . . . . . . 2.11.6 After Transmission Service or Replacement . . . . . . . . . . . . . . . 2.11.7 After Tire and Wheel Service . . . . . . . . . . . . . . . . . . . . . . . . . . 2.11.8 After Engine Service . . . . . . . . . . . . . . . . . . . . . . . . . . . . . . . . . 2.11.9 After Boom Service . . . . . . . . . . . . . . . . . .
General Information, Specifications, and Maintenance 2.1 2.3.2 REPLACEMENT PARTS AND WARRANTY INFORMATION The replacement of any part with any other than a Sky Trak authorized replacement part can adversely affect the safety, performance, or durability of the vehicle, and may void the warranty. Sky Trak International assumes no liability whatsoever for unauthorized replacement parts.
Section 2 6. Hold the fitting in the desired position and tighten to the proper torque according to the following chart: Adjustable Straight-thread O-ring Fitting Torque Chart SAE Size Torque lb/ft Nm 4 14.5-17.5 20-24 6 37-43 50-58 8 75-85 102-115 10 115-125 156-170 12 155-165 210-224 16 225-235 305-319 20 260-280 353-380 24 340-360 461-488 Acres 0.4 Hectares (ha) Ounces (oz) 28 Grams (g) Pounds (lb) 0.4536 Kilograms (kg) MASS (weight) Short tons (2000 lb) 0.
General Information, Specifications, and Maintenance LENGTH (distance) Millimeters (mm) 0,0394 Inches (in) Centimeters (cm) 0,394 Inches (in) Meters (m) 3,281 Feet (ft) Meters (m) 1,1 Yards (yd) Kilometers (km) 0,621 Miles (mi) AREA Square centimeters 0,4 (cm2) Square inches (in2) Square meters (m2) 1,1 Square yards (yd2) 0,6 Square miles (mi2) Square kilometers (km2) Hectares (10000 m2) 2,5 Acres MASS (weight) Grams (g) 0,035 Ounces (oz) Kilograms (kg) 2,2 Pounds (lb) Metric to
Section 2 2.4 SPECIFICATIONS 2.4.1 Vehicle Dimensions (Fig. 2-1) V M With Standard 12-ply 13.00-24 Tires I Ref. Description W A. Length (without attachment) 221.0" (5613 mm) B. Width 98.0" (2489 mm) C. Height (boom lowered) 91.75" (2330 mm) D. Wheelbase 122.0" (3099 mm) E. Tread 84.0" (2134 mm) F. Ground Clearance 17.0" (432 mm) G. Turning radius, curb to curb 138.0" (3505,2 mm) H. Turning radius, clearance 180.5" (4584,7 mm) I.
General Information, Specifications, and Maintenance C. Cylinder Times (with no load, at full throttle) F. Fuel Consumption Function Average, depending on load/duty: 2 gal/hr (1,67 Imp gal/hr, or 7,57 l/hr) Approximate Times, in seconds Boom extend 12.00 Boom retract 7.00 Boom lift retracted 12.75 Boom lower retracted 10.75 Fork tilt up 4.20 Fork tilt down 3.75 Frame tilt left to right with boom down 8.50 G. Steering Wheel Maximum number of turns, lock to lock 3.
Section 2 Block forks, 2 x 2 x 48 (5 x 5 x 122 cm) quantity: 6................................................. 480 lb (216 kg) Lumber forks, 1.75 x 7 x 60 (4 x 17,8 152,4 cm) quantity: 2.............................................. 466 lb (209,7 kg) Auger drive unit ..................................... 285 lb (128,2 kg) Auger mounting frame................................ 180 lb (81 kg) Auger (various sizes available)............................... Varies Auger extension (various sizes available) .......
General Information, Specifications, and Maintenance 2.5 2.5.1 FLUIDS, LUBRICANTS AND CAPACITIES 2.5.2 Axles (Differential Housings) and Transfer Case In general, use gear oil with an API classification of GL-5 that meets the requirements of U.S. ordinance specification MIL-L-2105 and MIL-L-2105D, respectively. The oil should be a 90W, a multi-grade 80W-90, or 80W-140 with EP properties (80W-90 EP). Products known to meet these requirements include: A.
Section 2 2.5.4 Hydraulic System 2.5.5 Engine A. Hydraulic Fluids A. Engine Fluids and Lubricants The hydraulic system is factory filled with ISO Grade 46 anti-wear hydraulic oil. When filling the hydraulic system, use an anti-wear hydraulic oil meeting ISO Grade 46 with -40°F (-40°C) pour point/ASTM viscosity SUS 215 at 100°F (38°C), or a 10W motor oil that meets the requirements of U.S. ordinance specification MIL-L-2104C. Products known to meet these requirements include: 1.
General Information, Specifications, and Maintenance 2.5.6 Transmission A. Transmission Fluid RECOMMENDED LUBRICANTS FOR CLARK-HURTH T12000 POWER SHIFTED TRANSMISSION Vehicle transmissions are factory filled with 10W motor oil. Any suitable 10W motor oil, which meets the requirements of U.S. ordinance specification MIL-L-2104C, can be used.
Section 2 2.5.7 Drive Shaft Splines B. Anti-corrosion Need Areas IMPORTANT: DO NOT disassemble any of the drive shafts (see Section 6 Transfer Case of this manual for information covering drive shafts and U-joints). To help ensure optimum performance, the drive shaft assemblies are specially balanced as a unit at the factory. When servicing any flange yoke, slip yoke or drive shaft tube, order a complete assembly. Refer to the parts manual for ordering information.
General Information, Specifications, and Maintenance 2.5.10 Paint C. White Paint Unless otherwise specified, paint components as indicated in the following sections. Durable, premium white paint is available in both a convenient 16-ounce (480 ml) spray can for touch-ups, and in a production-sized one gallon (3,8 l) container for extensive repainting. Consult the current Sky Trak Model 3606 PARTS MANUAL for the applicable part number and ordering information. A.
Section 2 2.6 CLEANING Dirt and abrasive dust reduce the efficient working life of parts and systems, and lead to the costly replacement of components. To help increase the service life of parts, clean the exterior of all parts before beginning any repairs. 2. Hoses must remain in good condition. Obvious signs of external hose wear or hydraulic fluid leaking or weeping indicates the need to replace the hose assembly. If in doubt, replace the hose. 3.
General Information, Specifications, and Maintenance 2.9.3 Bearing Installation 1. Always install bearings carefully to help avoid damaging their delicate surfaces. 2. Install bearings using one of the following methods: 4. Purge the hydraulic system of air by operating all vehicle functions through their entire range of motion several times. 5. Check for proper operation of all components. • PRESS FIT for installation on rotating parts such as shafts and gears; 6. Retract all cylinders fully.
Section 2 2.11.4 After Brake System Service 1. Check the oil level in the axle and replenish with SAE 80W90 or SAE 80W140 oil as required. 2. Bleed the brakes. 3. Check brake pressure. 4. Check brake operation. 2.11.5 After Fuel System Service 12. Run engine for two minutes at idle to help prime the torque converter and transmission lines. 13. Recheck the level of fluid in the transmission with the engine running at idle. 14.
General Information, Specifications, and Maintenance 2.12 2.12.1 Maintenance Schedule and Checklist MAINTENANCE INSTRUCTIONS Maintenance Introduction A. 10 Hour Intervals WARNING: DO NOT perform service or maintenance on the vehicle with the engine running. Contact with moving parts can cause serious injury or death. 10 This section contains a routine equipment checklist and a maintenance schedule and checklist with references to pertinent procedures and instructions.
Section 2 C. 250 Hour Intervals (2) PLACES 250 A Change Engine Oil and Filter (Cummins) Check Transfer Case Oil Level C Check Axle Oil Level F A 2 (2) PLACES D E E Check Wheel End Oil Level 3 A Apply Multi-Purpose Grease (MPG) At All Lubrication Points 1 A A 4 E E H MS1350 Figure 2–6. Two-hundred-fifty hour interval maintenance schedule and checklist.
General Information, Specifications, and Maintenance E. 1,000 Hour Intervals Angled-cut Wear Pad Indicator 1000 Check Boom Chain Tension Change Transfer Case Oil Check Fan Belt Change Transmission Oil and Filter Change Axle Oil Metal Insert Wear Pad Change Hydraulic Oil and Filter 0.625" (15,9 mm) Change Wheel End Oil MS1370 Figure 2–9. One-thousand-hour interval maintenance schedule and checklist. 0.25" (6,4 mm) Boom Wear Pad OS1230 Plate Spacer Figure 2–11.
Section 2 2.12.3 Air Cleaner B. Air Cleaner Element: Change or Clean A. Engine Air Filter Restriction Warning Indicator 500 1 2 3 F D 4 MS2180 Figure 2–14. Change or clean the air filter element. P N As indicated by the air cleaner restriction indicator, and/or every 500 hours, change or clean the air cleaner element.
General Information, Specifications, and Maintenance Air Cleaner Cover Primary Element Safety Element Air Cleaner Element 4. Rinse the filter from the inside out with a gentle stream of water [less than 40 psi (2,8 kPa), without nozzle] to remove all dirt and suds. If the inside of the element has been contaminated with dirty water from the soaking, rinse both sides. 5. Dry the filter before re-using. Circulate warm air at less than 160°F (57°C). DO NOT use a light bulb to dry the filter. 6.
Section 2 Fresh Air Intake Filter Periodically remove the cab rear panel and inspect the fresh air intake filter (Fig. 2–17). The filter must be cleaned sometimes as often as twice a day, depending on the operating environment. This is done by removing the filter and shaking it. Pressurized air can also be used to blow out dust. The filter will clean outside air when pressurizing the cab. The filter should be replaced when required.
General Information, Specifications, and Maintenance 8. Transfer the coolant into a properly labeled container. Dispose of properly. Radiator Cap 9. Reconnect the hose to the fitting on the neck of the radiator fill tube. Close the radiator drain plug or petcock. Fitting on Neck of Radiator Fill Tube Coolant Overflow Bottle 10. Fill the radiator completely with a 50/50 mixture of ethylene glycol and water. Replace the radiator cap.
Section 2 For most climates, use a premium-quality 15W40 motor oil that meets API, CD or CE (severe duty diesel engine) specifications. In cold climates where ambient (outside air) temperatures are consistently below 32° F (0° C), 10W30 motor oil can be used; however, continuous use of low viscosity oil may cause premature engine wear. B. Oil Level Check Oil Fill Cap Oil Filter Oil Drain Oil Fill Plug Dipstick Cap Oil Fill Cap (PERKINS ENGINE) 10 Dipstick OS0820 MS2140 Figure 2–23.
General Information, Specifications, and Maintenance 11. Remove the engine oil fill cap and add oil (refer to the engine manufacturer's manual for recommended oil types for various operating conditions). Engine oil capacity with filter change is: Perkins Engine . . . . . . . . 9.0 quarts (8,5 liters) Cummins Engine . . . . 11.6 quarts (11,0 liters) 12. Reinstall the oil fill cap. Start the engine and allow it to run for several minutes. 4. Loosen the fuel filter drain cock.
Section 2 6. Screw the new canister onto the base. Hand tighten only. 7. Remove air from the fuel system. See Venting Air from the Fuel System. (see 2.12.7 D) 8. Close, latch and lock the engine cover. C. In-line Fuel Strainer (Every 500 hours of engine operation) 1. Level the vehicle, ground the attachment, place the travel select lever in NEUTRAL (N), engage the parking brake switch and shut off the engine. Allow engine to cool. 2. Unlock and open the engine cover. CUMMINS ENGINE 1.
General Information, Specifications, and Maintenance IMPORTANT: DO NOT attempt to start the engine until the injection pump has been filled and primed with fuel. Serious damage to the lift pump will result due to lack of proper lubrication. CUMMINS ENGINE Vent Screw PERKINS ENGINE Vent Plug Filter Head Hand Plunger Lift Pump OS1450 Figure 2–35. Cummins vent screw, hand plunger and lift pump locations. OS0731 Figure 2–33. Perkins vent plug and filter head locations. 1.
Section 2 Alternator Pulley Fan Pulley High-pressure Fuel Lines Injector Crankshaft Pulley 1/4" to 3/8" (6,4 to 9,4mm) Deflection 0A0362 OS0990 Figure 2–36. Cummins injector and high-pressure fuel line locations. 4. Tighten the fitting to 22 lb/ft (30 Nm). Repeat this procedure for each fitting until the engine runs smoothly. With the engine running, visually check for leaks. Turn the ignition switch OFF. 2.12.8 Engine Fan Belt Figure 2–38. Perkins engine fan belt adjustment points. 5.
General Information, Specifications, and Maintenance Automatic Belt Tensioner Pulley Alternator Pulley Water Pump Pulley Crankshaft Pulley OS0770 Figure 2–39. Cummins engine fan belt adjustment points. 6. Close and lock the engine compartment cover. 2.12.9 Hydraulic System Oil And Filter Hydraulic Oil Sight Glass OS1590 Figure 2–41. Check the hydraulic oil level via the sight glass. 5. Reinstall the hydraulic oil fill cap. Close and lock the engine cover. B.
Section 2 1 2 3 F D 4 P N R Hydraulic Oil Filter Restriction Warning Indicator Early Production Hydraulic Oil Filter Head OS1040 Figure 2–44. Clean around the hydraulic oil filter head. Hydraulic Oil Filter Restriction Warning Indicator Current Production OS0222 Figure 2–43. Hydraulic oil filter restriction warning indicator for early production (top) and current production (bottom) vehicles. 1.
General Information, Specifications, and Maintenance 11. Fully install a new hydraulic oil filter element onto the hydraulic oil filter head until the filter seats. Slide the filter assembly into the reservoir. Secure the filter head by tightening the nuts loosened earlier. 3. Remove the transmission dipstick (Fig. 2–46). Check the transmission oil level. Hose, Hydraulic Reservoir to Main Pump 12. If the hydraulic oil return line was swiveled out of the way, reposition the line.
Section 2 2.12.11 Axle Oil Transmission Filter Transmission Dipstick A. Axle Oil Level Check 250 OS0920 MS2170 Figure 2–51. Every 250 hours of engine operation, check the axle oil level in both the front and rear axles. 1. Level the vehicle, ground the attachment, place the travel select lever in NEUTRAL (N), engage the parking brake switch and shut the engine off. Transmission Drain Plug OS1010 Figure 2–49. Location of transmission maintenance items. 4.
General Information, Specifications, and Maintenance 5. Clean and reinstall the drain plug. Remove the axle fill/level plug from the axle housing. 6. Fill the axle with a premium grade of SAE 80W90 or SAE 80W140 axle oil. Filling is accomplished through the axle fill/level hole. Fill until the axle oil level is even with the plug hole. The axle capacity is three gallons (11,5 liters). 7. Reinstall the axle fill/level plug into the axle housing. B. Wheel End Oil Change 1000 MS2190 OS0980 Figure 2–56.
Section 2 2.12.13 Transfer Case Oil 2. Clean the area around the transfer case oil level plug, oil drain plugs and the oil fill/vent cap (Fig. 2–61). A. Transfer Case Oil Level Check Vent Cap 250 Oil Fill Plug OS0910 MS2170 Figure 2–58. Every 250 hours of engine operation, check the transfer case oil level. 1. Level the vehicle, ground the carriage, place the travel select lever in NEUTRAL (N), engage the parking brake switch and shut the engine OFF. 2.
General Information, Specifications, and Maintenance minimum for 13.00 - 24, 12-ply tires. Maximum ground pressure with a full load is 93 psi (641 kPa). panel (Fig. 2–64) illuminates when the alternator is no longer able to charge the battery. 3. Add air as required. DO NOT overinflate. 4. Replace the valve stem cap. 2 1 B. Wheel Lug Nut Check 3 F Every ten hours of engine operation, check the torque on all lug nuts. Tighten as required. 1. Wire brush the area around the lugs if necessary.
Section 2 3. Wear safety glasses and visually inspect the battery. Check terminals for corrosion. Replace the battery if it has a cracked, melted or damaged case. WARNING: Fluid (electrolyte) in electric storage batteries contains sulfuric acid, a POISON that can cause SEVERE CHEMICAL BURNS. Avoid all contact of fluid with eyes, skin or clothing. Use proper protective gear when handling batteries. DO NOT tip a battery beyond a 45° angle in any direction.
General Information, Specifications, and Maintenance 7. Next, remove the negative (-) jumper cable connected to the negative (-) post of the booster battery. 8. Remove the other end of the positive (+) jumper cable connected to the positive (+) post of the booster battery. 9. Remove the positive (+) jumper cable connected to the positive (+) post of the discharged, but now charging, battery. Electrical Fuse and Relay Panel 10.
Section 2 Vehicles Stamped with S/N 8249 and Before Hourmeter Vehicles Stamped with S/N 8250 through 9398 Perkins Cold Start (optional) Neutral Relay/Starter Neutral Display Relay/Starter Panel Logic Panel Neutral Sense *Cold Start Fuel Shut-off Display Panel Neutral Sense Main Fuse Logic Panel Transmission Relay Switch Lamps Stabil-TRAK Solenoid Stabilizer Lock Relay Main Hourmeter Fuel Shut-Off Trans. Relay Park Brake Sense Relay 15 7.5 7.5 7.5 7.5 7.5 7.5 7.
General Information, Specifications, and Maintenance Vehicles Stamped with S/N 9399 and After *Light Pkg (B) Neutral *Window Logic Pkg Relay/Starter Motor Panel *Light Neutral (A) Sense *Cold Start Hourmeter 7.5 15 20 Main 30 20 30 *Front Display Wiper Panel 7.5 7.5 7.5 7.5 7.5 Fuel *Skylight Shut-Off Wiper/Washer *Blower Motor *Rear Wiper 7.5 25 7.5 7.5 Stabil-TRAK Horn Solenoid 7.5 7.5 7.5 7.5 7.5 *Switch 7.5 7.5 15 7.5 Park Brake Lamps Sense Relay Trans. Trans. Relay *Aux.
Section 2 Retract Chain Locknut 1. Install a properly charged battery. Secure the holddown strip and attach the cables. Clevis End 2. Change the engine oil and filter to remove condensation or other residuals. 3. If the vehicle has been stored for two years or more, drain the coolant from the engine block and radiator and refill with a 50/50 mixture of fresh anti-freeze and water. 4. Wipe off any LPS 3 (or equivalent) applied to exposed cylinder rods prior to storage. 5.
General Information, Specifications, and Maintenance 2.13 EMERGENCY OPERATIONS 2.13.1 Towing a Disabled Vehicle IMPORTANT: After the vehicle has been towed to a secure location, reactivate the parking brake. Carefully follow these procedures from start to finish. Consult your local Sky Trak Distributor or the Sky Trak Service Department if you are unsure about any part of this procedure, or for specific instructions for your particular situation.
Section 2 6. For early production vehicles, see Fig. 2–79; for current production vehicles, see Fig. 2–80. Alternately turn the parking brake release bolts A, B and C inward (clockwise) two to three complete turns until resistance is felt. 7. Use a torque wrench to alternately turn parking brake release bolts A, B and C (Fig. 2–79 or Fig. 2–80) inward (clockwise) until a torque of 22 lb/ft (30 Nm) is reached. This will take approximately a half-turn. DO NOT exceed 50 lb/ft (68 Nm). EARLY PRODUCTION 8.
General Information, Specifications, and Maintenance CURRENT PRODUCTION Steering Cylinder (ref.) Turn Counter-clockwise to Activate Brake A B FRONT C Brake Release Bolt Snap Ring 3. Use a torque wrench to alternately turn parking brake release bolts A, B and C outward (counter-clockwise) until the torque decreases sharply. 4. For early production vehicles, see Fig. 2–81; for current production vehicles, see Fig. 2–82.
Section 2 2-44 Model 3606 • Origin 10/99
Section 4 Cab, Covers and Mirrors Contents PAR. TITLE INTRODUCTION. . . . . . . . . . . . . . . . . . . . . . . . . . . . . . . . . . . . . . . . . . . . . . . . . Legend ................................................. General Overview (illustration) . . . . . . . . . . . . . . . . . . . . . . . . . . . . . . . . . 4.1 SERIAL NUMBER DECAL . . . . . . . . . . . . . . . . . . . . . . . . . . . . . . . . . . . . 4.2 CAB REPLACEMENT. . . . . . . . . . . . . . . . . . . . . . . . . . . . . . . . . . . . . .
Section 4 Introduction The welded metal cab features European styling and a modular design, allowing for a relatively quick, simple exchange of the entire cab and/or component parts. The cab is bolted to the cab mount, which in turn is bolted to the frame. The operator’s cab is a protective structure. The cab itself contains roll-over protective and falling object protective structures (ROPS/FOPS) for the operator. DO NOT weld, grind, drill, repair or modify the cab in any way.
Cab, Covers and Mirrors General Overview 2 3 4 5 1 30 29 29 28 6 78 27 26 25 9 8 7 5 4 9 6 13 12 78 10 11 6 15 16 17 24 5 6 18 6 4 14 19 5 4 Frame (ref.) 32 20 MS1530 Cab mount (ref.
Section 4 4.1 4.2.1 Cab Removal SERIAL NUMBER DECAL The cab serial number decal (Fig. 4–1) is located along the top right side of the cab, near the mirror. Information specified on the serial number plate includes the cab model number, the cab serial number and other data. Write this information down in a convenient location to use in cab correspondence. WARNING: Wear protective footwear with reinforced toe caps and slip-resistant soles.
Cab, Covers and Mirrors Cab (ref.) 20 16 13 21 22 10 Logic board panel (ref.) 11 9 8 6 7 17 1316 2 6 23 5 13 1617 18 17 15 16 1 24 19 2 2 2 13 16 17 13 2 2 14 2 12 13 16 17 15 16 17 3 14 15 4 MS0850 Figure 4–3. Operator’s cab inner console and dash panel components. 1. 2. 3. 4. 5. Front dash Retaining nut, 5/16-18 Lower dash cover Self-drilling screw, #12-14 x 1" Slotted hex-head capscrew, #10-24 x 1" 6. Spacer 7. Fender washer 8. Hex-lock elastic nut, #10-24 17.
Section 4 9. Remove the front cab-to-cab-mount attaching hardware (refer to items in the General Overview illustration on page three). Front hardware includes 3/4-10 hex-lock elastic nuts (12), 3/4-10 x 3-1/2" Grade 8 hex-head capscrews (22), 3/4" lock washers (23) and rebound washers (21). Rear hardware includes 3/4-10 hex-lock elastic nuts (12), 3/4-10 x 3-1/2" Grade 8 hex-head capscrews (22), and rebound washers (21).
Cab, Covers and Mirrors 4 3 2 5 S/N 8249 - 9398* S/N 9399 and After* 15 7.5 15 30 36 7.5 30 20 30 20 7.5 7.5 7.5 25 7.5 7.5 7.5 7.5 7.5 7.5 7.5 7.5 7.5 7.5 7.5 15 7.5 35 7.5 7.5 1 7.5 7.5 7.5 7.5 7.5 7.5 7.5 7.5 7.5 7.5 7.5 7.5 7.5 6 *See Section 2 for fuse and relay panel information. 11 7 8 34 10 9 37 33 32 11 23 31 30 29 28 20 8 22 12 9 21 25 24 26 25 23 27 13 25 14 11 16 17 15 18 38 19 Before S/N 8249* 1. 2. 3. 4. 5. 6. 7. 8. 9.
Section 4 4.2.2 Cab Installation WARNING: Explosion and fire hazard. Cap or safely cover the fuel tank and beaded hose tee openings. WARNING: Wear protective footwear with reinforced toe caps and slip-resistant soles. Failure to comply can result in foot injury from falling objects or other bodily injury from slipping or falling. WARNING: NEVER lift a heavy object without the help of at least one assistant or a suitable sling and hoist. Failure to comply can result in serious personal injury.
Cab, Covers and Mirrors 20. Connect the battery negative (-) ground cable (Fig. 4–2). An optional three-inch wide seat belt is available for those locations that require a three-inch seat belt. 21. Carefully examine all cab components, fasteners, etc., one last time before engine start-up. Rectify any faulty conditions. A. Seat Replacement WARNING: DO NOT use your hand or any part of your body to check for hydraulic leaks.
Section 4 Standard Optional seat seats 7 1 1 5 2 3 2 6 7 3 4 4 8 2 5 5 2 3 5 8 3 4 6 7 4 8 9 14 13 12 11 9 11 12 6 10 11 15 16 14 13 9 10 11 12 MS0900 Figure 4–9. Standard (left) and optional (right) seats. Standard Operator’s Seat Parts Legend Optional Operator’s Seat Parts Legend 1. 2. 3. 4. 5. 6. 7. 8. 9. 10. 11. 12. 13. 14. 15. 16. 1. Deluxe seat (covered with CLOTH or VINYL), with suspension 2. Tether 3. Spacer 4.
Cab, Covers and Mirrors Standard Seat Installation 1. Install the seat belt assembly (4, Fig. 4–9) and tethers (2) on the seat with the seat out of the cab. 2. Within the cab, access to the right-side tether (Fig. 4–10) is restricted due to the closeness of the seat to the cab wall. Move the seat all the way forward, and tip the seat back all the way forward to gain access as needed to the tether mounting hardware from inside the cab.
Section 4 Note: Early production cabs included a threaded hole for tether mounting. In Fig. 4–9, items 11 through 14 are not used on early production cabs. 1 2 3. Position the seat on the seat base. Align the seat bracket mounting holes with the holes in the cab seat platform. Secure the seat to the seat base with four 5/16-18 hex-lock elastic nuts (10, Fig. 4–9), eight 5/16 flat narrow washers (9), and four 5/16-18 x 1" Grade 5 hex-head capscrews (8) securing the seat (1) to the seat support.
Cab, Covers and Mirrors Steering Wheel Removal 1. Carefully pry the horn cover button out of its recess in the steering wheel. Disconnect the horn wire lead. 2. Remove the thin M18-1,5 nut securing the steering wheel to the splined steering column shaft. 3. Use a steering wheel puller to remove the steering wheel from the splined shaft. Steering Wheel Installation 1. Install the steering wheel (Fig. 4–12) onto the splined steering column shaft. 2. Secure the steering wheel with a thin M18-1,5 nut.
Section 4 Joystick Handle Installation 1. Apply Loctite® #272 (red) to the threaded stud on the joystick handle. Position the joystick mounting stud into the base mounting hole and turn the handle to thread it into the base. Align the joystick in the forward position. 2. Secure the joystick by tightening the mounting nut (jam nut) at the threaded end of the joystick onto the threaded shaft in the joystick assembly base. 3.
Cab, Covers and Mirrors 6. From the outside rear of the cab (Fig. 4–18), remove the four button-head capscrews and plastic washers securing the outer rear panel to the cab. Remove the outer rear panel. Button-head Capscrew Cab Plastic Washer Outer Rear Panel Capscrews, Lockwashers and Flat Washers SS1230 Figure 4–18. Remove the button-head capscrews and plastic washers securing the outer rear panel to the cab. 7.
Section 4 Logic Panel Opening Joystick Joystick Wires Ports As Viewed From Bottom Side SS1270 Figure 4–22. Reach through the logic panel opening and position the joystick wires as shown. 11. Use labels, tape or some type of permanent paint or marker to mark the six hoses on the underside of the joystick valve as shown in Fig. 4–23. Joystick Small O-Ring Long Fitting Large O-Ring Fitting SS1290 Figure 4–24. Joystick valve port fittings and O-rings. Joystick Assembly Installation 1.
Cab, Covers and Mirrors 6. Connect all wire leads to the proper connectors on the logic panel. Set the logic panel in its mounting hole, but DO NOT secure with fasteners at this time. 7. Check all joystick functions for proper operation: 8. Start the engine and move the joystick handle rearward, activating the boom hoist function. The boom should raise or lift. 14. Early Production Vehicles Use a one-inch (25mm) wooden block or other suitable device to raise and hold the front dash (Fig.
Section 4 20. Raise the armrest. From inside the glove box, install the three capscrews, lockwashers and flat washers and secure the tool bin to the right side of the cab, to the right side cab wall, and to the front dash. Joystick 21. From the outside rear of the cab, secure the rear tool bin (Fig. 4–30) to the cab with three flat washers, lockwashers and hex-head capscrews. Boot Cab Rear Tool Bin Base SS1190 Figure 4–28. Slide the boot onto the joystick. 17. Install the joystick boot (Fig.
Cab, Covers and Mirrors Service Brake Pedal Installation 1. Position the service brake pedal (Fig. 4–33) in its mounting location within the cab. Switch Bezel 2. Insert two brake pedal pivots into their mounting locations on the service brake pedal. Side Console SS1220 Figure 4–32. For Early Production Vehicles, snap the switch bezel into position in the side console. 24. Wipe up any spilled hydraulic oil. This completes the installation process for Early Production Vehicles. 3.
Section 4 Throttle Pedal Installation 4.2.9 Mirror Replacement 1. Install the hex jam nut (item E, Fig. 4–34) and SAE flat 1/4" washer (D) onto the end of the throttle cable (G). Secure the cable to the throttle pedal (A). WARNING: A mirror with cracked glass can cause cuts. Handle a cracked or broken mirror with care to help avoid personal injury. Note: If throttle cable (G) replacement is required (refer to Fig. 4–2), the cab must be unbolted from its mount and raised slightly to permit cable removal.
Cab, Covers and Mirrors Keep the mirrors clean for optimal operator performance. 4.3 Replace any mirror with cracked glass as vehicle use and vibration will eventually, if not immediately, cause the crack(s) to worsen or the mirror glass to fall out. 4.3.1 Cover and Guard Replacement The mirror mounted on the left side of the cab (item 6, Fig. 4–36) and the hood-mounted mirror head (1) are attached to mirror arm assemblies.
Section 4 Engine Hood Installation WARNING: Risk of severe personal injury. Contact with hot engine or other components will cause burns. Allow engine and components to cool completely before proceeding. Failure to comply will result in personal injury. 1. Park the vehicle on a firm, level surface. Allow sufficient overhead clearance for engine hood installation (item 1, Fig. 4–37).
Cab, Covers and Mirrors 10 1 9 2 7 14 12 40 39 48 47 7 15 5 4 13 14 12 11 3 46 19 3 45 13 3 11 6 16 17 18 37 34 36 8 38 20 13 14 10 32 21 13 35 33 22 13 14 33 13 14 23 31 22 25 26 24 4 14 13 25 Frame (ref.) 30 22 23 13 23 13 28 27 43 41 40 28 42 40 5 41 13 44 22 23 23 29 13 28 MS0950 Figure 4–37. Covers and guards.
Section 4 4-24 Model 3606 • Origin 10/99
Section 5 Axles, Wheels and Tires Contents PAR. TITLE PAGE INTRODUCTION. . . . . . . . . . . . . . . . . . . . . . . . . . . . . . . . . . . . . . . . . . . . . . . . . 5-2 Legend ................................................. 5-2 General Overview (illustration) . . . . . . . . . . . . . . . . . . . . . . . . . . . . . . . . . 5-3 5.1 GENERAL INFORMATION . . . . . . . . . . . . . . . . . . . . . . . . . . . . . . . . . . . . 5-4 5.1.1 Axle Serial Number Plate . . . . . . . . . . . . . . . . . . . . .
Section 5 Introduction The front (park-brake equipped) and rear (no park brake) Carraro axles are designed for heavy-duty, offroad industrial use. Each axle consists of a beam-type axle case, housing the differential center section, inboard wet-disc brakes, a pair of trumpet-like shaft housings, and stub-axle/wheel-hub units at each end. O-rings and oil seals retain fluid within the axle. The axles have a semi-floating mounting configuration.
Axles, Wheels and Tires General Overview Front of vehicle 1 31 6 27 28 14 11 2 10 3 9 2 34 33 35 36 30 32 27 37 28 4 29 6 27 13 12 5 15 4 20 16 17 2 7 21 22 8 9 18 23 24 19 25 26 PS0200 Model 3606 • Origin 10/99 5-3
Section 5 5.1 GENERAL INFORMATION 5.2 5.1.1 Axle Serial Number Plate The front axle serial number plate is located on a mounting pad on the inboard portion of the right beam trumpet. The rear axle serial number plate is located on a mounting pad on the inboard portion of the left beam trumpet. Information on the serial number plate is required in correspondence regarding the axle.
Axles, Wheels and Tires CAUTION: The use of replacement parts provided by other than the original manufacturer is not recommended, as such use may cause unit failure and affect vehicle safety. Supply information from the axle serial number plate when communicating about an axle assembly or axle components. • Risk of personal injury. Exercise extreme care when using snap rings or spring-loaded retention devices.
Section 5 1 2 Vehicle frame 1 3 4 2 5 6 15 13 13 12 12 5 3 5 6 1 7 4 7 5 3 2 14 1 4 15 3 8 Rear axle 4 2 8 12 16 Bushing (four incl. w/axle) 11 9 7 10 14 Support (ref.) (trunion) Front axle 9 7 10 12 11 MS0680 Support (ref.) (trunion) 1. 2. 3. 4. 5. Self-tapping lube fitting, 1/8" Self-align bearing, 1-1/2" ID Cylinder-mount pin, 1.5" diameter Hex-lock nut, 5/16-18 Hex-head capscrew, 5/16-18 x 3-1/2" 6. Hex-head capscrew, 7/8-9 x 12" 7. 8. 9. 10. 11.
Axles, Wheels and Tires IMPORTANT: Clear the work area of all debris, unnecessary personnel, etc. Allow sufficient space to raise the vehicle and to remove the axle. 1. Park the vehicle on a firm, level surface. Level the vehicle, ground the attachment, place the travel select lever in NEUTRAL (N), engage the park brake switch, straighten all wheels and shut the engine OFF. Allow the hydraulic fluid to cool. 2.
Section 5 4. Four bushings (Fig. 5–2) help locate the axle supports on the vehicle frame. Insert the bushings into the holes on the front and rear axle supports. Align the bushings and supports with the frame. Raise the axle as required to align the supports with the frame. Align yokes in same plane as shown (note angled notch in yoke) 5.
Axles, Wheels and Tires 11. Torque the lug nuts to 370 lb/ft (500 Nm) using the alternating pattern depicted in Fig. 5–5. 1 10 5 7 18. Start the engine. Turn the steering wheel several times lock to lock, operate the frame tilt function several times in both directions, and check the function of the brakes. Check for hydraulic leaks and tighten or repair as necessary. 5.2.
Section 5 5.3.1 Removing Wheel and Tire Assembly from Vehicle WARNING: Risk of serious personal injury. When removing a wheel and tire assembly from the vehicle: • Position vehicle on a flat, hard surface and support vehicle with approved jack stands or suitable supports. • Use appropriate safety glasses, safety shoes and appropriate clothing and equipment. • DO NOT wear rings or jewelry.
Axles, Wheels and Tires 5.3.2 Wheel Cleaning WARNING: Dirt and rust prevent the tire from seating properly on the wheel, which could result in an explosive separation. Such explosions could result in severe personal injury or death to the tire installer and to those in the area. Remove all rust, corrosion, dirt and other foreign material from all metal surfaces. In particular, the bead area (tireto-wheel mounting surface) must be especially clean. 5.3.
Section 5 D. Mounting Tire onto Wheel WARNING: Risk of serious personal injury. When mounting a tire onto a wheel: • Use the appropriate specialty tools and equipment for mounting a tire to a wheel or for dismounting a tire from a wheel, or have a qualified professional perform the work. DO NOT attempt to mount or dismount a tire without the proper tools, training and equipment. • Clean and inspect the wheel rim before installing a new tire.
Axles, Wheels and Tires F. Care and Storage of Tires Store unmounted tires vertically, standing on their tread. If stored for an extended period of time, rotate the tires periodically to help reduce stress concentrations in the ground contact area of the tread. Tires should not be stored flat or stacked vertically (“stove piped”) as they will become squashed and distorted, making mounting difficult, particularly for tubeless tires.
Section 5 5-14 Model 3606 • Origin 10/99
Section 6 Transfer Case and Drive Shafts Contents PAR. TITLE INTRODUCTION. . . . . . . . . . . . . . . . . . . . . . . . . . . . . . . . . . . . . . . . . . . . . . . . . Legend ................................................. General Overview (illustration) . . . . . . . . . . . . . . . . . . . . . . . . . . . . . . . . . 6.1 GENERAL INSTRUCTIONS . . . . . . . . . . . . . . . . . . . . . . . . . . . . . . . . . . . 6.1.1 Further Information . . . . . . . . . . . . . . . . . . . . . . . . . . . . . . .
Section 6 Introduction The Carraro Model TB 420 transfer case is a singlespeed, mechanical unit designed for heavy-duty industrial use. The transfer case is located beneath the frame of the vehicle, mounted to the engine mount (subframe), behind the transmission and ahead of the rear axle.
Transfer Case and Drive Shafts General Overview Transfer case turned 90° 13 9 2 12 8 7 15 7 14 10 4 56 3 11 10 16 15 7 1 37 35 36 37 35 7 17 14 10 7 18 22 23 33 31 32 10 21 19 20 24 30 29 28 26 25 27 2 36 12 2 11 34 39 38 40 41 42 43 38 44 39 45 41 46 40 MS0430 Model 3606 • Origin 10/99 6-3
Section 6 6.1 6.2.2 Technical Data GENERAL INSTRUCTIONS IMPORTANT: To help ensure optimum performance, the drive shaft assemblies are specially balanced as a unit at the factory. When servicing any flange yoke, slip yoke or drive shaft tube, order a complete assembly if components are bent or damaged. Refer to the Sky Trak International Model 3606 Parts Manual for ordering information. Before performing any inspection, maintenance or service operation, thoroughly clean the unit.
Transfer Case and Drive Shafts 6.3.2 Transfer Case Maintenance Information regarding checking the transfer case oil level and/or changing the transfer case oil is located in Section 2.12.13 Transfer Case Oil. 6.3.3 Transfer Case Removal 1. Level the vehicle, ground the carriage, place the travel select lever in NEUTRAL (N), engage the parking brake switch and shut the engine OFF. Allow the engine to cool. 2. Remove the engine mount rear cover plate (Fig. 6–2). 3.
Section 6 6.3.5 Transfer Case Installation IMPORTANT: To help ensure optimum performance, the drive shaft assemblies are specially balanced as a unit at the factory. When servicing any flange yoke, slip yoke, or drive shaft tube, order a complete assembly if components are bent or damaged. Refer to the Sky Trak International Model 3606 Parts Manual for ordering information. Inspect areas where the drive shaft flange yokes and slip yokes mount to the drive shafts.
Transfer Case and Drive Shafts 6.4.3 Drive Shaft Removal IMPORTANT: To help ensure optimum performance, the drive shaft assemblies are specially balanced as a unit at the factory. When servicing any flange yoke, slip yoke, or drive shaft tube, order a complete assembly if components are bent or damaged. Refer to the Sky Trak International Model 3606 Parts Manual for ordering information.
Section 6 6.4.7 Drive Shaft Installation B. Slip Yoke Removal IMPORTANT: To help ensure optimum performance, the drive shaft assemblies are specially balanced as a unit at the factory. When servicing any flange yoke, slip yoke, or drive shaft tube, order a complete assembly if components are bent or damaged. Refer to the Sky Trak International Model 3606 Parts Manual for ordering information.
Transfer Case and Drive Shafts 6.5 This section provides an easy reference guide covering the most common problems that occur during operation of the transfer case. TROUBLESHOOTING Transfer Case and Drive Shaft Troubleshooting Problem Cause Remedy 1. Gear teeth worn or grooved. 1. Insufficient lubrication. 2. Contaminated lubricant. • Replace gear. • Use correct lubricant. Fill to correct level and change at recommended intervals. 2. Gear teeth overheated (check color of gear teeth). 1.
Section 6 Transfer Case and Drive Shaft Troubleshooting Problem Cause Pinion and crown-wheel wear. Gears and bearings loose. Gears and bearings worn. Excessive eccentricity of gears. Lack of lubricant. Incorrect lubricant. Remedy 1. 2. 3. 4. 5. 6. Replace. Adjust. Replace. Replace. Fill to correct level. Replace. 10. Noise when driving. 1. 2. 3. 4. 5. 6. 11. Intermittent noise. 1. Gear damaged. 2. Cover bolts loose. 1. Replace gear. 2. Tighten to proper torque. 12. Continuous noise. 1.
Section 7 Transmission: Clark-Hurth T 12000 Contents PAR. TITLE INTRODUCTION. . . . . . . . . . . . . . . . . . . . . . . . . . . . . . . . . . . . . . . . . . . . . . . . . Legend ................................................. General Overview (illustration) . . . . . . . . . . . . . . . . . . . . . . . . . . . . . . . . . 7.1 TRANSMISSION SERIAL NUMBER . . . . . . . . . . . . . . . . . . . . . . . . . . . . 7.2 TRANSMISSION SPECIFICATIONS . . . . . . . . . . . . . . . . . . . . . . . . . . . . 7.2.
Section 7 Introduction Instructions in this section pertain mainly to general specifications, towing, maintenance information, and transmission removal and installation procedures. Internal transmission service instructions and detailed specifications are provided in the Clark-Hurth T 12000 Powershift Transmission 3, 4, & 6 Speed Intermediate Drop Maintenance and Service Manual, part number SM T12-3,4,6 ID.
Transmission General Overview 1 42 33 32 31 25 41 40 2 3 4 21 38 35 25 34 4 3 4 36 3 39 24 33 5 6 32 31 7 7 37 6 21 26 17 12 8 16 28 10 21 30 29 9 27 21 15 26 14 3 4 3 13 24 12 11 4 3 25 4 18 21 23 43 43 19 21 PF0760 21 22 22 20 4 4 Model 3606 • Origin 10/99 3 PS0010 7-3
Section 7 7.1 7.2.2 Transmission Lubrication TRANSMISSION SERIAL NUMBER The transmission serial number plate (Fig. 7–1) is located on the engine side of the transmission at the bottom right, toward the hydraulic fluid reservoir (tank). Information specified on the serial number plate includes the transmission model number, the transmission serial number and other data. Information on the serial number plate is required in correspondence regarding the transmission. A.
Transmission 7.4 TRANSMISSION MAINTENANCE 7.4.1 Maintenance Introduction WARNING: To help avoid severe burns, DO NOT attempt this procedure when the engine, cooling, and hydraulic systems are hot. Wait until they have cooled before proceeding. • Exercise extreme care to help avoid skin rashes, fire hazards and inhalation of harmful vapors when using solvent and caustic cleaners. • Exercise extreme care when using a steam cleaner to help avoid burns.
Section 7 7.5 TRANSMISSION REPLACEMENT IMPORTANT: To help ensure safety and optimum performance, replace the transmission if it is damaged. Refer to the Sky Trak International Model 3606 Parts Manual for ordering information. Cleanliness is of extreme importance. Before attempting to remove the transmission, thoroughly clean the exterior of the transmission to help prevent dirt from entering during the replacement process.
Transmission IMPORTANT: To help ensure optimum performance, the drive shaft assemblies are specially balanced as a unit at the factory. Mark the drive shaft yoke at the transmission for return to its original position. 14. Mark the transmission to transfer case drive shaft yoke at the transmission-mounting flange. Remove the M12 hex-head capscrews and lock washers securing the flange yoke to the transmission.
Section 7 23. Remove any external transmission components as required, including the transmission temperature switch (Fig. 7–4). Flywheel housing Flywheel 24. Remove the transmission oil filter and dispose of properly. Clean the filter mounting surface. The transmission is now ready for inspection and/or further service.
Transmission 8. Begin securing the transmission to the flywheel housing with M10 lock washers and M10 x 1,5 x 30 mm PC8.8 hex-head capscrews. Remove the two M10 x 1,5 x 63,5 mm guide studs (dowels) after several capscrews and washers are installed. When installing the washers and capscrews, tighten bolts evenly in stages and assure that the transmission converter housing installs evenly against the engine flywheel housing.
Section 7 24. Attach the front engine cover plate (Fig. 7–5) to the vehicle frame. Secure with 5/16-18 x 1" hex-head capscrews, 5/16" lock washers and 5/16" flat washers. Torque capscrews to 18 lb/ft (24 Nm). 25. Connect the fuel run solenoid connector on the top of the engine near the radiator. 26. Wipe up any spilled fluids. Dispose of properly. 27. Connect the battery negative (-) ground terminal at the battery. 7.5.
Transmission 7.6 TRANSMISSION TROUBLESHOOTING This section provides an easy reference guide covering the most common problems that occur during operation of the transmission. Transmission Troubleshooting Problem 1. Low clutch pressure. 2. Low converter charging pump output. 3. Overheating. 4. Noisy converter. 5. Lack of power. Cause Remedy 1. Low oil level. 1. Fill to the proper level. 2. Clutch pressure regulating valve stuck open. 2. Clean the valve spool and housing. 3.
Section 7 7-12 Model 3606 • Origin 10/99
Section 8A Engine: Perkins 1004 Series Contents PAR. TITLE INTRODUCTION. . . . . . . . . . . . . . . . . . . . . . . . . . . . . . . . . . . . . . . . . . . . . . . . . Legend ................................................. General Overview (illustration) . . . . . . . . . . . . . . . . . . . . . . . . . . . . . . . . . 8A.1 SAFETY INFORMATION . . . . . . . . . . . . . . . . . . . . . . . . . . . . . . . . . . . . . 8A.2 PERKINS ENGINE SERIAL NUMBER . . . . . . . . . . . . . . . . . . . . . . . . . . .
Section 8A Introduction DISCLAIMER AND SCOPE These instructions are written for worldwide use. In territories where legal requirements govern engine smoke emission, noise, safety factors, etc., apply all instructions, data and dimensions provided herein in such a way that after maintenance, service and repair of the engine, engine operation does not violate local regulations. IMPORTANT: These instructions cover only the routine maintenance, removal, installation and troubleshooting of the engine.
Perkins Engine General Overview 29 3 Flange nuts supplied w/ engine 28 25 2 26 1 27 20 9 5 6 4 24 11 10 7 8 10 22 9 21 20 11 10 19 18 17 10 16 9 Engine mount subframe (ref.) (includes hydraulic reservoir) 12 15 Front of vehicle 13 Torque to 60 lb/ft (81 Nm) 14 Torque to 180 lb/ft (244 Nm) MS1000 Figure 8A–1. Perkins engine general overview.
Section 8A 8A.1 SAFETY INFORMATION Engine Coolant (anti-freeze/anti-boilover) WARNING: DO NOT remove the radiator cap while the engine and coolant are hot. Hot coolant under pressure is dangerous and can injure the eyes and cause severe burns. • Cooling system corrosion inhibitors contain alkali (chemicals that break down organic substances such as skin and eye tissue). DO NOT swallow. Avoid prolonged or repeated contact with corrosion inhibitors.
Perkins Engine Engine Repair WARNING: Before beginning any adjustments or repairs, place a DO NOT OPERATE tag in the operator’s compartment and on the controls, and disconnect the battery negative cable. • DO NOT operate, clean, lubricate or adjust the engine without proper training. • NEVER attempt to perform an adjustment or repair that is not understood. • Before servicing, relieve pressure in fuel, oil, coolant and hydraulic lines.
Section 8A 8A.2 PERKINS ENGINE SERIAL NUMBER The Perkins 1004-series engine serial number is stamped on a label which is fastened to the side of the engine block, toward the vehicle hydraulic reservoir. Information contained in the serial number is required in correspondence regarding the engine.
Perkins Engine 8A.5.1 Radiator Pressure Cap The cooling system is designed to use a radiator pressure cap to help prevent the coolant from boiling. In addition, the pressure helps to eliminate the formation of steam pockets within the engine and ensures coolant circulation throughout all coolant passageways of the engine. For a 210° F (99° C) system, use a 7 psi (48 kPa) radiator cap. An incorrect or malfunctioning cap can result in the loss of coolant and a hot-running engine.
Section 8A 39 33 1 34 36 37 38 30 32 8 31 30 28 Front of vehicle 4 35 29 27 2 3 4 5 Engine (ref.) 24 26 19 8 7 6 17 18 19 24 25 21 23 20 22 10 7 9 16 13 15 12 11 13 14 7 14 Engine subframe (ref.) PS0490 1. 2. 3. 4. 5. 6. 7. 8. 9. 10. 11. 12.
Perkins Engine To remove the radiator and oil cooler: 1. Level the vehicle, ground the attachment, place the travel select lever in NEUTRAL (N), engage the parking brake switch and shut off the engine. Remove the ignition key. Secure accident prevention tags to both the steering wheel and the ignition switch. WARNING: DO NOT attempt this procedure when the engine is hot. Wait for the engine, muffler, and tailpipes to cool down before proceeding. Failure to do so could result in severe burns. 2.
Section 8A on the bottom of the radiator. Torque to 31 lb/ft (42 Nm). 16. Remove the oil cooler (Fig. 8A–6). 9. Working below the radiator, install two 5/16-18 x 3/4" Grade 5 hex-head capscrews (31), 5/16" lockwashers (30) and 5/16" narrow flat washers (29) securing the radiator at the lower mounting tabs to the radiator shroud (18). Torque to 18 lb/ft (24 Nm). Oil cooler 3/4" I.D. x 28" hose O-Ring 90° Elbow Reservoir SS1150 Figure 8A–6. Perkins oil cooler hose routings. 17.
Perkins Engine 5 6 7 4 6 8 6 10 9 11 10 1 10 3 12 Cab panel (ref.) 6 2 13 32 14 30 31 15 6 29 28 30 6 23 25 10 16 22 21 19 20 24 23 6 26 6 6 34 35 36 18 Front of vehicle 33 27 6 17 37 1. Fuel/water separator 2. Hex-head capscrew, 5/16-18 x 1-1/4" 3. Flat narrow washer, 5/16" 4. Hex-lock elastic nut, 5/16-18 5. Tube union, 5/16"-13/32" 6. Hose clamp, SAE Type F 7. Fuel hose, 3/8" x 4" 8. Fuel strainer 9. Fuel tank-to-engine hose, 3/8" x 68" 10.
Section 8A 8A.7.1 Diesel Fuel 8A.7.2 Fuel Tank Fuel represents a major portion of vehicle operating costs and therefore must be used efficiently. Always use a premium brand of high-quality, clean diesel fuel. Low cost, inferior fuel can lead to poor performance and expensive engine repair. The fuel tank (item 36, Fig. 8A–7) is located directly beneath the operator’s cab. Note: Use only diesel fuel designed for diesel engines.
Perkins Engine 5. Refill the fuel tank with water until it overflows. Completely flush the tank with water. Empty the tank and allow it to dry completely. Fuel lift pump D. Inspection 1. Inspect the fuel tank thoroughly for any cracks, slices, leaks or other damage. Replace a leaking or damaged tank. DO NOT attempt to repair, plug or patch a leaking or damaged fuel tank. The tank is manufactured using an injection molding process and cannot be repaired. 2.
Section 8A 8A.7.5 Fuel Filter Refer to Section 2 General Information, Specifications, and Maintenance Instructions for information on removing and replacing the fuel filter (item 1, Fig. 8A–7). 8A.7.6 Venting Air from the Fuel System Refer to Section 2 General Information, Specifications, and Maintenance Instructions, paragraph 2.12.7 D, Venting Air from the Fuel System. 8A.7.7 Fuel Injectors The Perkins engine uses closed nozzle hole-type injectors (or “atomizers”).
Perkins Engine 4. Place the new fuel injector and new seat washer into position. DO NOT misalign the fuel injector. Tighten the flange nuts evenly in small increments up to a final torque of 14 lb/ft (19 Nm). WARNING: KEEP CLEAR of spraying fuel. Diesel fuel will spray when venting high pressure lines. The fuel pressure is sufficient to penetrate the skin and cause serious bodily injury. Wear protective clothing and safety glasses. 5. Connect the high-pressure fuel pipe. Torque the nut to 15 lb/ft (20 Nm).
Section 8A 8A.9 PERKINS ENGINE REPLACEMENT Removal and installation of the engine can be done with or without the transmission attached. For information on removing the transmission from, and installing it to, the engine, refer to Section 7 Transmission. 8A.9.1 Engine Removal WARNING: To avoid severe burns, DO NOT attempt to remove the engine when the engine, cooling system and hydraulic system are hot. Wait until all parts and systems are cool before proceeding. 1.
Perkins Engine 11. Label and disconnect the alternator wire connector (Fig. 8A–13) and both alternator ground wires. Turbo mount 21 18 20 Natural mount 20 19 16 14 15 Ground wires 22 19 20 20 18 21 17 Alternator Engine (ref.) 22 21 20 5 19 14 15 16 4 Wire connector 6 MS1560 3 Figure 8A–13. Label and disconnect the alternator wire connector and both ground wires. 2 12. Disconnect (unplug) the hydraulic fluid level indicator lead (Fig. 8A–10 and Fig.
Section 8A 14. At the starter, label and disconnect the positive (+) battery cable. drive shaft must be in the same plane to help prevent excessive vibration (Fig. 8A–26). 15. Label and disconnect the engine water temperature switch lead (Fig. 8A–16), engine oil pressure switch lead, and transmission temperature lead. 17. Working from beneath the vehicle, label and disconnect all engine wire harness leads (refer to Section 10 Electrical System as required for detailed views of harness leads).
Perkins Engine Engine lift plates Fuel lift pump Fuel inlet line OA0332 Figure 8A–19. Fuel inlet line to lift pump connection. 23. Mark the location of the throttle cable at its engine mount bracket (Fig. 8A–20). 24. Disconnect the throttle cable at the bracket above the starter (Fig. 8A–20). 25. At the hydraulic fluid reservoir, disconnect the engine harness wire lead (Fig. 8A–10 and Fig. 8A–22) from the hydraulic fluid-level sending unit. 26.
Section 8A 2. Attach a suitable engine hoist to the engine lift plates (Fig. 8A–21). 3. Carefully install the engine onto the engine mounts (items 7, 8, 16, 17, 24 and 28, Fig. 8A–1). Make sure the bracket-type engine mounts align properly with the engine mounts in the subframe. 10. Connect the fuel return line to the fuel injector distributor (Fig. 8A–24). Fuel injector distributor Fuel return line 4. In four locations, install the nuts, washers and capscrews securing the engine mounts (Fig.
Perkins Engine Align yokes in same plane as shown (note angled notch in yoke) Angled notch 27. Attach the upper and lower radiator hoses (Fig. 8A– 4) to the engine water pump (and to the radiator, if necessary) and secure with hose clamps. 28. Open the radiator cap (Fig. 8A–4) and fill the radiator with a 50/50 mixture of water and ethylene glycol. More coolant will need to be added later. Replace and tighten the radiator cap. 29.
Section 8A 37. Purge the hydraulic system of air by operating all boom functions through their entire range of motion several times. Check the hydraulic oil level. 38. Check for proper operation of all components. 39. Turn the engine OFF. 8A.10 PERKINS ENGINE STORAGE If the engine is properly protected and stored according to the following recommendations, no corrosion damage will normally occur. Perkins Engine Company, Inc.
Perkins Engine 8A.11 TROUBLESHOOTING Items 1 through 60 in the Key cover both naturally-aspirated and turbocharged engines. There are no items that Trouble pertain to naturally-aspirated engines only. Items 61 through 64 cover turbocharged engines ONLY.
Section 8A 8A-24 Model 3606 • Origin 10/99
Section 8B Engine: Cummins 4BT3.9 Contents PAR. TITLE INTRODUCTION. . . . . . . . . . . . . . . . . . . . . . . . . . . . . . . . . . . . . . . . . . . . . . . . . Legend ................................................. General Overview (illustration) . . . . . . . . . . . . . . . . . . . . . . . . . . . . . . . . . 8B.1 SAFETY INFORMATION . . . . . . . . . . . . . . . . . . . . . . . . . . . . . . . . . . . . . 8B.2 CUMMINS ENGINE SERIAL NUMBER . . . . . . . . . . . . . . . . . . . . . . . . . . 8B.
Section 8B Introduction DISCLAIMER AND SCOPE These instructions are written for worldwide use. In territories where legal requirements govern engine smoke emission, noise, safety factors, etc., apply all instructions, data and dimensions provided herein in such a way that after maintenance, service and repair of the engine, engine operation does not violate local regulations. A gradual running in (break in) of a new engine is not necessary.
Cummins Engine General Overview Left side of engine (on right side of vehicle) 40 39 14 35 38 37 34 10 42 43 36 34 10 41 Front of engine 3 33 Front of vehicle 1 4 5 2 15 14 32 28 14 7 12 6 13 14 8 31 15 20 19 16 9 19 18 20 19 17 11 30 29 10 14 28 27 19 25 26 Front of vehicle Engine mount subframe (ref.) (includes hydraulic reservoir) 24 23 21 22 Torque to 60 lb/ft (81 Nm) Torque to 180 lb/ft (244 Nm) MS1140 Figure 8B–1. Cummins engine general overview.
Section 8B 8B.1 SAFETY INFORMATION Engine Coolant (anti-freeze/anti-boilover) WARNING: DO NOT remove the radiator cap while the engine and coolant are hot. Hot coolant under pressure is dangerous and can injure the eyes and cause severe burns. • Cooling system corrosion inhibitors contain alkali (chemicals that break down organic substances such as skin and eye tissue). DO NOT swallow. Avoid prolonged or repeated contact with corrosion inhibitors.
Cummins Engine Engine Repair WARNING: Before beginning any adjustments or repairs, place accident prevention tags in the operator’s compartment and on the controls, and disconnect the battery negative cable. • DO NOT operate, clean, lubricate or adjust the engine without proper training. • NEVER attempt to perform an adjustment or repair that is not understood. • Before servicing, relieve pressure in fuel, oil, coolant and hydraulic lines.
Section 8B 8B.2 CUMMINS ENGINE SERIAL NUMBER The Cummins 4BT3.9 serial number is stamped on the front of the engine block, near the fan pulley. Information contained in the serial number is required in correspondence with the engine manufacturer. DO NOT steam clean the following parts: • Electrical Components • Wiring • Injectors • Fuel Pump • Belts and Hoses • Bearings 4BT3.
Cummins Engine 8B.5.1 Radiator Pressure Cap The cooling system is designed to use a radiator pressure cap to help prevent the coolant from boiling. In addition, the pressure helps to eliminate the formation of steam pockets within the engine and ensures coolant circulation throughout all coolant passageways of the engine. For a 210° system, use a 7 psi (48 kPa) radiator cap. An incorrect or malfunctioning cap can result in the loss of coolant and a hot-running engine.
Section 8B 83 77 44 78 80 81 82 73 76 51 75 74 73 72 Front of vehicle 47 79 71 45 46 63 48 70 Engine (ref.) 47 49 51 50 68 61 62 69 68 63 64 65 66 53 60 67 Engine subframe (ref.) 55 50 52 54 56 59 56 57 50 58 PS0370 44. 45. 46. 47. 48. 49. 50. 51. 52. 53. 54. 55.
Cummins Engine To replace the radiator and oil cooler: 1. Level the vehicle, ground the attachment, place the travel select lever in NEUTRAL (N), engage the parking brake switch and shut off the engine. Remove the ignition key. Secure accident prevention tags to the steering wheel and ignition switch. WARNING: DO NOT attempt this procedure when the engine is hot. Wait for the engine, muffler, and tailpipes to cool down before proceeding. Failure to do so could result in severe burns. 2.
Section 8B 9. Working below the radiator, install two 5/16-18 x 3/4" Grade 5 hex-head capscrews (75), 5/16" lockwashers (74) and 5/16" narrow flat washers (73) securing the radiator at the lower mounting tabs to the radiator shroud (62). Torque to 18 lb/ft (24 Nm). 16. Remove the oil cooler (Fig. 8B–6). Oil cooler 3/4" I.D. x 28" hose O-Ring Reservoir 90° Elbow SS1150 Figure 8B–6. Cummins oil cooler hose routings. 17. Remove, inspect and replace the seal bulb (item 44, Fig.
Cummins Engine Front of vehicle 1 2 Cab panel (ref.) Engine rotated 180° for clarity 3 4 20 18 19 3 5 Fuel lift pump (ref.) 17 3 3 6 16 29 18 3 3 13 11 10 9 30 3 28 12 11 3 14 3 8 7 21 15 3 22 23 25 Front of vehicle 27 3 24 25 31 1. 2. 3. 4. 5. 6. 7. Fuel filter Straight barb connector, #6-4P Hose clamp, SAE Type F Fuel hose, 3/8" x 10" Fuel strainer Fuel tank-to-engine hose, 3/8" x 85" Hose barb coupling, #6-6P, use with Item 31 8.
Section 8B Inform the owner/operator of the vehicle to use No. 2 D diesel fuel, unless ambient temperatures are below 32° F (0° C). When temperatures are below 32° F (0° C), a blend of No. 1 D and No. 2 D fuels (known as "winterized" No. 2 D) may be used. Note: No. 1 D fuel may be used, however, fuel economy will be reduced. WARNING: DO NOT mix gasoline or alcohol with diesel fuel. The mixture can cause an explosion.
Cummins Engine 4. Reconnect the fuel hoses and follow the directions in Section 4 Cab, Covers and Mirrors to replace the other fuel system components and the cab. 8B.7.3 Fuel Level Sender and Gauge The fuel level sender and gauge assembly is described in Section 10 Electrical System. 3. Connect the fuel lines. 8B.7.5 Fuel Filter Refer to Section 2 General Information, Specifications, and Maintenance Instructions for information on removing and replacing the fuel filter (item 1, Fig. 8B–7). 8B.7.
Section 8B To test a fuel injector: 1. Remove the fuel injector from the cylinder head. 2. Invert the fuel injector with the nozzle facing out, then retighten the unions. Injector body O-ring Hold-down nut 3. Loosen the unions of the other fuel injector pipes (to help avoid the possibility of the engine starting). WARNING: KEEP CLEAR of spraying fuel. Diesel fuel will spray when venting high pressure lines. The fuel pressure is sufficient to penetrate the skin and cause serious bodily injury.
Cummins Engine 14. Bleed the fuel system in accordance with the instructions in Section 2 General Information, Specifications, and Maintenance Instructions. 8B.7.8 After Fuel System Service 1. Drain and flush the fuel tank if it was contaminated. 2. Vent air from the fuel system (see Section 2 General Information, Specifications, and Maintenance Instructions, paragraph 2.12.7 D). 3. Fill the fuel tank with fresh, clean diesel fuel as required. 8B.
Section 8B 8B.9 CUMMINS ENGINE REPLACEMENT Removal and installation of the engine can be done with or without the transmission attached. For information on removing the transmission from, and installing it to, the engine, refer to Section 7 Transmission. 8B.9.1 Engine Removal 4. Position a suitable container beneath the radiator (Fig. 8B–12). Remove the radiator cap and open the radiator drain petcock. Allow the coolant to drain into the container.
Cummins Engine Engine (ref.) 16 14 15 9. Label and disconnect the alternator wire leads (Fig. 8B–14). BL K 2L 5 19 4 20 2 K BL K 19 BL K BL K BL 17 18 B 2L 6 D D- 7 Alternator 8 N R K/G 3 10 9 PN LT N GR 1 MS1600 2 12 10 Figure 8B–14. Label and disconnect the alternator wire leads. 11 1 10. Disconnect (unplug) the hydraulic fluid level indicator lead (Fig. 8B–11 and Fig. 8B–15) and the hydraulic temperature sending unit lead (Fig.
Section 8B 12. Label and disconnect the positive (+) battery cable at the starter. 13. Label and disconnect the engine water temperature switch lead (Fig. 8B–17), engine oil pressure switch lead, and transmission temperature lead. 14. If removing the engine and transmission as a unit: • Place a suitable container beneath the vehicle frame side of the radiator. Disconnect the transmission cooler hoses at the radiator and cap the connectors to help prevent excess fluid drainage.
Cummins Engine 17. Label and disconnect the wiring harness at the steer select valve (Fig. 8B–18). 21. Mark the location of the throttle cable at its engine mount bracket (Fig. 8B–21). Steer select valve Two washers Jam nut Disconnect Engine wiring harness leads Bracket (above starter) Stop and throttle lever Throttle cable Disconnect MS1400 Figure 8B–18. Label and disconnect the wiring at the steer select valve. Clamp 18.
Section 8B 25. In four locations, remove the nuts, washers and capscrews securing the engine mounts (Fig. 8B–1) to the hydraulic reservoir/engine mount subframe. 26. Remove either the fan or the radiator to help prevent damage to the radiator when the engine is removed. 27. Begin removing the engine from the vehicle with the hoist or overhead crane. 28. As the engine is lifted away and removed, reposition the debris shield at the base of the radiator to prevent damage and allow engine removal.
Cummins Engine 18. For priming purposes, pour hydraulic oil into the main hydraulic pump. Connect the hydraulic system inlet and outlet hoses at the main hydraulic pump. If necessary, connect the inlet hose to the hydraulic reservoir. Refer to Section 9 Hydraulic System as required. 19. Connect the transmission hoses (Fig. 8B–5) to the radiator. 20. Connect the engine coolant temperature switch lead (Fig.
Section 8B 8B.10 CUMMINS ENGINE STORAGE If the engine is properly protected and stored according to the following recommendations, no corrosion damage will normally occur. Cummins Engine Company, Inc. and Sky Trak International are not responsible for any damage that occurs in relation to a service storage period. Use the following procedures immediately upon removing engine from service if being stored for an extended period of time. 13.
Cummins Engine 8B.
Section 8B 8B-24 Model 3606 • Origin 10/99
Section 9 Hydraulic System Contents PAR. TITLE INTRODUCTION. . . . . . . . . . . . . . . . . . . . . . . . . . . . . . . . . . . . . . . . . . . . . . . . . General Overview (illustration) . . . . . . . . . . . . . . . . . . . . . . . . . . . . . . . . . 9.1 SAFETY INFORMATION . . . . . . . . . . . . . . . . . . . . . . . . . . . . . . . . . . . . . 9.2 SPECIFICATIONS . . . . . . . . . . . . . . . . . . . . . . . . . . . . . . . . . . . . . . . . . . 9.3 HYDRAULIC PRESSURE DIAGNOSIS . . . . . . . . . . .
Section 9 9.10.4 Hoist/Lower Cylinder . . . . . . . . . . . . . . . . . . . . . . . . . . . . . . . . . 9.10.5 Frame Tilt and Stabilizer Cylinders . . . . . . . . . . . . . . . . . . . . . . 9.10.6 Swing Carriage (optional) . . . . . . . . . . . . . . . . . . . . . . . . . . . . . 9.10.7 Side Tilt Carriage Cylinder (optional) . . . . . . . . . . . . . . . . . . . . 9.10.8 Steer Cylinders . . . . . . . . . . . . . . . . . . . . . . . . . . . . . . . . . . . . . 9.11 TROUBLESHOOTING . . . . . . . . . . . . .
Hydraulic System General Overview FRONT ALE ATTACHMENT TILT CYLINDER AUILIARY COUPLERS (OPTION) L R STEER CYLINDER T BRAKE VALVE IN LS MAIN PUMP FRAME TILT CYLINDER IN T A B STEER SELECT VALVE HYDRAULIC RESERVOIR ETEND CYLINDER POER STEERING UNIT P BYPASS PRIM R P L T UNLOADER VALVE LS AUX HYDRAULIC OIL COOLER E R JOYSTICK 1 2 T P 4 3 HOIST CYLINDER OPERATORS CAB T R L LEFT SLAVE CYLINDER P PS PSG PP PPG R R E E PBG PB AUILIARY FUNCTION MANIFOLD RIGHT SLAVE CYLINDER F
Section 9 9.1 SAFETY INFORMATION General Hydraulic system maintenance will, at times, require that the engine be operated. Always follow safety precautions. Petroleum-based hydraulic fluids are used in this vehicle. Temperature increases occur to hydraulic fluid during operation of various hydraulic functions. A heated petroleum-based hydraulic fluid presents a considerable fire hazard, especially when an ignition source is present.
Hydraulic System In general, follow the steps below whenever conducting pressure checks and performing adjustments: 1. Park the vehicle on a firm, level surface. Engage the park brake, place the travel select lever in NEUTRAL (N), level the boom and turn the engine OFF. MS2120 MS2130 Figure 9–4. Flowmeter hydraulic diagnostic kit. 9.3.1 Pressure Checks and Adjustments When diagnosing trouble in the hydraulic system, use the hydraulic testing information on the pages 9-6 and 9-7.
Section 9 FRONT AXLE 7 ATTACHMENT TILT CYLINDER AUXILIARY COUPLERS L R STEER CYLINDER 1 T BRAKE VALVE IN LS MAIN PUMP 6 2 FRAME TILT CYLINDER EXTEND CYLINDER POWER STEERING UNIT UNLOADER VALVE LS AUX P T A BYPASS PRIM R P L T IN 2a HYDRAULIC RESERVOIR B STEER SELECT VALVE HYDRAULIC OIL COOLER E R JOYSTICK T 1 2 P 4 3 3a 4a HOIST CYLINDER OPERATOR'S CAB T R L P PS PSG PP PPG 3 5 LEFT SLAVE CYLINDER R R E E RIGHT SLAVE CYLINDER 4 PBG PB AUXILIARY MANIFOLD FTR
Hydraulic System 3606 HYDRAULIC TESTING Equipment Needed To Perform Tests From Hydraulic Diagnostic Test Kit Engine Information Idle . . . . . . . . . . . . . . . . . . . . . . . . . . . . 1,050 ± 50 rpm Full Speed . . . . . . . . . . . . . . . . . . . . . . 2,750 ± 50 rpm Circuit Gauge 2 4,000 PSI Gauge (275,6 bar) Hydraulic Oil Information Oil Type - 10W, meets MIL-L-2104C or ISO Grade 46 Capacity - Reservoir . . . . . . . . . . .32.2 gal. (114,7 liter) Capacity - System . . . . . . . . . . . .59.
Section 9 9.4 HYDRAULIC FLUID General information and specifications pertaining to hydraulic fluid are found in Section 2 General Information, Specifications and Maintenance Instructions. Use only clean, filtered fluid in the hydraulic system. After servicing or replacing a hydraulic system component, cycle all vehicle functions several times to remove (purge or “bleed”) air from the hydraulic system. DO NOT build maximum pressure at the end of stroke by continuing to hold the joystick function.
Hydraulic System HOSES, TUBE LINES, FITTINGS, ETC. 9.5.1 Hose, Tube, Line and Fitting Replacement There are numerous hydraulic hoses, tube lines, fittings, etc., used on this vehicle. Periodically inspect all of these and carefully examine any signs of wear, abrasion and/or deterioration. Determine whether any further use of the component would constitute a hazard. If in doubt, replace the component.
Section 9 9.6 HYDRAULIC RESERVOIR Hydraulic Reservoir Replacement The hydraulic reservoir (Fig. 9–5) includes the engine mounting crossmembers. The reservoir is secured to the right side of the vehicle frame with 1-8 x 2-3/4" Grade 8 hex-head capscrews, 1" hardened washers and 1-8 hexlock nuts. In order to remove the hydraulic reservoir, the engine and transmission assemblies must first be removed, along with all brackets, hoses, wiring, etc.
Hydraulic System 14 Slightly different for some models; consult 3606 Parts Manual 15 16 14 11 9 8 6 5 7 1 4 3 10 12 13 17 Torque to 4-5 lb/ft (5,4 - 6,8 Nm) 3 2 Frame (ref.) MS2010 Front of Vehicle 1. 2. 3. 4. 5. 6. 7. 8. 9. Hydraulic Reservoir Hex-head Capscrew, Grade 8, 1-8 x 2-3/4" Hardened Washer, 1" Hex-lock Nut, 1-8 Strainer Gasket Breather Temperature Switch, 195° F (76° C) Oil Pressure Switch, 20 psi (1,4 kPa) 10.
Section 9 9.7 HYDRAULIC SYSTEM PUMP The main gear pump (1, Fig. 9–6) is attached to the top of the transmission and driven via the pump main shaft via meshing with an internal transmission gear. The pump draws fluid through a 1-1/2" inside diameter hose via negative displacement, commonly but incorrectly referred to as vacuum or suction. Fluid is forced from the pump through a 3/4" inside diameter hose to the unloader valve. Hydraulic system pressure begins at the main pump.
Hydraulic System 23 21 10 5 Oil Cooler 15 10 5 Load Sense Port 3 4 35 34 18 1 36 21 23 35 VIEW FROM REAR 16 6 9 7 38 38 37 29 9 37 22 Inlet Tube Assembly 40 11 13 9 22 20 20 7 14 27 40 12 26 Auxiliary Function Manifold 8 25 22 2 13 20 11 20 32 22 13 33 11 6 32 31 30 17 25 Hydraulic Reservoir Front Of Vehicle Load Sense Port 28 Torque to Maximum 20 lb/ft. (27 Nm) Bypass Port Primary Port 2 Aux. Supply Port 39 19 24 Inlet Port PS0671 Figure 9–6.
Section 9 9.7.3 Pump Replacement Fig. 9–8. Grind off the tip to fit the notch behind the main pump shaft seal. a. Pump Removal 1. Park the vehicle on a firm, level surface, fully retract all hydraulic cylinders, ground the attachment (if any), place the travel select lever in NEUTRAL (N), engage the park brake switch and shut the engine OFF. WARNING: Hot hydraulic fluid can cause severe burns. Wait for hydraulic fluid to cool before servicing any hydraulic component. 2.
Hydraulic System c. General Repair Precautions 1/4" DIAMETER DRILL THROUGH HOLE 1. To facilitate repair of the pump and before any work is done, first, read and understand all of the steps used in the disassembly and assembly instructions. C RADIUS 2. The first requirement of good hydraulic equipment maintenance is cleanliness. Perform procedures in a clean area. 3. If it becomes necessary to pry sections apart, be extremely careful to avoid damaging the finelymachined surfaces.
Section 9 3 2 5 1 6 8 5 4 5 6 7 9 10 9 11 8 5 6 10 15 16 12 7 6 PF0760 14 13 PF0760 PS0020 Figure 9– 11. Hydraulic system pump. Legend for Pump 1. 2. 3. 4. 5. 6. 7. 8. 9. 10. 11. 12. 13. 14. 15. 16. Main Pump Washer Capscrew PEC Housing Dowel Pin Bushing Back-up Seal Channel Seal Thrust Plate Square “R” Seal Gear Housing Gear Set SEC Housing Lip Seal Seal Kit (includes items 7, 8, 10 and 14) Seal Kit w/Thrust Plates (includes items 7, 8, 9, 10 and 14) 9-16 5.
Hydraulic System f. Pump Inspection 1. Inspect internal pump components for wear, damage, etc. If inner surfaces of the pump do not display an ultra-smooth, polished finish, or are damaged in any way, replace the damaged part. Most often, dirty hydraulic fluid causes failure of internal pump seals and damage to the polished surfaces within the pump and other hydraulic system components. 2. If a dowel (5, Fig. 9– 11) or dowel-mounting hole is damaged, replace the dowel or housing as required. 3.
Section 9 12. Lubricate the gear set (12) with clean hydraulic oil from a filtered source. Slide the gear set into position within the SEC housing (13). Avoid damaging the lip seal (14) when the driven gear passes through the housing. Apply additional oil to the gears after installation. 13. Install the other thrust plate (with channel and with backup seals) over the gears so that the groove in the thrust plate will face away from the gear housing (11).
Hydraulic System 9.8 HYDRAULIC CIRCUITS This section describes each hydraulic circuit and includes, on the following pages, a circuit schematic and a discussion of the hydraulic function involved. The steer select valve is comprised of two electrical solenoids that act on a spool valve to direct flow to the steering cylinders, providing steering action.
Section 9 9.8.1 Brake Circuit b. Service Brake Circuit The brake system circuit (Fig. 9– 12) includes the park brake and the service brake, along with the auxiliary function manifold, main control valve and various hoses, fittings and other components. A hydraulic line from auxiliary function manifold port PS (Fig. 9– 12) provides flow to the service brake valve when the engine is running. A reservoir line is installed on the service brake valve at port T.
Hydraulic System FROM STEERING UNIT RESERVOIR (“ TANK” ) RETURN LINE TO MAIN CONTROL VALVE LOAD SENSE OUT FROM MAIN CONTROL VALVE SHUTTLE VALVE TO MAIN CONTROL VALVE 65 PSI T BYPASS TO TANK UNLOADER VALVE 3500 PSI SPOOL RELIEF VALVE 250 PSI INLET 25 PSI 2500 RPM 32.5 GPM 3.0 IN 4 0.5 PSI BRAKE VALVE 5 PSI TO JOYSTICK PARK BRAKE PSG PS PP PPG PB PBG FRONT WHEEL BRAKE REAR WHEEL BRAKE .090 DIA 550 PSI 2500 PSI P 650 PSI T AUXILIARY FUNCTION MANIFOLD MS0090 Figure 9– 12.
Section 9 Legend for Brake Circuit 1. Service Brake Valve 2. 90° Elbow, SAE 6 - Str. Thd. ORB x O-ring face seal 3. Swivel Run Tee, SAE 6, O-ring face seal 4. 90° Swivel, SAE 6, O-ring face seal 5. Diagnostic Nipple 6. Dust Plug 7. Auxiliary Function Manifold 9-22 8. Connector, SAE 6 - Str. Thd. ORB x O-ring face seal 9. Diagnostic Nipple, 9/16-18 10. 90° Elbow, SAE 8 - Str. Thd. ORB x O-ring face seal 11. Hose, 1/2” I.D. x 17” 12. Hose, 3/8” I.D. x 106” 13. Hose, 3/8” I.D. x 32” 14. Hose, 3/8” I.D.
Hydraulic System Front of Vehicle 9 T 6 10 7 9 8 6 12 11 Hydraulic Reservoir/Engine Mount Main Control Valve 2 19 Rear Axle 14 11 11 13 20 12 17 14 13 2 18 1 15 16 13 18 17 13 20 14 11 17 21 2 17 13 20 18 18 Shuttle Valve (Ref.) 13 15 15 1 3 Front Axle 4 6 Front of Vehicle 5 MS1870 Figure 9– 13. Vehicle brake circuit.
Section 9 Rubber Boot Piston Plunger Series Spring Relief Valve Piston Ring Spool One-way Orifice Metering Notches Make-up Check with Load Sense Spool MS1880 Figure 9– 14. Cross section of service brake valve. Fluid Flow When Brake Pedal is Pressed System pressure from the main pump flows to the unloader valve, to the auxiliary function manifold, to the brake valve. With the pedal depressed, spool valves open and oil is allowed to flow through the brake valve and out to the axles.
Hydraulic System 1. Brake pedal displacement is transmitted to the valve at the plunger (Fig. 9– 14). 2. The series spring transmits plunger displacement to the piston. 3. The piston and spool, functioning as pumps, send oil to the brake lines. Initially, the brake lines are vented to the reservoir by an annular gap between a stepped-down piston diameter and the piston bore. Flow to the reservoir is restricted when the piston contacts the piston sealing ring. 4.
Section 9 9.8.2 Boom Hoist/Lower Circuit b. Lower Circuit a. Hoist Circuit With the joystick in the boom lift position, pilot pressure shifts the hoist/lower spool valve (Fig. 9– 15) in the directional control valve to direct system pressure to ports A-D through E-B and through the check valve to the base end of the hoist cylinder. Return oil from the rod end of the cylinder flows through ports C-F of the spool valve to the return filter and then to the hydraulic fluid reservoir (Fig. 9– 16).
Hydraulic System HOIST/LOWER CYLINDER HOIST/LOWER SOLENOID VALVE (Part of Pilot Select Manifold) 4000 PSI X X b a B A 1 3 FWD. BACK TANK JOYSTICK LOAD SENSE OUT T P HOIST/LOWER SECTION (Part of Main Control Valve Assy) INLET PSG PS PP PPG PB PBG BYPASS TO TANK 65 PSI UNLOADER VALVE 3500 PSI RELIEF VALVE SPOOL 250 PSI INLET 25 PSI 2500 PSI P 2500 RPM 32.5 GPM 3.0 IN .090 DIA 550 PSI 650 PSI 4 T AUXILIARY FUNCTION MANIFOLD 0.5 PSI 5 PSI MS0020 Figure 9– 16.
Section 9 9.8.3 Boom Extend/Retract Circuit Hydraulic flow is applied in the boom extend/retract circuit (Fig. 9– 17 and Fig. 9– 18) by the hydraulic gear pump. System pressure is directed to either side of the extend/retract cylinder by the shifting of the spool valve in the directional control valve of the main control valve. The spool valve is shifted by pilot pressure, regulated by the position of the joystick. a.
Hydraulic System EXTEND/RETRACT CYLINDER 1 PILOT SELECT MANIFOLD 2 4000 PSI RETRACT 4000 PSI 12 3750 PSI 3200 PSI EXTEND 11 2 4 LEFT RIGHT TO RESERVOIR JOYSTICK LOAD SENSE OUT SHUTTLE IN P T PPG PB RETRACT EXTEND INLET PSG PS PP PBG BYPASS TO TANK 65 PSI UNLOADER VALVE 3500 PSI .090 DIA 550 PSI 2500 PSI RELIEF VALVE SPOOL P 250 PSI 3.0 IN T 2500 RPM 32.5 GPM INLET 25 PSI 650 PSI AUXILIARY FUNCTION MANIFOLD 4 0.5 PSI 5 PSI MS0040 Figure 9– 18.
Section 9 4 Port “ R” (retract) 8 4 8 Port “ E” (extend) Extend/Retract Cylinder 5 1 2 Bulkhead (ref.) 4 4 7 6 2 3 7 8 6 5 3 3 Main Control Valve 5 3 Hoist/Lower Cylinder Front of Vehicle Legend Hoist 1. 2. 3. 4. 5. Hose, 3/4” I.D. x 21-1/2” Hose, 3/4” I.D. x 27” Hose, 3/4” I.D. x 45” Hose, 3/4” I.D. x 36” 90° Elbow, SAE 12 - Str. Thd. ORB x O-Ring Face Seal 6. Bulkhead Nut, SAE 12 O-Ring Face Seal 7. Bulkhead Connector, SAE 12 O-Ring Face Seal 8. Connector, SAE 12 - Str. Thd.
Hydraulic System d. Extend/Retract Cylinder Counterbalance Valve The extend/retract cylinder (Fig. 9– 19) includes two counterbalance valves (Fig. 9– 20). The valves serve two main functions. One of the functions is to help prevent component damage. The other counterbalance valve function can be described as follows: • If the vehicle is travelling and the boom runs into a solid object, pressure will build up on the base end of the cylinder.
Section 9 9.8.4 Frame Tilt Circuit PILOT SELECT MANIFOLD PORT 9 a. Frame Tilt LEFT With the two frame tilt select buttons on the joystick depressed and held, and the joystick moved to the left, the spool valve in the frame tilt directional control valve (Fig. 9– 21) of the main control valve assembly (see Fig. 9– 22) is shifted by pilot pressure. System pressure is directed to ports A-D (Fig.
Hydraulic System V G3 G2 FTR .030” 5 FRAME TILT CYLINDER TOP FTB CYL2 PILOT SELECT MANIFOLD FTR 1 3 4 100 PSI T P STABILI ER CYLINDER 2 .060” G1 10 9 STABIL-TRAK MANIFOLD a b B A JOYSTICK RETURN LINE TO RESERVOIR LOAD SENSE OUT 2 4 LEFT RIGHT SHUTTLE IN P T 2 GPM MAX FRAME TILT MAIN CONTROL VALVE INLET BYPASS TO TANK UNLOADER VALVE 3500 PSI 65 PSI PSG PS PP PPG PB PBG SPOOL RELIEF VALVE 250 PSI 2500 RPM 32.5 GPM INLET 25 PSI 3.0 IN .
Section 9 Frame Tilt/Stabilizer Legend 9.8.5 Stabil-TRAK Hydraulic Circuit a. Stabil-TRAK System The patented rear axle lock or Stabil-TRAK system works to stabilize the vehicle under various conditions. The SKY TRAK Owners/Operators Manual Model 3606 contains basic Stabil-TRAK information; a copy of the owners/ operators manual should always be available in the storage compartment beneath the operators seat.
Hydraulic System 23 Main Control Valve (ref.) 16 8 17 20 17 21 22 18 NOTE: With optional Aux. Hydraulics, a tee replaces the 90° elbow (see item 17).
Section 9 b. Stabil-TRAK Modes The function of the Stabil-TRAK system varies under different operating conditions. The basic modes include the free pivot mode (Fig. 9– 25), final positioning mode (Fig. 9– 26), and locked mode (Fig. 9– 27). A hydraulic circuit diagram of each of the modes is included on the following pages. Free Pivot Mode (Fig. 9– 25) • Rod Oil OUT Conditions: Boom angle is below 40° .
Hydraulic System 3606 Stabil-TRAK HYDRAULIC CIRCUIT Free Pivot Mode STABILIER CYLINDER FTR V G3 G2 FRAME TILT CYLINDER SOLENOID #s: 5 FT 0.30 ORIFICE v R 5 2 4 3 1 4 100 PSI 2 1 3 0.60 ORIFICE T 100 PSI CARTRIDGE G1 P FTR b ( TO / FROM PILOT SELECT MANIFOLD ) a TO RESERVOIR B FTB A FRAME TILT SECTION OF MAIN CONTROL VALVE LOAD SENSE OUT SHUTTLE IN FRAME TILT SECTION OF MAIN CONTROL VALVE 3500 PSI 2 GPM MAX INLET 25 PSI BYPASS 3.
Section 9 Final Positioning Mode (Fig. 9– 26) Final Positioning Mode (Fig. 9– 26) • Rod Oil OUT • Base Oil OUT Conditions: Boom angle is above 40° , park brake OFF, and service brake released, and travel select lever in FORWARD (F) or REVERSE (R) position; solenoids 3 and 4 are energized. Conditions: Boom angle is above 40° , park brake OFF and service brake released, and travel select lever in FORWARD (F) or REVERSE (R) position; solenoids 3 and 4 are energized.
Hydraulic System 3606 Stabil-TRAK HYDRAULIC CIRCUIT Final Positioning Mode STABILIER CYLINDER FTR V SOLENOID #s: 5 G3 G2 FRAME TILT CYLINDER FT 0.30 ORIFICE R v 5 2 4 1 2 4 3 100 PSI 1 0.60 ORIFICE 3 T 100 PSI CARTRIDGE G1 P FTR b ( TO / FROM PILOT SELECT MANIFOLD ) a B TO RESERVOIR FTB A FRAME TILT SECTION OF MAIN CONTROL VALVE LOAD SENSE OUT SHUTTLE IN FRAME TILT SECTION OF MAIN CONTROL VALVE 3500 PSI 2 GPM MAX INLET 25 PSI BYPASS 3.
Section 9 Locked Mode (Fig. 9– 27) • Rod Oil OUT • Frame TILT LEFT Conditions: Boom angle is above 40° , park brake ON, or service brake applied, or travel select lever in neutral. Oil flows to the base end of the frame-tilt cylinder. Oil from the rod-end of the frame-tilt cylinder flows through a check valve (which was unseated by pilot pressure), then flows to port FTR on the stabilizer valve block.
Hydraulic System 3606 Stabil-TRAK HYDRAULIC CIRCUIT Locked Mode FTR V 5 STABILIZER CYLINDER G3 G2 0.30 ORIFICE v SOLENOID #s: 5 FT R E 2 4 3 1 2 4 100 PSI T FRAME TILT CYLINDER 1 3 0.
Section 9 9.8.6 Steering Circuit Vehicle steering modes are two-wheel steer, four wheel steer and crab steer. Fig. 9– 35 shows an exploded view of the steering circuit components. b. Two-wheel Steer a. Two-wheel Steer With the steer select switch in the two-wheel steer position, when a right turn is made, the steering control valve spool is shifted so that system pressure is applied through ports E-B of the intake side of the steering unit metering section.
Hydraulic System TO/FROM JOYSTICK b STEERING UNIT RESERVOIR RETURN T P A LOAD SENSE OUT a B REAR STEERING CYLINDER SHUTTLE IN 65 PSI FRONT STEERING CYLINDER TO BRAKE VALVE BYPASS TO TANK UNLOADER VALVE 3500 PSI RELIEF VALVE SPOOL 250 PSI INLET 25 PSI 2500 RPM 32.5 GPM 3.0 IN 4 0.5 PSI 5 PSI PSG PS PP TO BRAKE VALVE REAR WHEEL BRAKE PB PBG .090 DIA 550 PSI 2500 PSI FRONT WHEEL BRAKE PPG P 650 PSI T AUXILIARY FUNCTION MANIFOLD MS0120 Figure 9– 30.
Section 9 c. Four-wheel Steer • Left Turn (Fig. 9– 31) • Right Turn (Fig. 9– 32) With the steer select switch in the four-wheel steer position, the steering unit control valve spool is shifted so that the system pressure is applied through ports E-C to the intake side of the power steering unit metering section.
Hydraulic System d. Crab Steer • Left Turn (Fig. 9– 33) • Right Turn (Fig. 9– 34) With the steer select switch in the crab steer position, the steering control valve spool is shifted so that system pressure is applied through ports E-C to the intake side of the steering unit metering section. A specific amount of hydraulic oil is exhausted from the metering section and routed back to the control valve section where it is channeled through ports B-A to the left rod end side of the front steer cylinder.
Section 9 42 Auxiliary Function Valve 33 24 33 25 43 17 12 12 27 P PS 41 PS 19 T G 14 PP PP G 9 28 PB 18 13 19 18 15 Unloader Valve 30 16 VIEW FROM REAR OF VEHICLE 40 33 12 34 Rear Axle 29 UNDERSIDE VIEW 21 11 32 10 35 37 9 20 24 25 48 27 15 52 29 28 51 30 46 51 49 46 51 31 38 46 49 50 32 47 15 27 53 35 39 46 31 48 52 29 15 47 53 15 35 30 55 44 46 28 49 22 Transfer Case 25 27 3 52 15 36 37 46 35 49 32 51 46 46 48 32 37 45 37 54 36 21
Hydraulic System Steering Circuit Legend 1. 2. 3. 4. 5. 6. 7. 8. 9. 10. 11. 12. 13. 14. 15. 16. 17. 18. 19. 20. 21. 22. 23. 24. 25. 26. 27. 28. Steering Unit 90° Elbow, SAE 6-4 - str. thd. ORB x o-ring face seal Long Connector, SAE 8 - str. thd. ORB x o-ring face seal Check Valve 8-8 Swivel Run Tee, SAE 6 - o-ring face seal 90° Elbow, SAE 6 - str. thd. ORB x o-ring face seal Shuttle Valve 90° Elbow, SAE 6 - str. thd. ORB x o-ring face seal swivel Dust Plug Diagnostic Nipple Branch Tee, SAE 8 - str. thd.
Section 9 9.8.7 Attachment Tilt and Slave Cylinder Circuit The attachment tilt functions are dependent on the position of the attachment tilt mode switch (Fig. 9– 36 and Fig. 9– 37) and can be achieved by pressing and holding the button on the top right of the joystick. Moving the joystick backward controls attachment tilt UP. Moving the joystick forward controls attachment tilt DOWN.
Hydraulic System SLAVE CYLINDERS PILOT SELECT MANIFOLD 1 3 2 4 ATTACHMENT TILT 4000 PSI ATTACHMENT TILT CYLINDER 8 4000 PSI AUX 1 15 7 a B 3700 PSI RETURN TO RESERVOIR A 16 b 3700 PSI LOAD SENSE OUT SHUTTLE IN 15 GPM MAX INLET ATTACHMENT TILT MAIN CONTROL VALVE ASSEMBLY 1 FWD 3 BACK JOYSTICK P T BYPASS TO RESERVOIR 65 PSI UNLOADER VALVE PSG PS PP PPG PB PBG 3500 PSI RELIEF VALVE SPOOL 250 PSI 25 PSI 3.0 IN 2500 PSI 2500 RPM 32.5 GPM INLET .
Section 9 a. Center Position PILOT SELECT MANIFOLD PORT 7 When the joystick is in the center or neutral position, the attachment tilt spool valve (Fig. 9– 39) in the directional control valve is positioned to prevent flow to any of the working ports. BASE OF CYLINDERS RESERVOIR ROD END OF CYLINDERS SHUTTLE IN 15 GPM MAX LOAD SENSE OUT b. UP Position INLET With the right button depressed and held on the joystick, and the joystick moved to the left, the attachment tilt spool valve (Fig.
Hydraulic System c. DOWN Position With the right button depressed and held on the joystick, and the joystick moved to the right, the attachment tilt spool valve (Fig. 9– 39) in the directional control valve is shifted so system pressure is directed to ports A-D, through ports E-B to the rod end of the attachment tilt cylinder and the slave cylinders.
Section 9 13 15 6 Inner Boom 23 24 11 20 16 3 10 7 3 26 5 Inner tube at bulkhead 25 15 19 23 16 Outer tube at bulkhead Inner tube under boom 16 11 24 14 7 17 22 15 Front of Vehicle Outer tube under boom 14 22 21 29 18 21 22 Main Control Valve Assembly (ref.) 29 3 Attachment Tilt Cylinder 3 1 27 28 1 22 20 27 22 20 8 9 1 1 29 28 17 4 18 2 RH 2 12 LH PS0390 Figure 9– 40. Attachment tilt/slave cylinder circuit.
Hydraulic System Attachment Tilt/Slave Cylinder Legend 1. 2. 3. 4. 5. 6. 7. 8. 9. 10. 11. 12. 13. 14. 15. Hose, 1/2” I.D. x 33-1/2” Hose, 1/2” I.D. x 16” Hose, 1/2” I.D. x 39” Bulkhead Fitting Support Twin Hose Clamp Set, 0.78” I.D.
Section 9 Joystick Circuit Legend 9.8.8 Joystick Circuit Joystick hydraulic circuit (Fig. 9– 43) commands are achieved through electric and hydraulic signals via a set of cartridge-type, solenoid-operated control valves mounted in an array at the pilot select manifold (Fig. 9– 42). The cartridge valves shift to allow hydraulic oil to flow to the proper circuit as commanded by joystick position. Hydraulic oil flows from the joystick valve to the pilot select manifold (Fig.
Hydraulic System 1 5 Front of Vehicle UNDERSIDE 2 6 2 5 9 8 8 3 4 6 10 Auxiliary Function Valve 7 9 8 Port “ PP” 8 11 4 Valve Plate Assembly 5 6 Front of Vehicle PS0760 Figure 9– 43. Joystick circuit.
Section 9 27 21 27 10 19 41 40 26 1 34 20 29 21 23 19 25 15 13 24 22 16 43 38 35 39 30 31 12 11 37 5 36 17 See “ Main Control Valve” 7 18 2 7 6 16 15 15 17 4 28 28 30 32 33 8 FRAME 9 Front Of Vehicle 7 12 6 Front Of Vehicle See “ Directional Control Valves” 6 19 3 17 15 12 42 15 12 3 12 16 14 6 8 6 14 7 15 6 19 42 16 6 16 12 14 13 7 6 15 17 17 17 19 15 REAR VIEW OF VALVE PLATE 6 7 15 7 1 PS0380 Figure 9– 44.
Hydraulic System Valve Plate Assembly Legend (without auxiliary hydraulics) 1. 2. 3. 4. 5. 6. 7. 8. 9. 10. 11. 12. 13. 14. 15. 16. 17. 18. 19. 20. 21. 22. 23. Pilot Select Manifold Main Control Valve Shuttle Valve Spacer Main Valve Bracket Hose, 3/8" I.D. x 18" Hose, 3/8" I.D. x 19.3" Hose, 3/8" I.D. x 20" Carriage Bolt, 3/8-16 x 2-1/4" Long Connector, SAE 8 - Str. Thd. ORB x O-Ring Face Seal Branch Tee, SAE 8 - Str. Thd. ORB x O-Ring Face Seal 90° Elbow, SAE 6 - Str. Thd.
Section 9 18 NOTE: The Auxiliary Hydraulic System is an option that consists of the parts shown on this page PLUS the parts shown on the “ Valve plate assembly without auxiliary hydraulics” 17 15 12 Front Of Vehicle 6 See “ Main Control Valve” 13 10 11 To Stabilizer Cylinder Port “T” 14 26 27 7 17 16 17 28 25 9 2 9 1 17 8 13 11 15 REAR VIEW OF VALVE PLATE 15 17 19 18 15 10 20 6 18 14 3 13 23 5 4 16 19 Remove Plug 24 29 14 7 3 8 PF0760 21 Front Of Vehicle 22 PS0550 F
Hydraulic System Valve Plate Assembly Legend (with auxiliary hydraulics) 1. 2. 3. 4. 5. 6. 7. 8. 9. 10. 11. 12. Auxiliary Control Valve Auxiliary Control Valve Mounting Bracket Lockwasher, 3/8" Hex-head Capscrew, 3/8-16 x 1-1/4" Hex-head Capscrew, 3/8-16 x 3/4" Gr. 5 Hose, 1/2" ID x 21" Hose, 1/2" ID x 26" Hose, 3/8" ID x 21-1/2" Hose, 3/8" ID x 10-1/2" Hose, 3/8" ID x 26" Hose, 3/8" ID x 41" Modified 90° Elbow, SAE 6, Str. Thd. ORB x O-Ring Face Seal 13. 90° Elbow, SAE 6 - Str. Thd.
Section 9 9.8.9 Auxiliary Hydraulics Circuit (optional) Manually Operated Pressure Relief Valve The optional auxiliary hydraulic circuit (Fig. 9– 47 and Fig. 9– 48) functions can be achieved by pressing and holding the center button on the joystick. Moving the joystick to the left controls auxiliary function in one direction, usually forward, if the auxiliary device is so designed. Moving the joystick to the right controls auxiliary functions in reverse, or the opposite direction.
Hydraulic System RESERVOIR FEMALE MALE B T MANUAL PRESSURE RELIEF VALVE P PILOT SELECT MANIFOLD 1 a B 3700 PSI A 2 b 3700 PSI AUX 2 (OPTIONAL) 6 5 15 GPM MAX 2 4 LEFT RIGHT P AUXILIARY CONTROL VALVE (Option) LOAD SENSE OUT SHUTTLE IN (MAIN CONTROL VALVE) P T JOYSTICK INLET TO AUXILIARY FUNCTION MANIFOLD LOAD SENSE OUT BYPASS TO TANK 65 PSI UNLOADER VALVE 3500 PSI RELIEF VALVE SPOOL 250 PSI 2500 RPM 32.5 GPM INLET 25 PSI 3.0 IN 3 0.5 PSI 5 PSI MS2000 Figure 9– 47.
Section 9 15 31 12 11 13 11 12 19 31 15 22 3 10 20 7 21 Front Of Vehicle 18 4 10 6 Auxiliary Hydraulics Bulkhead 8 3 14 5 4 33 23 39 36 29 30 7 14 2 17 16 6 9 37 40 See “ Valve Plate Assembly With Auxiliary Hydraulics” 34 1 35 40 39 41 42 23 43 23 38 38 32 44 43 26 25 24 28 36 27 41 44 32 37 PS0520 Figure 9– 48. Optional auxiliary hydraulic circuit.
Hydraulic System Auxiliary Hydraulics Legend 1. 2. 3. 4. 5. 6. 7. 8. 9. 10. 11. 12. 13. 14. 15. 16. 17. 18. 19. 20. 21. 22. 23. 24. Shuttle Valve Bulkhead Fitting Support Bracket Tube Assembly, Outer-Aux. Hydraulics (Rear) Tube Assembly, Inner-Aux. Hydraulics (Rear) Swivel Run Tee, #10 Tube Assembly, Inside-Aux. Hydraulics (Front) Tube Assembly, Outside-Aux.
Section 9 9.9 a. Unloader Valve Removal VALVES AND MANIFOLDS Valves are devices that open or close passageways. Manifolds (derived from the words, “many folds”) contain circuit passageways involved in the distribution of hydraulic fluid flowing under pressure. There are various valves and manifolds in use on this vehicle. As valves open and close, hydraulic fluid is directed to flow through various passageways to the prescribed circuit, causing vehicle functions occur. 1.
Hydraulic System 2 Torque to Maximum 20 lb/ft. (27 Nm) 3 4 8 5 6 1 7 PS0510 Figure 9– 50. Unloader valve detail. Unloader Valve Legend 1. 2. 3. 4. 5. 6. 7. 8. f. Unloader Valve (includes items 2 through 8) Cap O-Ring Spool Spring Tube Spacer Spool Valve Housing Relief Valve Assembly Preset at 3500 psi ± 100 psi (241 bar ± 7 bar) Unloader Valve Installation 1. Secure the unloader valve to the vehicle frame near the transmission (Fig.
Section 9 9.9.2 Main Control Valve a. Main Control Valve Replacement The main control valve assembly (2, Fig. 9– 51) is located at the rear of the vehicle, beneath the rear cover, secured to the valve plate assembly. The main control valve assembly consists of various working sections with their own valve assemblies, each with a particular purpose in providing vehicle functions. The main control valve assembly (2, Fig.
Hydraulic System b. Main Control Valve Removal 1. Park the vehicle on a firm, level surface, fully retract all hydraulic cylinders, ground the attachment (if any), place the travel select lever in NEUTRAL (N), engage the park brake switch and shut the engine OFF. WARNING: Hot hydraulic fluid can cause severe burns. Wait for hydraulic fluid to cool before servicing any hydraulic component. 2. Unlatch, unlock and open the engine cover. Allow the hydraulic fluid to cool.
Section 9 21 27 10 19 27 41 40 26 1 34 29 20 21 23 24 19 25 15 13 22 16 43 38 35 39 30 31 12 11 37 5 36 17 7 18 See “ Main Control Valve” 2 7 6 16 15 15 17 4 28 28 30 32 33 8 FRAME 9 Front Of Vehicle 7 6 See “ Directional Control 6 3 17 12 Front Of Vehicle 15 12 42 Valves” 19 15 12 14 12 6 3 16 8 6 14 7 15 6 19 42 16 6 16 12 14 13 7 6 15 17 17 17 19 15 REAR VIEW OF VALVE PLATE 6 7 15 7 44 PS0380 Figure 9– 51.
Hydraulic System Main Control Valve Plate Assembly Legend (without auxiliary hydraulics) 1. 2. 3. 4. 5. 6. 7. 8. 9. 10. 11. 12. 13. 14. 15. 16. 17. 18. 19. 20. 21. 22. 23. Pilot Select Manifold Main Control Valve Shuttle Valve Spacer Main Valve Bracket Hose, 3/8" I.D. x 18" Hose, 3/8" I.D. x 19.3" Hose, 3/8" I.D. x 20" Carriage Bolt, 3/8-16 x 2-1/4" Long Connector, SAE 8 - Str. Thd. ORB x O-Ring Face Seal Branch Tee, SAE 8 - Str. Thd. ORB x O-Ring Face Seal 90° Elbow, SAE 6 - Str. Thd.
Section 9 18 NOTE: 17 15 The Auxiliary Hydraulic System is an option that consists of the parts shown on this page PLUS the parts shown at “ Valve plate assembly (without auxiliary hydraulics)” 12 Front Of Vehicle 6 13 See “ Main Control Valve” 10 11 To Stabilizer Cylinder Port “T” 14 26 7 17 16 17 27 28 15 9 2 9 1 17 8 13 11 15 REAR VIEW OF VALVE PLATE 15 17 10 20 6 19 18 18 14 15 3 13 23 4 5 16 19 Remove Plug 24 29 14 7 3 8 PF0760 21 Front Of Vehicle 22 PS0550 Fig
Hydraulic System Main Control Valve Assembly Legend (with auxiliary hydraulics) 1. 2. 3. 4. 5. 6. 7. 8. 9. 10. 11. 12. Auxiliary Control Valve Auxiliary Control Valve Mounting Bracket Lockwasher, 3/8" Hex-head Capscrew, 3/8-16 x 1-1/4" Hex-head Capscrew, 3/8-16 x 3/4" Gr. 5 Hose, 1/2" ID x 21" Hose, 1/2" ID x 26" Hose, 3/8" ID x 21-1/2" Hose, 3/8" ID x 10-1/2" Hose, 3/8" ID x 26" Hose, 3/8" ID x 41" Modified 90° Elbow, SAE 6, Str. Thd. ORB x O-Ring Face Seal 13. 90° Elbow, SAE 6 - Str. Thd.
Section 9 Outlet Section Relief Valve Remove the SAE plug (7, Fig. 9– 53) and O-ring (8) from the outlet section assembly (6) to facilitate cleaning and removal of any debris from within the outlet section. The relief valve assembly (27, Fig. 9– 53) is part of the attachment and frame tilt section assemblies. The valve is preset at 3700± 50 psi (255 ± 3,5 bar). Attachment Tilt Section 1. Carefully separate the outlet section assembly (6, Fig. 9– 53) from the attachment tilt section assembly (9).
Hydraulic System 2. Remove the plug (45), poppet (46), back-up rings (47), and jam nut (48). Keep the back-up rings (47) for re-use later during assembly. 3. Carefully remove the plug (49) with O-ring (29) from the housing (51), exposing the spring (36) and pilot poppet (50). Discard the O-ring (29). 4. Remove the check valve poppet (54) from the housing (51). 5. Remove the relief valve poppet (53), O-ring (30), and back-up ring (35). Discard the O-ring (30) and backup ring (35). 6.
Section 9 38 39 PF0760 1 7 13 14 14 17 4 8 2 27 13 3 12 15 20 21 16 5 12 23 18 11 19 22 11 25 24 6 9 10 24 26 16 Boom Raise/Lower & Extend/Retract Sections for Reference Only 40 42 37 29 30 41 31 43 44 36 28 33 27 45 35 32 47 34 46 48 PS0780 Figure 9– 53. Attachment tilt and frame tilt sections.
Hydraulic System Main Control Valve Legend Attachment Tilt and Frame Tilt Sections 1. Main Control Valve Assembly (includes items 2 through 37) 2. Special Upper Nut 3. Special Lower Nut 4. Upper Tie Rod 5. Lower Tie Rod 6. Outlet Section Assembly 7. SAE Plug 8. O-Ring 9. Attachment Tilt Section Assembly (includes items 11 through 26) 10. Frame Tilt Section Assembly (includes items 11 through 26) 11. O-Ring 12. Shuttle 13. Spring 14. C.V. Compensator Piston 15. Socket-head Capscrew 16. Seal Plate 17.
Section 9 f. Main Control Valve Reassembly Note: Always replace O-rings with new O-rings to help ensure a leak-proof seal and proper vehicle performance. Attachment and Frame Tilt Outlet Section Assembly Install a new O-ring (8, Fig. 9– 53), and the SAE plug (7), into the outlet section assembly (6). Attachment Tilt Section The section can be identified by manufacturing markings made for the inlet (triangle) and outlet (“B”) ports.
Hydraulic System Boom Extend/Retract Section 1. Install the poppet (24, Fig. 9– 54), spring (25) and shuttle (21) into the boom extend/retract section assembly (8). 2. Install a new O-ring (20) into the boom extend/retract section assembly (8). 3. Carefully attach the boom extend/retract section assembly (8) to the boom hoist/lower section assembly (9) and outlet section assembly (7). Assembling the Relief Valve Assemblies Relief valve assembly (27, Fig.
Section 9 Attachment Tilt and Frame Tilt Sections for Reference Only 1 24 14 24 25 37 25 10 26 16 14 11 39 27 12 13 15 20 17 6 18 38 42 19 28 21 27 4 2 19 20 3 41 23 11 9 22 21 7 40 8 43 44 23 5 PF0760 45 46 48 30 47 36 51 29 49 29 31 50 27 28 33 52 34 30 54 32 35 53 PS0770 Figure 9– 54. Hoist/lower and extend/retract sections.
Hydraulic System Main Control Valve Legend Hoist/Lower and Extend/Retract Sections 1. Main Control Valve Assembly (includes items 2 through 42) 2. Special Upper Nut 3. Special Lower Nut 4. Upper Tie Rod 5. Lower Tie Rod 6. Orifice Shut-off Plug Assembly 7. Outlet Section Assembly 8. Boom Extend/Retract Section Assembly (includes items 10 through 25) 9. Boom Hoist/Lower Section Assembly (includes items 10 through 26) 10. Socket-head Capscrew 11. Retainer 12. Spool Cap 13. Shoulder Socket-head Screw 14.
Section 9 a. Auxiliary Function Manifold Replacement 9.9.3 Auxiliary Function Manifold The auxiliary function manifold (Fig. 9–55) is located near the battery, secured to a bracket at the hydraulic fluid reservoir/engine mount with two capscrews and lockwashers. 1. Park the vehicle on a firm, level surface, fully retract all hydraulic cylinders, ground the attachment (if any), place the travel select lever in NEUTRAL (N), engage the park brake switch and shut the engine OFF.
Hydraulic System b. Auxiliary Function Manifold Disassembly, Cleaning, Inspection and Reassembly 1. Secure the auxiliary function manifold (Fig. 9– 56) in a suitable bench vise if possible. 2. Remove the pressure-reducing valve “PS” (Fig. 9– 56) set at 2500 psi (172 bar). 3. Remove the pressure-reducing valve “PB” set at 550 psi (38 bar). 4. Remove the pressure-relief valve set at 650 psi (45 bar). 5. Remove the check valve. 6. Remove the diagnostic nipples at “PPG” and PBG”.
Section 9 9.9.5 Pilot Select Manifold The pilot select manifold (Fig. 9– 57) is a preciselymachined block located inside the rear cover, secured at its four corners by capscrews and lockwashers to the main control valve plate assembly (Fig. 9– 51) near the left inside frame rail. The pilot select manifold contains ports for cartridge valves and hose fittings. DO NOT loosen, disassemble or attempt to adjust any of the cartridges unless specifically instructed by Sky Trak to do so! 4.
Hydraulic System 6. Start the engine and run at approximately 1/3 to 1/2 throttle for about one minute without moving the vehicle or operating any hydraulic functions. 7. Inspect for leaks and check the level of the hydraulic fluid in the reservoir. Shut the engine OFF. Note: Check for leaks and repair as required before continuing. Add hydraulic fluid to the reservoir as needed. 8. Conduct a pressure check of all boom function hydraulic circuits. 9.
Section 9 When the solenoid is de-energized, the control spool (4) is returned to its normal condition by the centering springs (5). P2 1 P3 8 P1 MS2080 4 7 2 3 5 5 6 3 Figure 9– 61. Shuttle valve. 6 7 WARNING: Hot hydraulic fluid can cause severe burns. Wait for hydraulic fluid to cool before servicing any hydraulic component. MS2060 1. 2. 3. 4. O-rings Housing Solenoids (2) Control Spool 5. 6. 7. 8. Return Springs Push Pin Manual Override Solenoid-operated Valve Figure 9– 60.
Hydraulic System 9.9.9 Service Brake Valve c. Shuttle Valve Installation 1. Attach the shuttle valve (Fig. 9– 61) to the brake valve (Fig. 9– 62) with a 90° elbow fitting. The shuttle valve (Fig. 9– 61) joins the steering valve shuttle fluid input line (port P1, Fig. 9– 61), shuttle-in line from the main control valve (port P2), and the brake valve loadsense line (port P3). Use new O-rings as required. Reattach and secure all hoses, clamps, etc. The service brake valve (Fig. 9– 58 and Fig.
Section 9 9.10 CYLINDERS There are many factors involved with the proper disassembly, cleaning, inspection, repair and reassembly of hydraulic cylinders; therefore, only qualified professionals with proper training, supervision, tools and equipment should rebuild the cylinders used on this vehicle. For example, special pin spanner wrenches of the correct size are needed to disassemble the cylinders.
Hydraulic System 9.10.1 Attachment Tilt Cylinder The attachment tilt cylinder (Fig. 9– 64) is attached at the front of the inner boom inside the gooseneck. a. Attachment Tilt Cylinder Removal 1. Park the vehicle on a firm, level surface, fully retract all hydraulic cylinders, ground and remove the attachment. Allow sufficient work space at the front of the boom. Raise the boom enough to allow the quick attach or the bottom of the gooseneck to clear the ground.
Section 9 17 1 Torque to 300-400 lb/ft. (407-542 Nm) 16 14 17 18 8 Apply Loctite #271 and Torque to 1100-1250 lb/ft. (1492-1695 Nm) 13 15 12 11 10 9 3 5 6 2 7 19 5 4 2 Torque to 30-35 lb/ft. (41-47 Nm) - 2 Places PF0760 20 PF0760 PS0580 Figure 9– 64. Attachment tilt cylinder. Attachment Tilt Cylinder Legend 1. Attachment Tilt Cylinder w/Bushings (includes items 2 through 18) 2. Counterbalance Valve - Set at 4000 psi (276 bar) 3. Tube 4. Lock Nut, 1.50-12 NF 5. Precision Wearband 6.
Hydraulic System c. Attachment Tilt Cylinder Cleaning 1. Thoroughly clean the inner surface of the attachment tilt cylinder (Fig. 9– 64) with trichlorethylene or another approved cleaner. 2. Discard all seals, backup rings and O-rings. Replace with new items from a complete seal kit to help ensure proper cylinder function. 3. Clean all metal parts with an approved cleaning solvent such as trichlorethylene. Carefully clean cavities, grooves, threads, etc.
Section 9 2. Install the lower attachment tilt cylinder pin by tapping it out through the bottom of the quick attach (if installed). 3. Coat the attachment tilt cylinder base pin with antiseize compound and install the pin by tapping it in through the top of the gooseneck. 4. Secure the attachment tilt cylinder base pin to the boom with two 2" external retaining rings. 5. Install the lower pivot pin and quick attach as required. 6.
Hydraulic System 1 Torque to 250-300 lb/ft. (339-407 Nm) 14 15 11 10 13 7 12 Apply Loctite #271 and Torque to 445-515 lb/ft. (603-698 Nm) 9 8 6 5 4 3 PF0760 16 2 PS0560 Figure 9– 65. Slave cylinder exploded view drawing. Slave Cylinder Legend 1. Slave Cylinder (includes items 2 through 15) 2. Tube 3. Lock Nut, 1.125 - 12 NF 4. Capped T-Seal 5. Piston 6. O-Ring 7. Precision Wearband 8. Deep Z-Seal with Rod Backup 9. Locking Insert 10. Head Gland 11. Heavy-duty Rod Wiper, Sealed OD 12. O-Ring 13.
Section 9 9. Remove the capped T-seal (4) from the piston (5). Note: The T-seal actually consists of four components; a wide, flexible inner band, the flexible T-seal band itself, and two supportive split caps that mount on either side of the “T” itself. c. Slave Cylinder Cleaning 1. Remove all hydraulic fluid, dirt and debris from the inner surface of the cylinder. 2. Discard all seals, backup rings and O-rings. Replace with new items from a complete seal kit to help ensure proper cylinder function. 3.
Hydraulic System 6. Install the capped T-seal (4) onto the piston (5). Note: The T-seal actually consists of four components; a wide, flexible inner band, the flexible T-seal band itself, and two supportive split caps that mount on either side of the “T” itself. 7. Install the deep Z-seal with rod backup (13), precision wearband (7), O-ring (14), back-up ring (13), and O-ring (12) onto the head gland (10). 8. Carefully insert the rod (15) with all attachments straight into the tube (2).
Section 9 9.10.3 Extend/Retract Cylinder The extend/retract cylinder (Fig. 9– 66) is located within the inner boom. a. Extend/Retract Cylinder Removal Procedures for replacing the extend/retract cylinder appear in Section 3.2.1 Inner Boom Replacement. b. Extend/Retract Cylinder Disassembly Note: An additional O-ring may be included at the base of the cylinder rod.
Hydraulic System 18 Torque to 150-160 lb/ft. (203-217 Nm) 1 Torque to 250-300 lb/ft. (339-407 Nm) 15 16 17 Torque to 72-82 lb/in. (8-9 Nm) 14 13 12 Apply Loctite #271 and Torque to 1500-1700 lb/ft. (2034-2305 Nm) 5 2 11 10 9 7 3 18 4 6 20 8 19 6 PF0760 21 PF0760 PS0600 Figure 9– 66. Extend/retract cylinder. Extend/Retract Cylinder Legend 1. Extend/Retract Cylinder (includes items 2 through 19) 2. Hytrel Backup Ring 3. O-Ring 4. Piston 5. Setscrew, 5/16-18 UNC x 0.63” 6.
Section 9 2. Clean parts with trichlorethylene. 3. Check that the rod (17) is straight. If it is bent, install a new rod. e. Extend/Retract Cylinder Assembly Note: Follow Section 9.10 c. General Cylinder Assembly Instructions. 1. Install a new hytrel backup ring (2, Fig. 9– 66), small O-ring (3) and another hytrel backup ring (2) into forward end of the piston (4). 2. Install the capped T-seal (7) and both precision wearbands (6) onto the piston (4).
Hydraulic System 11 2 10 Apply Loctite #271 (red) and Torque to 1550-1750 lb/ft. (2102-2373 Nm) 1 9 3 7 5 3 6 Hoist Cylinder 4 8 7 E 12 Orient Fracture In Bearing Race at Clock Position Shown 1 6 5 17 8 5 18 16 4 15 19 20 13 12 PF0760 10 14 9 21 E 15 2 11 Torque to 300-400 lb/ft (407-542 Nm) Torque to 45-50 lb/ft (61-68 Nm) PF0760 PS0590 Figure 9– 67. Hoist/lower cylinder. Hoist/Lower Cylinder Legend 1.
Section 9 4. Attach a sling to the hoist/lower cylinder and to a hoist or an overhead crane. Support the hoist/lower cylinder in the sling, and remove both nuts, capscrews and cylinder mount pins from the cylinder. 5. Safely and carefully, remove the hoist/lower cylinder from the vehicle. Wipe up any hydraulic fluid spillage in, on, near and around the vehicle. b. Hoist/Lower Cylinder Disassembly Note: An additional O-ring may be included at the base of the cylinder rod.
Hydraulic System c. Hoist/Lower Cylinder Cleaning 1. Remove all hydraulic fluid, dirt and debris from the inner surface of the cylinder tube (3, Fig. 9– 67). 2. Discard all seals, backup rings, O-rings, etc. Replace with new items from a complete seal kit to help ensure proper cylinder function. 3. Clean all metal parts with an approved cleaning solvent such as trichlorethylene. Carefully clean cavities, grooves, threads, etc.
Section 9 19. If necessary, install a grease fitting (19) into the tapped hole in the end of the rod weldment (18). Lubricate the self-align bearing (17) in the rod end through the grease fitting (19) with multi-purpose grease before the boom is operated. f. Hoist/Lower Cylinder Installation 1. Raise and support the boom to allow installation of the hoist/lower cylinder (1, Fig. 9– 67). 2. Attach a sling to the hoist/lower cylinder and to a hoist or an overhead crane.
Hydraulic System 1 Torque to 300-400 lb/ft. (407-542 Nm) Manifold Block Mounting Boss (ref.) 14 15 16 10 9 8 13 12 11 Apply Loctite #271 and Torque to 1100-1250 lb/ft. (1492-1695 Nm) 7 4 6 5 4 17 3 PF0760 2 PS0570 Figure 9– 68. Frame tilt and/or stabilizer cylinder. Frame Tilt and Stabilizer Cylinder Legend 1. Frame Tilt/Stabilizer Cylinder (includes items 2 through 16) 2. Tube 3. Lock Nut, 1.50 - 12 UN 4. Precision Wearband 5. Piston 6. Capped T-Seal, Type 730 7. O-Ring 8. O-Ring 9.
Section 9 4. Remove the locking insert (13) from its hole in the head gland threads. Pry or drill out the insert as required. DO NOT damage the head gland threads. A new locking insert will be required for reassembly. 5. Use a pin spanner wrench to unthread the head gland (14) from the tube (2). Note: The head gland is installed at a torque of 300-400 lb/ft (407-542 Nm). Use suitable tools to remove the head gland. IMPORTANT: Protect the finish on the rod at all times.
Hydraulic System c. Frame Tilt or Stabilizer Cylinder Internal Cleaning 1. Remove all hydraulic fluid, dirt and debris from the inner surface of the cylinder. 2. Discard all seals, backup rings and O-rings. Replace with new items from a complete seal kit to help ensure proper cylinder function. 3. Clean all metal parts with an approved cleaning solvent such as trichlorethylene. Carefully clean cavities, grooves, threads, etc. d.
Section 9 e. Frame Tilt or Stabilizer Cylinder Assembly Note: Follow Section 9.12 c. General Assembly Instructions. 1. Install the deep Z-seal with rod backup (12, Fig. 9– 68) into the head gland. 2. Install the precision wearband (11) into the head gland. 3. Install the heavy-duty rod wiper (15) with the raised portion of the lip seal oriented toward the rod eyelet as shown. Note: The wiper lip should be toward the outer end of the gland and seal lips toward the inner end of the gland.
Hydraulic System f. Frame Tilt or Stabilizer Cylinder Installation 1. Lubricate the 1.5" diameter cylinder pins with multipurpose lithium-based grease. 2. Use a sling and hoist or other suitable lifting device to help install the cylinder. Orient the cylinder with the cylinder eyelet on top, the rod eyelet on the bottom and the dual pilot-operated check valve facing the rear of the vehicle. 3. Install the upper cylinder pin.
Section 9 9.10.6 Swing Carriage (optional) The optional swing carriage (1, Fig. 9– 69) provides a way to swing the carriage attachment from side to side. The swing carriage includes two cylinders that operate to provide the side to side motion. Swing Carriage (optional) Legend 1. 2. 3. 4. 5. 6. 7. 8. 9. 10. 11. 12. 13. 14. 15. 16. Carriage Cover, Clamp HHCS, 5/16-18 x 1-1/2” Pin, Carriage Pivot Base, Pivot Pin, Cylinder Pivot (Rod End) Pin, Cylinder Pivot (Base End) Shim, 2” I.D. x 10 Ga.
Hydraulic System 16 17 24 18 19 20 21 23 LH Cylinder 12 E 40 R 27 RH Cylinder 27 38 38 28 37 39 R 14 13 37 E 2 42 29 3 12 5 See “ Swing Carriage Cylinder” 35 33 8 4 9 33 33 6 32 41 42 32 31 25 22 1 32 11 8 9 9 10 15 Mounting plate on carriage 7 8 25 36 8 10 Attach to Port “R” RH Cylinder 9 12 26 Attach to Port “R” LH Cylinder 4 12 33 30 31 32 34 PH0560 Figure 9– 69. Swing carriage (optional).
Section 9 a. Swing Carriage Cylinder Removal 2 1. Level the boom (place the boom in a horizontal boom). 1 2. Swing the carriage to the centered position. 3. Lower the boom until the carriage is resting firmly on the ground. 1 4. Place the travel select lever in NEUTRAL (N), engage the park brake switch and shut the engine OFF. R 3 WARNING: Hot hydraulic fluid can cause severe burns. Wait for hydraulic fluid to cool before servicing any hydraulic component. E 5.
Hydraulic System 1 2 3 Apply Loctite #271 to Inside Threads 4 Torque to 250 lb/ft. (339 Nm) 11 Retract Port 5 6 7 “X” Port 14 8 Extend Port 15 9 Torque to 30-35 lb/ft. (40,7-47,5 Nm) 13 16 10 17 PF0760 12 PH0441 Figure 9– 72. Swing carriage cylinder (optional). Swing Carriage Cylinder Legend 1. Swing Carriage Cylinder (OPTIONAL) (includes items 2 through 14) 2. Cylinder Tube 3. Wear Ring 4. Piston Seal 5. Piston 6. O-Ring 7. Backup Ring 8. Gland 9. Rod Seal 10. Wiper 11. Rod 12.
Section 9 5. Using a pin spanner wrench, unscrew the gland (8) from the cylinder tube (2). Slide the gland down along the rod toward the eyelet, away from the tube (2). IMPORTANT: Protect the finish on the rod at all times. Damage to the surface of the rod can cause seal failure. 6. Carefully pull the rod (11) with all attachments straight out of the tube (2). IMPORTANT: When sliding the rod and piston assembly in the tube, prevent the threaded end of the tube from damaging the piston (5).
Hydraulic System 9. Install new O-rings and backup rings on the counterbalance cartridge (12) and direct-acting relief valve (13). Lubricate the cartridge, valve, and rings with clean, filtered hydraulic oil. Install and torque to 30-35 lb/ft (40,7 to 47,5 Nm). 10. Install the orifice (14) into the valve block. 11. Test the cylinder at low operating pressure (100 psi, or 6,9 bar). Verify that the piston and rod move freely in both directions. 12.
Section 9 9.10.7 Side Tilt Carriage Cylinder (optional) Manually-operated Release Valve (for OPTIONAL Auxiliary Hydraulics) The optional side tilt carriage cylinder (1, Fig. 9– 75) provides a way to tilt the carriage attachment from side to side. The side tilt carriage includes a cylinder that operates to provide the side tilt motion. a. Side Tilt Carriage (optional) Removal 1. Level the boom (place the boom in a horizontal boom). 2. Tilt the carriage (1, Fig.
Hydraulic System 24 18 19 20 21 25 15 16 17 23 15 37 14 13 14 1 26 See “ Side Tilt Carriage Cylinder” 33 8 9 11 10 28 7 31 11 27 11 8 12 32 29 6 35 3 2 36 22 5 30 38 4 33 31 32 PA1592 34 Figure 9– 74. Side tilt carriage (optional).
Section 9 14 4 13 1 5 12 11 9 3 10 6 15 Torque to 30-35 lb/ft. (40,7-47,5 Nm) 15 2 Apply Loctite #271 to Threads and Torque to 350 lb/ft. (474,6 Nm) 8 7 Extend Port 16 Retract Port 17 PF0760 PH0800 Figure 9– 75. Side tilt carriage cylinder (optional). Side Tilt Carriage Cylinder Legend 1. Side Tilt Carriage Cylinder (OPTIONAL) (includes items 2 through 14) 2. Cylinder Tube 3. Pilot Check Valve 4. Piston 5. Gland 6. Rod 7. Piston Nut 8. Self-aligning Bearing 9. Rod Seal 10. Wiper 11.
Hydraulic System 7. Using a pin spanner wrench, unscrew the gland (5) from the cylinder tube (2). IMPORTANT: Protect the finish on the rod at all times. Damage to the surface of the rod can cause seal failure. 8. Carefully pull the rod (6) with all attachments straight out of the tube (2). IMPORTANT: When sliding the rod and piston assembly in the tube, prevent the threaded end of the tube from damaging the piston (4). Keep the rod centered within the tube to help prevent binding. 9.
Section 9 10. Apply a compression sleeve or other suitable tool to the gland in order to compress the O-ring (11). Carefully insert the rod (6) with all attachments straight into the tube (2). Use a pin spanner wrench to thread the gland into the tube. Remove the compression tool. IMPORTANT: When sliding the rod and piston assembly in the tube, prevent the threaded end of the tube from damaging the piston seal (14). Keep the rod centered within the tube to help prevent binding. 11.
Hydraulic System This section provides an easy reference guide covering the most common problems that occur during operation of the hydraulic system. 9.11 TROUBLESHOOTING Hydraulic System Troubleshooting Problem Cause Remedy 1. Ruptured hoist or extend hose. 1. Lower load using Emergency Boom Lowering instructions in Section 3 Boom. 2. Loss of engine power or hydraulic pump failure. 2. Lower load using Emergency Boom Lowering instructions in Section 3 Boom. 3.
Section 9 Hydraulic System Troubleshooting Problem 6. Boom hoist or extend function slow or malfunctioning. Cause Remedy 1. External fluid leakage at tubes, hoses or fittings. 1. Check and tighten connections. Repair or replace faulty hose(s). 2. Faulty relief valve setting. 2. Adjust pressure to proper setting. 3. Repair cylinders as required. 3. Internal leakage in cylinders. 4. Internal leakage in main control valve. 4. Repair control valve as required. 5. Repair control circuit. 5.
Hydraulic System Hydraulic System Troubleshooting Problem 10. Frame tilt slow or malfunctioning. Cause Remedy 1. External fluid leakage at tubes, hoses or fittings. 1. Check and tighten connections. Repair or replace faulty hose(s). 2. Faulty relief valve setting. 2. Adjust pressure to proper setting or replace valve. 3. Repair cylinders as required. 3. Internal leakage in cylinders. 4. Internal leakage in main control valve. 4. Repair control valve as required. 5. Repair pump. 5.
Section 9 Hydraulic System Troubleshooting Problem 17. Park lock brake fails to set. 18. Power steering fails completely. 19. No four-wheel or crab steering, or steering mode change does not occur. 20. Steering slow or sluggish. 21. Front or rear wheels not parallel in two-wheel or four-wheel steering mode. 9-120 Cause Remedy 1. Defective solenoids and/or valves. 1. Refer to the appropriate electrical schematic in Section 10 Electrical System. Check and/or replace solenoids and valves. 2.
Hydraulic System Hydraulic System Troubleshooting Problem Cause Remedy 1. Air in steering lines. 1. Check and tighten loose connections. Operate steering lock-to-lock several times to purge air from system. 2. Faulty steering unit. 2. Replace steering unit. 1. External fluid leakage. 1. Check and tighten connections; replace defective hoses, etc. 2. Faulty relief valve setting. 2. Check and set relief valve to proper specification. 3. Internal cylinder leakage. 3. Repair cylinder as required.
Section 9 Hydraulic System Troubleshooting Problem Cause Remedy 1. Air trapped in cylinder or in hydraulic line. Low oil level in hydraulic oil reservoir. 1. Inspect fluid for foam or bubbles. Check and tighten connections. Bring hydraulic fluid up to operating temperature and cycle vehicle functions several times through full range of motion to remove (purge or “bleed”) air from system. 2. Binding of cylinder rod or piston. 2. Repair or replace cylinder. 3. Rod seal installed improperly. 3.
Hydraulic System Hydraulic System Troubleshooting Problem 31. Directional control valve difficult to shift. 32. Movement of joystick fails to cause spool in control valve to shift. Model 3606 • Origin 10/99 Cause Remedy 1. Broken internal parts. 1. Disassemble control valve and replace broken parts. 2. Scored valve body bore, producing leakage between spool and body. 2. Inspect bore. Replace valve section if scored. 3. Broken centering spring. 3. Replace spring. 1.
Section 9 9-124
Section 10 Electrical System Contents PAR. TITLE INTRODUCTION. . . . . . . . . . . . . . . . . . . . . . . . . . . . . . . . . . . . . . . . . . . . . . . . . General Overview (Cab Harness). . . . . . . . . . . . . . . . . . . . . . . . . . . . . . . General Overview (Engine Harness) . . . . . . . . . . . . . . . . . . . . . . . . . . . . 10.1 SERVICE WARNINGS . . . . . . . . . . . . . . . . . . . . . . . . . . . . . . . . . . . . . . . 10.2 SPECIFICATIONS . . . . . . . . . . . . . . . . . . . . . . . .
Section 10 10.8.17 Steering . . . . . . . . . . . . . . . . . . . . . . . . . . . . . . . . . . . . . . . . . . . 10.8.18 Steer Select Valve . . . . . . . . . . . . . . . . . . . . . . . . . . . . . . . . . . . 10.8.19 Engine Low Oil Pressure Sender . . . . . . . . . . . . . . . . . . . . . . . 10.8.20 Transmission High Temperature Sender . . . . . . . . . . . . . . . . . . 10.8.21 Engine Coolant High Temperature Sender . . . . . . . . . . . . . . . . 10.8.22 Engine Block Heater (option) . . . . . . . . .
Electrical System Introduction The electrical system produces, stores and distributes electricity in the operation of the vehicle. An engine-driven, 65-amp alternator equipped with an internal, solid-state voltage regulator produces electricity. Current from the alternator charges the battery and powers electrical system components. The battery provides power for starting the engine and supplements the output of the alternator during periods of peak demand.
Section 10 Legend for Cab Harness (S/N 8249 and before) 1. 2. 3. 4. 5. 6. 7. 8. 9. 10. 11. 12. 13. 14. Cab Harness Back-up Alarm Hex-lock Elastic Nut, 1/4-20 Flat Washer, 1/4” Boom Sensor Service Brake Switch Logic Board Button-head Capscrew, #10-32 x 3/4 Well Nut, #10-32 Steer Select Switch Switch Bezel Operators Display Panel Park Brake Switch Round-head Wood Screw, #6 x 1/2” 10-4 15. Hourmeter 16. Machine Bushing Washer, 0.63” I.D. 17. Ignition Switch 18. Ignition Key 19. Fuse, 7.5 Amp 20.
Electrical System General Overview (Cab Harness) 3 4 2 5 Connects to engine harness 34 35 1 6 11 7 8 10 33 9 11 36 12 32 31 8 19 22 9 13 11 27 28 29 20 15 24 30 14 17 25 23 21 24 26 37 16 18 22 Typical fuse block shown; see text. PS0791 Figure 10–1. Typical cab harness (S/N 8249 and before; see text).
Section 10 General Overview (Engine Harness) MS1590 24 17 17 18 20 19 23 Front 22 23 21 22 21 20 17 17 18 19 25 16 24 15 16 15 14 14 Perkins Cummins 10 3 11 9 12 8 13 1 7 6 3 5 4 2 PS0801 Figure 10–2. Engine harness.
Electrical System Legend for Engine Harness 1. 2. 3. 4. 5. 6. 7. 8. 9. 10. 11. 12. 13. Engine Harness Conduit, 3/4” diameter x 10” long Hex-lock Elastic Nut, 3/8-16 Tube Clip Hex-lock Elastic Nut, 1/2-13 Flat Washer, 3/8” Hex Locknut Battery Ground Cable Positive (+) Battery Cable, w/protective cover Hex-head Capscrew, 3/8-16 x 9-11/2” Battery Hold-down Strip Battery, 12 Volt, 1000 CCA Negative (-) Battery Cable, w/protective cover 10.
Section 10 10.2 SPECIFICATIONS Electrical system specifications are listed in Section 2 General Information, Specifications and Maintenance Instructions. 10.3 EFFECTIVE GROUND CONNECTIONS Effective ground connections are essential to the efficient operation of electrical components. If an inadequate ground is suspected or determined, establishing another ground may be desired.
Electrical System 10.4 WIRING HARNESSES Wiring on the vehicle is contained within two separate wiring harnesses, an engine harness and a cab harness. There are several figures in this section that depict the different wiring harnesses. A harness consists of black-nylon woven braiding, providing a protective cover to bundle numerous wiring groups, splices, terminals, connectors, and, where applicable, diodes. Each harness is identified with a Trak part number when the vehicle leaves the factory.
Section 10 Bulkhead Connector GR Y/O RN 30 BL K 2K RE D RE D/ 3 GR N BR 35 N/ GR N 42 B 18 GR Y/G 19 11 10 A 10 PN K/G RN 14 12 WH T/B 34 RN 44 YE L/P GR UR Y/B LU PN K/B LU 46 31 32 PU R/ WH T PN K/G RN RN YE L/B LK RE D/ BL U 4 BL K 26 2E 32 23 N TA 32 25 49 31 11 Horn 44 32 TA N 34 GR Y/B LU G 18 LT BL U 45 Dash Display Panel 25 46 T WH N/ D OR RE R/ PU 7 5 Service Brake Switch A 47 25 26 A 48 58 59 46 YE L/B WH RN T/G RY A DK GR N/ WH T 17 56 46 A LU T
Electrical System 41 41 HT 39 N/W GR D E 38 R / N GR T DK /WH 37 U L B LT RN 36 N/G OR D 40 E T/R WH EL D/Y RE 42 B 42 C 2K 3 30 G BL RY/O K RE RN RE BR D/G D N/G R N RN BR N/G RN ) LK (B A 48 63 48 48 A 3 DK 43 46 A GR Y/B 46 RN PN K/B LU 48 48 PN 4 2A 42 A 66 63 4 71 RN 64 65 om 53 DK BLU/ORN PNK/WHT 49 LT GRN/WHT 56 TAN/GRN 6 ORN 5 YEL/RED 77 PUR BRN 7 15 Tra n Re smis lay sio n s U/ BL 70 BL K SP LIC E3 GR Y/P UR LT GR N/W HT 62 OR N/P UR Boom Proximity S
Section 10 10.4.1 Cab Harness, S/N 8249 and Before Use this chart for vehicles with S/N 8249 and before. WIRE No.
Electrical System WIRE No.
Section 10 42C YEL/BRN 59A 48A P A N E L BLU / WHT TRANSISSION RELAS ORG / DK BLU YEL/PNK DK BLU/WHT GRY/BRN GRY/BRN OSTIC LOGIC PANEL 43 65 3 62 63 2KK DK GRN/WHT 22 BLK 2T BRN/GRN 2T BLK 2K BLK BLK LT GRN/WHT LT BLU YEL / ORG GRY/BLU PUR / WHT YEL/PUR LT BLU WHT / BRN RED/GRN RED 40 12 10A 36 GRY/BLU 44 B3 30 D7 11 G3 19 H2 18 G9 10 BLK PNK/GRN RED/YEL 36 ORN/GRN 2K 37 42B B7 35 D9 3 F8 34 D1 14 G7 2K F2 12 G5 2K FORTILT FORE/AFT 4
Electrical System Head-on views; wires exit at the rear of each component. JUMPER JUMPER DOUBLE TERMINAL 67 62 2BB 23 66 21 4 59A 2C 2CC 63 9 60 65 Stabilier Lock Relay 48 64 42A 42A 47 Boom Switch Relay 71 Neutral Relay Shift Control Relays (2) JUMPER 2LL 73 69 70 76 Trans. Relay 2 Trans. Relay 1 ENGINE HARNESS 1 3 5 7 9 74 Trans.
Section 10 Bulkhead Connector GR Y/O RN 30 BL K 2K RE D RE D/G 3 RN BR 35 N/G RN 42 B 18 GR Y/G RN 19 11 PU R/W HT 10 A 10 PN K/G PN RN K/G RN 12 WH T/B 34 RE RN D/B 44 YE LU L/P GR UR Y/B LU PN K/B LU YE L/B LK 14 46 31 32 4 BL K 26 2E 32 23 44 25 49 U BL LT RG L/O YE 11 44 TA N 34 GR Y/B LU 12 YE L/P UR 10 RE D/B LU 18 Steer Select Switch A 19 21 YE OR L/BL N/B U LU 27 45 Dash Display Panel 25 A LT BL U 46 HT N/W ED OR R/R PU 57 Service A 47 A 48 A DK GR N/W HT
Electrical System 41 41 HT 39 N/W GR D E 38 R / N GR T DK /WH 37 U L B LT RN 36 N/G OR D 40 E T/R WH EL D/Y RE 37 22 35 2K 3 30 RE RE BR D/G D N/G RN RN 42 C G BL RY/O K RN BR N/G RN 42 A 48 A 3 HT N/W GR DK 43 46 A GR Y/B 46 RN PN K/B LU 48 48 PN 42 A 66 43 42 A 66 4 63 71 K/G 53 DK BLU/ORN 17 PNK/WHT 49 56 U/ BL LT GRN/WHT 65 RE D 35 BL K ICE T WH 61 PN K/B LU NK LU BLK /B L/P N/ YE PNK OR 6 65 4 GR Y/P UR LT GR N/W HT 62 OR N/P UR Boom Proximity Switch 35
Section 10 10.4.2 Cab Harness, S/N 8250-9398 Use this chart for vehicles with S/N 8250-9398. WIRE No.
Electrical System WIRE No.
Section 10 WIRE No.
Electrical System 93 46 DK BLU/WHT ORN/GRY GRY/BRN OSTIC LOGIC PANEL 43 3 62 2KK DK GRN/WHT 40 22 62 22 BLK 2T 2T 2K LT BLU TAN YEL / ORG GRY/BLU PUR / WHT YEL/PUR LT BLU 31 D5 PNK/BLU 93 46 E8 YEL / ORG GRY/BLU BRN/GRN BLK BRN/GRN BRN/GRN 42B RED/GRN 35 42B BLK BLK RED/GRN 44 B3 30 D7 RED 12 2E 10A 10 BLK RED/YEL PNK/GRN 40 36 2J FORTILT FORE/AFT 36 LT GRN/WHT ORN/GRN 2K 37 G3 19 H2 18 G9 42B B7 35 D9 3 F8 34 D1 14 G7 3 40 GRY/PUR 11 2
Section 10 This page is intentionally blank.
Electrical System Head-on views; wires exit at the rear of each component. GROUND JUMPER 71 GROUND JUMPER 2BB 2LL 66 23 7 3 24 21 4 69 62 67 DOUBLE TERMINATE 2C 59A 70 9 76 74 48 63 42A 42A 60 47 Trans. Trans. Trans.
Section 10 Bulkhead Connector GR Y/O RN 30 BL K 2K RE D RE D/G 3 RN BR 35 N/G RN 42 B 18 GR Y/G RN 19 11 PU R/W HT 10 A 10 PN K/G PN RN 14 K/G RN 12 WH T/B 34 RE RN D/B 44 YE LU L GR /PU Y/B R LU PN K/B LU 46 31 32 YE L/B LK 4 HT R/W PU 26 BL K 2E 11 32 23 41 LU N TA 25 31 Horn 44 32 TA N 10 RE D/B LU 12 Y/G GR LT B LU RN 8A 18 A 19 2F LK RN EL/B LU Y Y/G GR A 19 27 13 A 18 RN N/G BR 45 Dash Display Panel 46 A HT N/W ED OR R/R PU Service 57 47 A 25 A A 48 DK GR
Electrical System 41 41 HT 39 N/W GR D 38 /RE N GR T DK /WH 37 U BL LT RN 36 /G N OR ED 40 T/R WH EL Y / D RE 35 42 39 37 38 3 2K 22 36 40 Attachment Tilt Frame Tilt 2J RN Extend/ Retract 2J RE D/Y EL Hoist/ Lower 2J Attachment Tilt Fore/Aft 66 63 3 46 2K K BL RE K D 35 4 RN 48 48 T RE A N/G H R T D/G B H DK N/W RN DK GR N/W GR B 42 N/W GR GR DK LT HT N/W R 63 Boom HT U P B Y/ 48 Proximity GR 64 UR Switch HT 66 DK N/P U/W L OR B B LU K DK /W BL HT 62 K 64 2K 43 PN GR K/B Y/B LU RN 4
Section 10 10.4.3 Cab Harness, S/N 9399 and After Use this chart for vehicles with S/N 9399 and after. WIRE No.
Electrical System WIRE No.
Section 10 WIRE No.
Electrical System YEL / BLU 21 53 RED / GRY 23 WHT / PUR SEAT BELT SWITCH 73 45 71 26 ORN/WHT 46 64 63 48B 66 62 DK BLU/WHT 46 35 2PP GRY/BRN GRY/BRN HDRAULIC OSTIC LOGIC 43 63 DK GRN/WHT 40 22 62 22 BLK 2T 2T BRN/GRN BLK GRN/WHT 36 BAC-UP ALAR DK GRN/RED DK GRN/WHT LT BLU/WHT 42B DK GRN/WHT ORN/GRN 48B 66 LT BLU TAN YEL / ORG GRY/BLU PUR / WHT YEL/PUR LT BLU 31 D5 PNK/BLU 46 E8 YEL / ORG GRY/BLU YEL / BLK GRY / GRN BRN/GRN BRN/GRN RED/GRN 35 RED 3
Section 10 Head-on views; wires exit at the rear of each component. GROUND JUMPER 71 GROUND JUMPER 2LL DOUBLE TERMINATE 62 67 23 7 3 24 66 21 4 2C 69 59A 9 70 76 74 Trans. Trans. Trans.
Electrical System 34 34 Hydraulic Pressure Switch RE D Fuel Shut Off YE L/P UR WH T/B RN 14 B WH RED LK /G T RN 33 BL K 2L 35 30 K BL N T RN WH UR G/ T/B OR WH T WH 35 D RE 33 OR G/ WH T YE 14 L/P WH UR T/B RN 34 O 12 D D OR N LT G RE RN D K /BL 54 K BL N/ K BL OR 55 2A Air Filter Indicator Switch RN D/G RE RN T/B WH UR P / L YE 2P K BL G OR 35 T 34 WH G/ OR N 4 R 4 K/G PN 3 2A D RE N GR LT 1 1 K BL 55 K/ PN 1 3 54 K BL GRY/ORN PUR/WHT RE RN RE E 10 RE 44 D
Section 10 10.4.4 Engine Harness Use the chart below for the engine harness diagram (Fig. 10– 17) and engine harness schematic (Fig. 10– 18). WIRE No.
Electrical System BULHEAD CONNECTOR PIN LOCATION TRANSISSION SOLENOIDS ORN/BLU ORN/BLU 24 24 2R SHUTTLE LT BLU LT BLU 25 25 2R FIRST YEL/BLU YEL/BLU 21 21 2R REVERSE RED/GRY RED/GRY 23 23 2R FORWARD WHT/BLU YEL/BLU WHT/BLU 26 YEL/BLU 4 26 2R 4 SECOND TRANS. TEP. SWITCH TAN TAN 32 2R 32 4 54 AIR FILTER SWITCH 54 44 55 2P 2Q 42 3 BLK 42 2 BLK FUEL SHUT-OFF SOLENOID 2L RED WHT 33 35 33 RED 3 3 3 HD. OIL FILTER PRES. SWITCH HD. OIL TEP.
Section 10 10.4.5 Closed Cab Harness (Option) A closed cab option was being finalized shortly before completion of this manual. Use the wiring schematic below (Fig. 10– 19 and Fig. 10– 20) as needed when troubleshooting closed cab electrical problems. BUSS BARS ACCESSORY POWER (2) BATTERY (+) POWER SWITCHED POWER ACCESSORY POWER 7.5A CIRCUIT BREAKER 7.5A CIRCUIT BREAKER 7.5A CIRCUIT BREAKER 7.
Electrical System BUSS BARS ACCESSORY POWER (2) BATTERY (+) POWER SWITCHED POWER ACCESSORY POWER ACCESSORY RELAY 25 A FUSE 85 5/D #141 RED/BLU 10 #124 DK BLU/GRY 10 DOOR POWER RELAY 87A 87 85 87A 87 30 A 5/E 30 86 86 30 CAB STRUCTURE 2/B 5/C COMPRESSOR CLUTCH M L #165 LT GRN/ORN 16 #27A BRN/WHT 16 #2XX BLK 16 G55 BLOWER MOTOR M #142 YEL/GRN 10 #2AC BLK 12 149 FROM SPLICE 65 BLOWER MOTOR H DRIVE M G34 VALVE POTENTIOMETER PRESSURE P SWITCH A 7/A 7/B 7/C #182 ORN 10 1/A #1
Section 10 10.5 FUSES AND RELAYS Fuses and relays help to protect the electrical system. In general, a blown fuse is a symptom of another electrical problem. Address the true problem, not just the symptom. Simply replacing the fuse often will not solve the problem. Blown fuses are usually due to simple causes, including loose or corroded connections, or a defective relay. There are two main causes of blown fuses; a shorted or grounded wire in the applicable circuit, or a defective electrical component.
Electrical System 10.5.1 Fuse and Relay Replacement Vehicles Stamped with S/N 8249 and Before Shut off the engine and disconnect the negative (-) battery cable at the negative (-) battery terminal (Fig. 10– 23) before checking the electrical system. Use an ohmmeter to check the resistance of wires and components.
Section 10 Vehicles Stamped with S/N 8250 through 9398 Neutral Display Relay/Starter Panel *Cold Start Main Hourmeter Fuel Shut-Off Trans. Relay Park Brake Sense Relay Transmission Solenoids 15 Vehicles Stamped with S/N 9399 and After Logic Panel Neutral Sense 7.5 30 7.5 7.5 7.5 7.5 7.5 7.5 7.5 7.5 7.5 7.5 7.5 7.5 7.5 *Switch Lamps Horn 7.5 *Aux. Detent Mode Steer Solenoids Stabil-TRAK Solenoid Stabilizer Lock Relay Reverse Relay Neutral Relay Trans. Relay #3 Trans. Relay #2 Trans.
Electrical System 10.6.1 Testing the Starter on the Engine 10.6.2 Starter If the starter does not engage when the ignition key is turned, check the following: The starter (Fig. 10– 29) is located on the left side of the engine (the right side of the vehicle), just inboard of the hydraulic oil reservoir. 1. The main fuse may be blown, requiring replacement. Check for the cause of the blown fuse. 2. There may be a defect in the ignition switch, ignition wiring, or starter solenoid. 3.
Section 10 10.6.3 Starter Relay The starter relay (Figs. 10–30 and 10–31) is a non-serviceable part and must be replaced if defective. The starter relay consists of a movable contact, not unlike a solenoid, with a fixed coil in a weatherproof case. PERKINS ENGINE 2 4 1 3 2 5 9 8 8 6 11 7 10 9 2 Remove bolt and cable MS2400 Figure 10–29. Disconnect the ground cable (from the chassis ground stud) at the starter mounting bolt (Cummins engine shown). b. Starter Cleaning and Drying 1.
Electrical System a. Starter Relay Removal CUMMINS ENGINE 1. Disconnect the negative (-) battery cable at the battery. 2 4 2 1 3 2 5 9 3. Remove hex nut (9), lockwasher (8) and the pink and brown wire #54 (item 6) from the relay terminal stud. 8 2 9 8 6 2. Remove the hex nut (9), lockwasher (8) and the orange/black wire #55 (5) from the relay. 4. Remove small hex nut (11), small lockwasher (10) and the yellow and blue wire #4 (item 7) from the relay terminal stud. 10 7 11 5.
Section 10 10.7 CHARGING CIRCUIT The charging circuit consists of the battery and a beltdriven alternator with an internal voltage regulator. These components work together to provide electrical power for the vehicle, including the starting system, operators display panel, horn, solenoids, back-up alarm, joystick, logic panel and all accessories. Examine the appropriate wiring diagrams and schematics earlier in this section to understand the wiring circuits involved.
Electrical System 10.7.1 Alternator There are two types of 65-amp alternators used. Vehicles equipped with Perkins engines use a Perkins alternator. Vehicles equipped with Cummins engines use a Bosch alternator. Ground wires Alternator PERKINS ENGINE a. Perkins Alternator Removal 1. Disconnect the negative (-) battery cable (Fig. 10– 33) at the negative (-) battery terminal. Three-wire plug MS1560 Figure 10– 34. Label and disconnect the alternator wire connector and both ground wires.
Section 10 6 22 3 1 7 2 5 4 22 20 21 9 19 18 13 12 14 8 15 16 11 10 MA1111 17 1. 2. 3. 4. Screw Lockwasher Washer Bolt 5. 6. 7. 8. Lockwasher 9. Washer Lever 10. Screw Spacer 11. Sleeve Self-locking Nut 12. Sleeve 13. 14. 15. 16. Nut Washer Washer Bracket 17. 18. 19. 20. Stud Hex Nut Washer Belt 21. Belt Pulley 22. Alternator Figure 10– 35. Perkins alternator mounting detail. b. Perkins Alternator Installation 1. If required, install pulley (21, Fig.
Electrical System 7 2 6 1 1 4 5 3 MA6190 1. 2. 3. 4. MA1881 Alternator Tensioner Bracket Engine Fan Belt Lower Mounting Capscrew 5. Lower Mounting Tab 6. Upper Mounting (“longer”) Capscrew 7. Upper Mounts Belt rides in pulley groove Figure 10– 36. Cummins alternator mounting detail. ratchet to lift the bracket and remove the engine fan belt (3). CUMMINS ENGINE a. Cummins Engine Bosch Alternator Removal 1. Disconnect the negative (-) battery cable (Fig.
Section 10 4. Use a 1/2" square drive ratchet to raise the tensioner bracket (2). Properly route the fan belt (3) onto the alternator and engine pulleys. Check the tensioner pulley to verify that it is pivoting freely to provide the proper tension on the belt. Check for proper fan belt deflection (refer to Section 2.12.8 Engine Fan Belt). 5. Connect the negative (-) battery cable (Fig. 10– 37) to the negative (-) battery terminal. 10.7.
Electrical System Note: The accuracy of this test procedure depends on closely following the load, time and temperature specifications. Relation of Battery Temperature to Minimum Voltage TEMPERATURE MINIMUM VOLTAGE 70° F (21° C) and above 9.6 50° F (10° C) 9.4 30° F (-1° C) 9.1 15° F (-10° C) 8.8 0° F (-18° C) Below 0° F (-18° C) d.
Section 10 i. WARNING: Any other procedure than that outlined in these instructions could result in: • Personal injury caused by electrolyte spewing out of the top vent holes on the battery. • Personal injury or property damage due to battery explosion; • Damage to the starting systems of both vehicles. 2. Continue with the jump starting instructions found under C. Jump Starting in Section 2.12.15 Battery. g. Battery Removal 1.
Electrical System 10.8 ELECTRICAL SYSTEM COMPONENTS Electrical components include warning devices such as the indicators in the operators display panel, horn, backup alarm, and other components such as the joystick, logic panel, various solenoids and all accessories. b. Warning Indicator Lights (in operators display panel) 2 3 4 1 Examine the appropriate wiring diagrams and schematics earlier in this section to help understand the wiring circuits involved. 1 2 3 4 F N D R 10.8.
Section 10 2. Engine Coolant Temperature Warning Indicator c. Back-Up Alarm This indicator (item 2, Fig. 10– 41) is illuminated when the engine coolant temperature is above 210° F (85° C). An audible alarm will sound, and the engine must be shut down as soon as practical to help avoid engine damage. The back-up alarm (Fig. 10– 43) is located at the rear of the vehicle, under the rear cover, mounted on the top left side of the frame. 3.
Electrical System Back-up Alarm Removal 10.8.2 Operators Display Panel 1. Disconnect the negative (-) battery cable at the negative battery terminal (Fig. 10– 44). There are two types of operators display panels in existence (Fig. 10– 45) at the time this manual was published. 1 2 3 F D Negative (-) Terminal 4 P N R Early Production Operators Display Panel OS1040 Figure 10– 44. Disconnect the negative (-) battery cable at the negative (-) battery terminal. 2.
Section 10 a. Power-Up Lights C. Steering Mode Indicators When the ignition key switch is turned to power up the vehicle, all lights in the display panel will illuminate for three seconds as a test function. During this time, an audible alarm will also sound. The steering mode indicators (Fig. 10– 46) illuminate to show which of the steering modes (front-wheel, crab, or four-wheel steering) is presently engaged. The Fasten Seat Belt and Read Manual symbols (Fig.
Electrical System B. Parking Brake Indicator This illuminates any time the parking brake switch is applied and the ignition switch is in the RUN position. Display Panel Internal-hex Fastener C. Stabil-TRAK Indicator This light illuminates when the Stabil-TRAK system is activated. b. Operators Display Panel Removal IMPORTANT: Static electricity can cause damage to the operators display panel. Avoid any manner of touching (hands, tools, etc.) the printed circuit boards and terminals.
Section 10 Operators Display Panel Test 10.8.3 Switches and Solenoids Check the following as the key is switched into the "RUN" position (Fig. 10– 51): a. Ignition Key Switch OFF RUN PREHEAT START The ignition key switch (Fig. 10– 52) is located on the lower left side of the dash. It is a key-operated switch used to start the engine and to run the vehicle.
Electrical System If the key binds in the switch, check the key for defects and the switch for foreign objects. Clean or remove foreign material from the key as required. Check that the key is not bent or excessively worn; replace a bent or worn key with a new key. Apply powdered graphite to the key and insert and withdraw the key from the switch several times to distribute the graphite into the switch lock mechanism.
Section 10 4. Connect the negative (-) battery cable at the negative battery terminal (Fig. 10– 55). 10.8.4 Thermo-Start Plug (optional for Perkins engines only) The thermo-start plug (Fig. 10– 56) is located in the Perkins engine intake manifold, plumbed into the fuel line. 1 4 Negative (-) Terminal 3 1 2 OS1040 Figure 10– 55. Connect the negative (-) battery cable to the negative (-) battery terminal. b.
Electrical System a. Thermo-Start Plug Removal 1. Label and disconnect the thermo-start wiring lead at the thermo-start plug electrical connector. 2. Disconnect the fuel line. 3. Remove the thermo-start plug by unthreading it from the intake manifold. b. Disassembly 10.8.5 Fuel Run Solenoid The fuel run solenoids a valve that lets fuel enter the injection pump when the ignition switch is turned to the START or RUN positions.
Section 10 3. Connect the wiring connector at the fuel run solenoid lead. a. Fuel Run Solenoid Removal 1. Disconnect the negative (-) battery cable at the negative battery terminal (Fig. 10– 59). 4. Connect the negative (-) battery cable to the negative battery terminal (Fig. 10– 59). 5. Clear personnel and any obstructions from the area around the vehicle. 6. Start the engine. Negative (-) Terminal 7. If the engine starts, the fuel run solenoid is functioning. 8.
Electrical System Examine the fluid in the hydraulic oil sight glass (Fig. 10– 61) to check whether there is a sufficient amount of fluid in the system (the oil level should be at the bottom of the sight glass with all hydraulic cylinders retracted) and whether the fluid is contaminated. Replace the hydraulic oil filter as required. c. Cleaning and Drying DO NOT submerge the hydraulic oil filter pressure switch. Clean only with an approved solvent and dry with a clean, lint-free cloth. d.
Section 10 a. Hydraulic Oil Temperature Switch Removal 1. Disconnect the negative (-) battery cable at the negative battery terminal (Fig. 10– 62). 2. Label and disconnect the switch wiring connector from the hydraulic oil filter pressure switch lead. 3. Unthread the switch from the hydraulic reservoir. b. Hydraulic Oil Temperature Switch Disassembly DO NOT disassemble the hydraulic oil temperature switch. Replace a defective or faulty switch with a new one. 10.8.
Electrical System a. Parking Brake Switch Removal 1. Disconnect the negative (-) battery cable at the negative battery terminal (Fig. 10– 62). 2. Carefully pry the parking brake switch and wiring out of the mounting hole in the switch bezel (Fig. 10– 63). 3. Label and disconnect the wiring from the parking brake switch. Remove the switch from the vehicle. b. Parking Brake Switch Disassembly DO NOT disassemble the parking brake switch. Replace a defective or faulty switch with a new one. 6.
Section 10 Service Brake Switch Adjustment Gear Select Lever (switch) The service brake switch may be adjusted as required by loosening the jam nut and positioning the switch so that the brake switch does not activate until the pedal arm moves a minimum of 1/8” (3,2mm). Tighten the jam nut after adjusting the position of the switch in relation to pedal travel. The gear select lever (Fig. 10– 68) is part of the transmission shift control switch (travel select lever).
Electrical System 10.8.11 Transmission Solenoid Valves a. Transmission Solenoid Valve Removal The transmission is shifted via spool-type solenoid cartridge assemblies (Fig. 10– 69) or valves. While each 12volt solenoid coil at the transmission is the same, the wiring to the solenoids is different and connected so that the various transmission clutches can be actuated via input from the transmission shift control switch (travel select lever) and gear select switch. 1.
Section 10 d. Transmission Solenoid Valve Installation 1. Carefully install the four-way cartridge valve assembly with four new O-rings (8, 9, 10 and 11, Fig. 10– 69) into the transmission. Always replace used Orings with new O-rings. 2. Install an O-ring (5) on each side of the 12-volt solenoid coil (6). Always replace used O-rings with new O-rings. Install the 12-volt solenoid coil onto the cartridge valve (7). 3.
Electrical System 10.8.12 Attachment Tilt Mode Switch The attachment tilt mode switch (Fig. 10– 72) is located on the dash to the right of the steering column. d. Attachment Tilt Mode Switch Installation and Testing 1. Route the wiring through the dash and switch bezel (Fig. 10– 73), then connect the wiring to the attachment tilt mode switch as labeled during switch removal. 138 GRN / BLU Top of Switch 138A GRN / BLU 137 LT BLU / ORN 139 ORN / GRY NOTE: 138 and 138A are double-terminated.
Section 10 10.8.13 Joystick The multi-function joystick (Fig. 10– 74) controls boom movement, attachment tilt, vehicle frame tilt, and optional auxiliary hydraulics. Logic Panel Screw (one of four) Multi-function Joystick Logic Panel OS0151 Figure 10– 74. Joystick and logic panel locations. The joystick is equipped with several momentary switches (“buttons”) that enable the joystick to operate in four specific modes.
Electrical System 7.5 A BULKHEAD 139 ORN/GRY 16 +6 MIDDLE BUTTON COMMON BUTTON 137 LT BLU/ORN 16 2 • 12V 2/A ATTACH.
Section 10 a. Joystick Button Testing b. Joystick Function Solenoid Valves 1. Remove the four button-head capscrews (Fig. 10– 76) securing the logic panel to the side console. Button-head Capscrew Joystick commands are actuated both electrically and hydraulically via a set of solenoid-operated control valves mounted in an array at the pilot select manifold (Fig. 10– 78). The pilot select manifold is located inside the rear cover on the left side of the frame.
Electrical System 10.8.14 Logic Board Panel 10.8.15 Boom Sensor (Proximity Switch) The logic board or side console panel (Fig. 10–80; see also Fig. 10–76 and Fig. 10–77) is secured to the right side dash panel, in front of the joystick. The panel consists of a solid-state printed circuit board and various indicators that illuminate per joystick, attachment tilt, and auxiliary hydraulics selections. The boom sensor (Fig.
Section 10 10.8.16 Stabil-TRAK System The patented Stabil-TRAK system works to stabilize the vehicle under various conditions. The Owners/Operators Manual for this vehicle contains basic Stabil-TRAK information; a copy of the Owners/Operators Manual should always be in the storage compartment beneath the operators seat. The operators display panel Stabil-TRAK indicator (C, Fig. 10– 47, page 10-48) goes ON when the Stabil-TRAK system is activated.
Electrical System Stabil-TRAK System Test IMPORTANT: The operator must know that the StabilTRAK system is active and functioning properly. DANGER: Vehicle tipover can result in death or serious injury. DO NOT use the vehicle if the Stabil-TRAK system is not functioning properly. To test the function of the Stabil-TRAK system, read the Stabil-TRAK system test instructions and follow steps 1 through 9 of the Stabil-TRAK system test procedure.
Section 10 8. Depress the service brake pedal. Disengage the parking brake switch and move the travel select lever to the REVERSE (R) position. Release the service brake pedal to deactivate the Stabil-TRAK system and the Stabil-TRAK light should go OFF. The left front tire should return to the ground while the vehicle travels in reverse. Depress the service brake pedal to stop the vehicle. 9.
Electrical System 10.8.17 Steering Certain steering functions are dependent upon electrical operations, described below. Consult the Owners/Operators Manual for further information related to steering. Steering Selection Indicators Travel and Gear Select Lever Bezel Four Wheel Steer Indexing If the vehicle does not drive “straight,” the steering could not be synchronized or “out of phase.” Perform the Four Wheel Steer Indexing procedure to synchronize the steering.
Section 10 FOUR WHEEL STEERING FRONT WHEEL STEERING • Two-wheel steer mode: (Fig. 10– 90) With the steering select switch in the centered position, the following conditions must be met: CRAB STEERING OS0290 Figure 10– 90. Two wheel steering. OS0640 Figure 10– 88. The steer select switch has three positions.
Electrical System e. Steering Select Switch Installation and Testing c. Steering Select Switch Removal 1. Route the wiring through the dash and switch bezel, then connect the wiring (Fig. 10– 94) to the switch as labeled during switch removal (the eight-pin connector only goes on one way). 1. Disconnect the negative (-) battery cable at the negative battery terminal (Fig. 10– 92). 2.
Section 10 10.8.18 Steer Select Valve The steer select valve (Fig. 10– 95), is secured to the steer select manifold and frame with four capscrews and O-rings near the hydraulic fluid reservoir. 1 It contains two solenoids that direct hydraulic fluid through hoses and ultimately help operate the steering. The valve is a direct dual-solenoid operated, spool-type directional control valve.
Electrical System 10.8.19 Engine Low Oil Pressure Sender The engine oil pressure sender is located on the engine block (Cummins, Fig. 10– 97, and Perkins, Fig. 10– 98) and is connected via the engine wiring harness, bulkhead connector and cab wiring harness to the operators display panel (Fig. 10– 99). PERKINS ENGINE Engine Oil Pressure Sender CUMMINS ENGINE Transmission Temperature Sender Engine Oil Pressure Sender MS1770 Figure 10– 98. Perkins engine/transmission senders.
Section 10 c. Engine Oil Pressure Sender Inspection and Replacement Inspect the sender and the wiring harness connector terminals for continuity. Replace a defective or faulty sender with a new one. Negative (-) Terminal d. Engine Oil Pressure Sender Installation and Testing 1. Thread the sender (Cummins, Fig. 10– 101 or Perkins, Fig. 10– 98) into the engine block snugly, then connect the wiring harness connector lead to the sender. OS1040 Figure 10– 100.
Electrical System 10.8.20 Transmission High Temperature Sender The transmission high temperature sender (Cummins, Fig. 10– 101 or Perkins, Fig. 10– 98) is threaded into the transmission housing and is connected via the engine wiring harness, bulkhead connector and cab wiring harness to the operators display panel (Fig. 10– 99). When the transmission fluid temperature rises above 250° F (107° C), the sender heats up, closing contacts within the sending unit. The operators display panel indicator (C, Fig.
Section 10 PERKINS ENGINE Engine Coolant Temperature Sender Negative (-) Terminal Transmission Temperature Sender OS1040 Figure 10– 104. Disconnect the negative (-) battery cable at the negative (-) battery terminal. c. Engine Coolant High Temperature Sender Inspection and Replacement MS1770 Figure 10– 102. Perkins engine/transmission senders. B d. Engine Coolant High Temperature Sender Installation and Testing C 1. Thread the sender (Fig.
Electrical System 10.8.22 Engine Block Heater (option) Some engines are equipped with an optional engine block heater (Fig. 10– 105) that can be plugged into a standard 110/120V ac grounded outlet to heat the engine coolant. When temperatures are below 10° F (-12° C), the block heater should be used. CUMMINS ENGINE 10.8.23 Fuel Level Indicator and Fuel Level Sender The fuel level indicators on the left side of the operators display panel (Fig. 10– 106) work in conjunction with the fuel level sender (Fig.
Section 10 The fuel level sender (Fig. 10– 107) consists of a resistance, float-type fuel level sender mounted in the top of the fuel tank, and the wiring connecting it with the fuel indicators in the operators display panel. a. Fuel Level Indicator Testing 1. With approximately eight gallons (30,4 liters) of fuel in the fuel tank (Fig. 10– 107), the bottom fuel level indicator bar should illuminate, indicating approximately 1/4 tank of fuel. 2.
Electrical System 4. If the fuel level indicators do not illuminate, and a faulty or defective fuel sender in the fuel tank has been ruled out, and wiring and connectors have been checked and ruled out, the operators display panel is defective and must be replaced in its entirety. Hourmeter 5. Check that the ignition terminal has current, and that the fuse in the fuse panel is not blown. 6.
Section 10 This section provides an easy reference guide covering the most common problems that occur in the electrical system. 10.9 ELECTRICAL SYSTEM TROUBLESHOOTING Electrical System Troubleshooting Problem Possible Cause Remedy 1. No voltage at horn; broken wire or blown fuse. 1. Replace wiring and fuse as required. 2. Corroded electrical ground at horn mounting. 2. Repair electrical ground. 3. Loose or broken wiring. 3. Repair or replace wiring. 4. Defective horn switch. 4.
Electrical System Electrical System Troubleshooting Problem Possible Cause Remedy 7. LOSS OF ELECTRICAL POWER for some but not all vehicle operations. 1. No voltage at these circuits, caused by a broken wire or switch, or a blown fuse. 1. Repair wiring, switch and fuse as required. 8. FUSE continuously blows. 1. Check the system for shorts, loose grounds, defective or corroded electrical components. 1. Repair or replace as required. 9. Overheating and burnout of wiring and electrical components.
Section 10 Electrical System Troubleshooting Problem 14. Engine turns over but does not start. Possible Cause Remedy 1. Fuel tank is empty. 1. Fill fuel tank. 2. Faulty injection pump or fuel run solenoid. 2. Test for fuel at injection pump. Test the electrical circuit and the solenoid. Check that 12 volts are present at the fuel run solenoid. Check wiring for defects and repair as required. 1. Discharged battery. 1. See corrections for problem of discharged battery. 2.
Electrical System Electrical System Troubleshooting Problem Possible Cause Remedy 1. Thermo-start plug is ON continuously due to a defective ignition switch or a short circuit in the wiring. 1. Remove and test the ignition key switch in all positions. Replace a defective switch. 2. Thermo-start plug leaks fuel into intake manifold. 2. Replace thermo-start plug. 1. Check for loose or corroded connections. 1. Repair as required. 2. Check the condition and adjustment of the alternator belt. 2.
Section 10 Electrical System Troubleshooting Problem Possible Cause Remedy 27. With key in the START position, engine does not crank. 1. Travel select lever is in forward (F) or reverse (R). 1. Move the travel select lever to NEUTRAL (N). 28. Engine runs momentarily then stops. 1. Defective fuel run solenoid. 1. Refer to Step 30, Fuel Run Solenoid troubleshooting. Note: Refer to the Perkins or Cummins engine troubleshooting information in Section 8A or Section 8B. 2. Fuel tank is empty. 2.
Electrical System Electrical System Troubleshooting Problem Possible Cause Remedy 33. Backup alarm sounds with travel select in NEUTRAL (N) and FORWARD (F). 1. Short circuit in wiring. 1. Determine and repair cause of short circuit. 2. Defective travel select lever. 2. Test travel select lever for continuity and circuit for shorts. Replace travel select lever if defective. 34. STEER SELECT SWITCH Steer select switch fails to select mode or selects incorrect steering mode. 1. Blown fuse. 1.
Section 10 Electrical System Troubleshooting Problem Possible Cause Remedy 40. ENGINECOOLANT TEMPERATURE SWITCH Engine coolant temperature warning indicator on operators display panel fails to illuminate when engine is overheated. 1. Defective engine coolant temperature sender. 1. Check and test sender. Test electrical circuit to sender. 2. Defective wiring. 2. Test circuit for continuity and repair as required. 41.
Electrical System Electrical System Troubleshooting Problem Possible Cause Remedy 1. Wiring is shorting to ground. 1. If the indicator continues to illuminate, check the wiring from the operators display panel to the ignition key switch, fuse panel and sender for a short to ground. If a short is detected, test the circuit and repair the short. 2. Defective transmission temperature sender. 2. Disconnect wiring connector at the transmission temperature sender switch on the transmission.
Section 10 10-92 Model 3606 • Origin 10/99
Corporate Office JLG Industries, Inc. 1 JLG Drive McConnellsburg PA. 17233-9533 USA Phone: (717) 485-5161 Fax: (717) 485-6417 JLG Worldwide Locations JLG Industries (Australia) P.O. Box 5119 11 Bolwarra Road Port Macquarie N.S.W.