
Installation Guide


®
®
®
Figure 3
Figure 2
1.
Remove existing baseboard End Caps and
Inside Corner Pieces.(Figure 1).
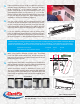
2.
Measure Front Panel Cover from top to oor, top to bottom
of element, and end to end wth a tape measure. (Figures 2,3)
3.
Remove the old baseboard Front Panel Cover by lifting from
the bottom to unhook from the bracket. Remove damper by
either sliding off from open end or by holding at each bracket
point and snapping off from the pivot. (Figures 4,5).
4.
If the old baseboard length is the same as a standard length Re-
vital/Line
®
Cover, use the standard length Revital/Line
®
Cover
and End Plates/Solid End Caps. Attach End Plates, (if chosen),
placing them against the end of the Revital/Line
®
Cover using
Phillips Head screws supplied. Use smaller #4-40 Phillips Head
screw at the bottom of Cover and larger #6 Phillips Head screw
(See gure 8) for the top of the End Plate.
All of the other accessories are installed without tools by plac-
ing them over the Revital/Line
®
Cover, once in place. When
more than one cover is used, the seam between the covers
can be hidden by using one of the ller sleeves (2", 4", 7" or
14"). All accessories are sold separately.
From the World’s Leader in Baseboard Heaters Since 1949! • www.slantn.com
®
BOILERS & BASEBOARD
W
e
B
u
i
l
d
T
r
u
s
t
a
n
d
C
o
m
f
o
r
t
Use to Revitalize your Aging Hydronic Baseboard!
Figure 1
Figure 4
Figure 5
Before You Order: Measure and Preparation
Now you’re ready to order your Revital/Line
®
Replacement Covers.
Go HERE to purchase from our selected distributors.
Remove
Front Panel
Important to wear safety glasses and gloves before removing old front panel, damper and accessories.
2-5/8”
6-1/16”
(W)
MAXIMUM
Existing Back Panel (Wall)
to Front of Element
MAXIMUM
Height from Top of
Back Panel to Base
of Element Bracket
7-3/16”
Height of
Revital/Line
End Plate
5/8”
Revital/Line
Back Lip
®