
Install Instructions

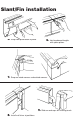
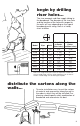

begin by drilling
riser holes...
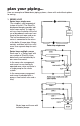
The riser connects sub-floor supply tubing to
the baseboard. The diameter of the riser hole
and the location of the hole with respect to
the walls will vary depending on the type of
baseboard you’re using. Here is a handy
chart to follow:
Model
Diameter
Pipe
Hole*
Back Wall
to Center
(floor holes)
Floor to
Center
(partition holes)
BL-50/75
1
⁄2
”
or
3
⁄4
”
1
1
⁄4
”
1
3
⁄8
”
2
5
⁄16
”
15-50
1
⁄2
”
1” 1
21
⁄64
”
3”
15-75
3
⁄4
”
1
1
⁄4
”
1
21
⁄64
”
3”
30-75
3
⁄4
”
1
1
⁄4
”
1
3
⁄8
”
3
3
⁄16
”
81A
3
⁄4
”
1
1
⁄4
”
1
3
⁄4
”
3
7
⁄8
”
83A2
3
⁄4
”
1
1
⁄4
”
1
9
⁄16
”
3
1
⁄2
”
84A3 1” 1
1
⁄2
”
1
9
⁄16
”
3
1
⁄2
”
85A/86AX 1
1
⁄4
”
1
3
⁄4
”
1
3
⁄4
”
3
7
⁄8
”
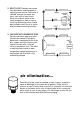
* Hole is 1/2” larger than pipe to allow for expansion. Install riser
snug to inside edge of hole to allow maximum room for riser to
move to outside edge of hole when pipe expands.
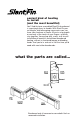
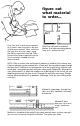
To make installation easy, lay out the cartons
of material and accessories along the wall in
the order in which they will be installed. Pre-
planning should specify which combination of
baseboard and accessories fits best.
distribute the cartons along the
walls...
9