
Manual


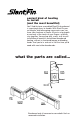


nail it up...
The pre-assembled baseboard goes right from carton to wall with Slant/Fin’s
“T-Shot” Nailing Tool (or power screw gun). You can load the Nailing Tool with
any nail up to
5
⁄1
6
” round head. Just place the baseboard against the wall, and
slip the Nailing Tool between the damper and front panel. Hit the drive rod
with the hammer and that’s it. Add another row of nails below the front panel.
If you’re working without a “T-Shot” or screw gun, snap off the front panel by
lifting it upward so the bottom bracket bends slightly upward, then pull toward
you with thumb.
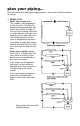
1. for plaster walls...
Locate the studs in the wall and mark location above baseboard, or
on floor. It’s best to nail the baseboard at top and bottom to each stud.
2. for concrete or cinder block walls...
Use masonry nails, or install a furring strip and nail into it.
3. for a particularly solid installation...
Slide the bracket to the stud position and drive nail through the bracket
holes and the back panel.
before you drive your nails...
Make sure you leave enough room at the ends of the baseboard or other
points where accessories will have to be installed later.
NOTE: To avoid scratching or cutting yourself, always handle baseboard with care.
solder the elements...
1. Clean and solder the adjoining element ends together using a non-corrosive
flux, and connect elements to risers.
2. Immediately upon completion, flush system thoroughly. Left unflushed, flux
can cause pitting in copper tubing of unfilled systems.
3.
Fill system as soon as possib
le but prevent from freezing.
4. Make sure cradles are centered over brackets to allow for smooth expansion
without scraping noises.