user GUIDE pro-hd
TABLE OF CONTENTS WELCOME! . . . . . . . . . . . . . . . . . . . . . . . . . . . 1 Here's what you can connect to your slingbox . . . 2 BEFORE YOU BEGIN SETUP . . . . . . . . . . . . . . . . . . 3 STEP 1: CONNECT YOUR HD SOURCE . . . . . . . . . . . . . 4 STEP 2: CONNECT YOUR SD SOURCE . . . . . . . . . . . . . 6 STEP 3: CONNECT YOUR COAX SOURCE . . . . . . . . . . . 8 STEP 4: ATTACH THE REMOTE CONTROL IR CABLE . . . .
Welcome! Thank you for purchasing the Slingbox PRO-HD. Follow these instructions to connect your new Slingbox and to start watching your TV programs almost anywhere. If you run into any problems along the way, visit our support web site where you can find video tutorials, technical articles and ways to contact Sling for help: http://support.slingmedia.
HERE'S WHAT YOU CAN CONNECT TO YOUR SLINGBOX: The Slingbox PRO-HD supports connecting up to three audio/video sources: • One high definition (HD) device using component cables for video. You can use either analog or digital cables for audio. • One standard definition (SD) device using composite cables for audio and video. If your A/V device has S-Video, you can use an S-Video cable for video. • One coaxial (COAX) device. Use a coaxial cable for both audio and video.
BEFORE YOU BEGIN SETUP: To make the setup process easier, write down the type, brand and model of the A/V sources, along with information about your home network. This will come in handy when you configure the software later on.
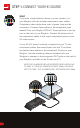
Step 1: CONNECT YOUR HD SOURCE VIDEO: If you have a high-definition device, you can connect it to your Slingbox with the included component video cables. Component video cables have a set of green, blue and red connectors. Connect these cables to the component jacks labeled IN on your Slingbox PRO-HD. These jacks are in the top row on the back of your Slingbox. Connect the other ends of the component cables to the output component jacks on your HD video source.
AUDIO: Analog audio connectors are usually red and white. To connect using analog audio, use the included stereo audio cable. The red connector is for the right audio channel, and white is for the left audio channel. Insert one end of these audio cables into the jacks labeled IN on your Slingbox PRO-HD. These jacks are also in the top row on the back of your Slingbox. Insert the other end into the audio output jacks on your A/V source. These jacks are typically labeled AUDIO OUT.
Step 2: CONNECT YOUR SD SOURCE VIDEO: If you have an SD (standard definition) A/V device, you can connect it to your Slingbox using the included composite cables. Composite cables have a yellow connector for video, along with red and white connectors for audio. Insert the yellow connector into the yellow composite jack labeled IN on your Slingbox PRO-HD. This jack is in the top row on the back of your Slingbox.
UDIO: A Composite cables also have red and white connectors for audio. Insert the red connector into the red composite jack labeled IN on your Slingbox PRO-HD. These jacks are also in the top row on the back of your Slingbox. Connect the other end of this cable to the red output audio jack on your SD source. Repeat this process with the cable that has the white connectors. TIP: If your SD source has an S-Video jack, use it instead of the yellow video connector to get higher quality video.
Step 3: CONNECT YOUR COAX SOURCE Coaxial cable carries both video and sound. They're used to connect antennas or to some cable TV systems. Connect your coaxial source to the jack labeled COAX IN on your Slingbox PRO-HD. If your coaxial A/V source is already connected to your TV with a coaxial cable, disconnect it from the TV and then re-connect this cable to the COAX IN jack on your Slingbox.
Step 4: attach REMOTE CONTROL IR CABLE Connect the remote control IR cable to the IR jack on the Slingbox. Next, place a remote control IR cable head on the top or bottom of your A/V device so it points at its IR sensor. Make sure that the head of the remote control IR cable extends out far enough over the front your A/V device to send a signal to it. You may want to affix the remote control IR cables using the adhesive pads after you've determined their correct positions.
Step 5: LINK to your network • Plug one end of the Ethernet cable into the Slingbox NETWORK jack. • Connect the other end into your router. The Slingbox works with almost any router with a high-speed Internet connection or a broadband home network. You must have a router to use the Slingbox. TIP: For best video performance, Sling Media recommends that you use wired Ethernet to connect Slingbox PRO-HD to your home network.
Step 6: attach the power adapter • Connect the power adapter cable into the Slingbox POWER jack. • Plug the power adapter into an electrical outlet. WARNING: THE INCLUDED POWER SUPPLY IS FOR THE SLINGBOX PRO-HD. DO NOT USE THIS POWER SUPPLY ON THE SLINGBOX CLASSIC, THE SLINGBOX AV OR THE SLINGBOX PRO. When plugged in, the power light comes on, and the lights blink a few times as the Slingbox starts up. The network light will remain on while your Slingbox is successfully connected to your network.
Step 7: INSTALL THE SOFTWARE Now that you have the Slingbox connected, you’re ready to install the software. Before you do, make sure that your computer is on the same network as your Slingbox. Next, go to http://downloads.slingmedia.com and follow the instructions to download the latest software to your PC or Mac. Once you've downloaded the software, follow the onscreen instructions to install SlingPlayer™ and to configure your Slingbox.
TROUBLESHOOTING 1. If the power light is not on: NETWORK POWER Disconnect the power cable from both the Slingbox and the electrical outlet and reconnect them - making sure that they are secure. 2. If the network light is not on: Disconnect the Ethernet cable from the back of the Slingbox and re-insert it. You will hear a click when it is fully inserted. Do the same with the other end of the Ethernet cable, making sure that it is attached to your router.
Technical specifications Slingbox pro-hd (US/can) Specifications: Dimensions (unit only) 13.25” (w) x 5.63” (d) x 2.38” (h) Weight (unit only) 4 lbs.
Warranty, Safety, Regulatory, and Legal Information Sling Media, Inc. - Slingbox Limited Warranty and Non-Warranty Returns Policy Limited Warranty: What Does This Warranty Cover? This warranty only covers defects in Slingbox hardware products purchased from Sling Media authorized resellers. How Long Does the Coverage Last? Your Slingbox hardware product is warranted to be free of defects for one (1) year from the original date of purchase.
Also, consequential and incidental damages are not recoverable under this warranty. Some states do not allow the exclusion or limitation of incidental or consequential damages, so the above limitation or exclusion may not apply to you. Sling Media may charge for out-of-warranty service at a rate of $150 (USD), which includes costs to ship the repaired or replacement product to you.
Non-Warranty Returns Policy: For products purchased at Sling Media’s online store: If you purchased your Slingbox hardware product directly from Sling Media’s online store and are dissatisfied, you may return it at your expense within 30 days from original shipment as long as it is in good condition. Please contact the Sling Media Online Store billing support team at 1-877 GO-SLING (option #2) to obtain a Return Material Authorization (RMA) number.
Important Safety Instructions Please read all of these instructions and retain for future reference. Follow all warnings and instructions. • Do not use a Slingbox near water. • Do not place the product near heat sources such as direct sunlight, radiators, heat registers, stoves, or other apparatus (including amplifiers) that produce heat. • Do not block the ventilation holes on the Slingbox. A Slingbox requires adequate ventilation.
Lightning For added protection of this product during a lightning storm, or when it is left unattended and unused for long periods, unplug it from the wall outlet. Servicing Do not attempt to service this product yourself, as opening or removing covers may expose you to dangerous voltage or other hazards. Refer all servicing to qualified service personnel. Contact your local office for servicing information.
The lightning flash with arrowhead symbol, within an equilateral triangle, is intended to alert the user to the presence of uninsulated “dangerous voltage” within the product’s enclosure that may be of sufficient magnitude to constitute a risk of electric shock to persons. The exclamation point within an equilateral triangle is intended to alert the user to the presence of important operating and maintenance (servicing) instructions in the literature accompanying the product.
Environmental Information This symbol indicates that your Slingbox must be disposed of properly according to local laws and regulations. When your Slingbox reaches its end of life, contact your local authorities to learn about recycling options. Sling Media cares about the environment. Some of our packaging materials are made from recycled paper and all of our packaging is designed to be recycled. Federal Communications Commission Notices This device complies with Part 15 of the FCC Rules.
This equipment has been certified to comply with the limits for a class B computing device, pursuant to FCC Rules. Operation with non-approved equipment or cables is likely to result in interference to radio and TV reception. The user is cautioned that changes and modifications made to the equipment without the approval of manufacturer could void the user’s authority to operate this equipment. This Class B digital apparatus meets all requirements of the Canadian Interference-Causing Equipment Regulations.
Legal Notices SoundTouch SlingPlayer software uses the SoundTouch Sound Processing Library (http://www.surina.net/soundtouch/), which is licensed under the terms of the GNU Lesser General Public License (http://www.gnu.org/ licenses/). SoundTouch Library Copyright © Olli Parviainen 2001-2005. Microsoft This product includes technology owned by Microsoft Corporation and under a license from Microsoft Licensing, GP.
NOTES: 24 10
25
pro-hd