
Instructions / Assembly


NOTES
If you are installing a 5’ high fence then dig 48” deep holes and make sure the 9’
fence posts are only 5 ‘4” above the ground level, OR order 8’ posts from your
TAHOE Slipfence Dealer and only dig 36” holes.
If you are installing an 8’ high fence in a non frost climate then make sure to order
the Tahoe Slipfence 10' Posts (actually 124" long) and dig up to 36” deep holes, lay
in your gravel and when inserting the post make sure your post are 24" into the
concrete leaving 100” above the ground level. This leaves enough room for the 2"
from ground to Fence board and on the top for the 1" Post cap and 1" space from
cap to board.
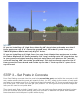
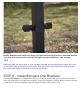
STEP 3 – Set Posts in Concrete
Pour Post Setting concrete into the post hole around the post, and while the concrete is still
wet, make certain that the posts are exactly 8 feet, (or 96”), apart to the center of each post
and also try to make sure for a 6' high fence that your posts are 76" from ground level to the
top of the post. The closer you can get your posts to 76” from ground to tip at this stage the
less you will need to cut posts later
Then Level each Post on both X and Y-axis. You can hold your fence posts level and in place
for a few minutes with quick-setting post hole concrete or stabilize the posts with stacked
fence boards to hold the post in place while drying.