
Instructions / Assembly


!!!!!
NOTES
It is at this point that if you are running a string line to follow the grade instead of
stepping your fence, that you should measure approximately 12" up from the
ground to the bottom of your bottom End bracket collar and hand tighten the
bottom bracket.
Then measure 51”" from the top of the bottom bracket collar to the top of your top
bracket collar.
These two brackets are now your string line starting points. Pull the string-line
tight along 5 posts down the fence line. (We recommend only 5 sections at a time
so your string line doesn't sag), and these will be your tie on points for the other
end of your string line.
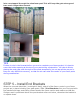
Fasten the top and bottom brackets (likely Middle brackets), onto posts along your
string line between your two string line points and repeat for the rest of your fence
project 5 sections at a time.
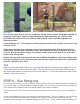
TIPS
Make sure that the dome-side of your carriage bolt that are inserted at this stage are on all
on the same side of the fence for all posts. This will be the side of the fence that will have
the ripped half board on either end of the fence section, i.e. the HALF board hole side of the
stringer. See step 8 picture.
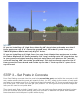
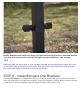
STEP 6 – Run String-line
It is at this point that if you are running a string line to follow the grade instead of stepping
your fence, that you should measure approximately 12" up from the ground to the bottom of
your bottom End bracket collar and hand tighten the bottom bracket.
Then measure 51" from the top of the bottom bracket collar to the top of your top bracket
collar.
These two brackets are now your string line starting points. You only need to run one string
line from the bottom bracket and measure 51” up from the bottom bracket to the top
bracket so the stringers run straight along your fence line. Then measure approximately 12”