
Specification Sheet
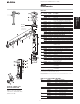


Royal
®
Flushometer
Repair Parts and Maintenance Guide
13
Manual
Flushometers
ATTENTION INSTALLERS: With the exception of the control stop inlet,
DO NOT USE pipe sealant or plumbing grease on any valve component or
coupling! To protect the chrome or special finish of Sloan flushometers,
DO NOT USE toothed tools to install or service these valves. Use our A-50
Super-Wrench
™
or other smooth-jawed wrench to secure couplings.
Regulations for low consumption fixtures (1.6 gpf/6.0 Lpf closets and
1.0 gpf/3.8 Lpf urinals) prohibit use of higher flush volumes.
1. Flushometer does not function (no flush).
A. Control stop or main supply valve is closed. Open control stop or main
supply valve.
B. Handle assembly is damaged. Replace B-73-A handle or repair with
B-51-A handle repair kit.
C. Relief valve is damaged. Replace relief valve.
2. Handle leaks.
A. Handle seal or handle assembly is damaged. Replace B-73-A handle
or repair with B-51-A handle repair kit.
3. Water splashes from fixture.
A. Control stop is open wider than necessary. Adjust control stop for
desired delivery of water volume.
B. Water saver/conventional diaphragm assembly is installed on low
consumption fixture or closet diaphragm assembly is installed on
urinal fixture. Determine the required flush volume (see label on valve
or markings on fixture). Replace diaphragm assembly or relief valve
for appropriate flush volume of fixture.
4. Volume of water is insufficient to adequately siphon fixture.
A. Control stop is not open wide enough. Adjust control stop for desired
delivery of water volume.
B. Diaphragm assembly is damaged. Replace diaphragm assembly.
C. Low consumption diaphragm assembly is installed on water
saver/conventional fixture or urinal diaphragm assembly is installed
on closet fixture. Determine the required flush volume (see label on
valve or markings on fixture). Replace diaphragm assembly or relief
valve for appropriate flush volume of fixture.
D. Inadequate water volume or pressure is available from supply.
Increase flow rate or pressure to the valve. If gauges are not available
to measure supply pressure/volume, remove relief valve from
diaphragm assembly and open the control stop.
If the fixture siphons: Additional water volume is required. Install
higher flushing volume relief valve or diaphragm assembly or cut flow
ring from guide. IMPORTANT: LAWS AND REGULATIONS PROHIBIT
THE USE OF HIGHER FLUSHING VOLUMES THAN LISTED ON
FIXTURE OR FLUSHOMETER.
If the fixture DOES NOT siphon (or a low consumption flush is
required): Additional steps must be taken to increase the water
pressure and/or volume at the water supply. Contact fixture
manufacturer for minimum supply requirements of fixture.
5. Flushometer valve closes immediately (short flush).
A. Worn or damaged diaphragm assembly. Replace diaphragm
assembly.
B. Handle assembly is damaged. Replace B-73-A handle or repair with
B-51-A handle repair kit.
C. Low consumption diaphragm assembly is installed on water
saver/conventional fixture or urinal diaphragm assembly is installed
on closet fixture. Determine the required flush volume (see label on
valve or markings on fixture). Replace relief valve or diaphragm
assembly for appropriate flush volume of fixture.
6. Length of flush is too long (long flush) or fails to shut off.
A. By-pass hole (upper filter ring) of diaphragm assembly is dirty.
Remove the diaphragm assembly. Disassemble the filter rings from
the diaphragm, wash under running water, and reassemble. Replace
as necessary.
B. Relief valve or diaphragm assembly is damaged. Replace relief valve
or diaphragm assembly.
C. Water saver/conventional diaphragm assembly is installed on low
consumption fixture or closet diaphragm assembly is installed on
urinal fixture. Determine the required flush volume (see label on valve
or markings on fixture). Replace diaphragm assembly or relief valve
for appropriate flush volume of fixture.
D. Inside cover is damaged. Install new A-71 part.
E. Line water pressure dropped and is insufficient to close valve. Close
the control stop until pressure is restored.
F. Relief valve is not seated properly. Disassemble diaphragm
components (relief valve, filter rings, and diaphragm unit), wash under
running water, and reassemble. Replace as necessary.
7. Chattering noise is heard during flush.
A. Inside cover is damaged. Install new A-71 part.
B. Relief valve or diaphragm assembly is damaged. Replace relief valve
or diaphragm assembly.
CARE AND CLEANING INSTRUCTIONS
DO NOT USE abrasive or chemical cleaners to clean flushometers that may
dull the luster and attack the chrome or decorative finish. Use ONLY mild
soap and water, then wipe dry with a clean towel or cloth. When cleaning
the bathroom tile, protect the flushometer from any splattering of cleaner.
Acids and cleaning fluids can discolor or remove chrome plating.
When assistance is required, please contact
Sloan Technical Support at: 1-888-SLOAN-14 (1-888-756-2614).
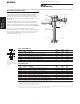
TROUBLESHOOTING GUIDE