
Installation Sheet


8
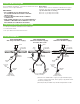
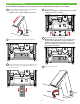
BATTERY REPLACEMENT
B
Install four (4) AA-size batteries (supplied) as indicated by the (+)
and (–) symbols inside the battery compartment.
A
Loosen cover screw and remove cover from battery pack.
C
Replace battery pack lid and tighten with screwdriver.
NOTE: Insure batteries are installed with proper
polarity. The cover of the case indicates polarity
of batteries. Improper polarity will not harm the
faucet. Improper polarity will cause the faucet not
to operate.
NOTE: Replace Battery when LED1 indicator flashes red
each time faucet is in use or when faucet stops function-
ing. LED1 is identified by the battery symbol.
NOTE: Turning off water is not necessary.
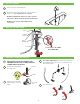
REPLACING THE SOLENOID/FILTER
A
Remove crown by
loosening hex screw
located on underside of
spout and slide crown
down and lift off.
NOTE: Screw is
captive within
faucet body.
B
Rotate solenoid
assembly counter-
clockwise through
a 45º angle.
C
Pull solenoid caddy from faucet.
NOTE: Strainer can be
removed, cleaned and
replaced at this time.
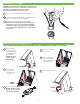
D
Insert new solenoid caddy
at a 45° angle.
E
Rotate solenoid caddy
clockwise to align with
arrow, locking the unit and
opening water path.
LOCK
UNLOCK
NOTE: TURNING OFF WATER IS NOT NECESSARY, DUE TO INTEGRATED AUTOMATIC STOP VALVE.
SPARE
FILTER
F
Slide on crown and secure.